Show Changelog
- V3 introduced a new webcam system, incompatible with V2. 0.80.1 will ignore auto configuration from V2 image but server will still work.
- V4 fixed a problem with network-manager preventing connections to network to work.
- V5 improved webcam configuration. Now allows setting resolution and frame rate from printer webcam configuration.
- V6 fixes wifi issues, adds screensaver control.
- V7 wifi management improved, packages updated
- V8 based on stretch, first Raspberry Pi 3+ compatible image.
- V9 improved webcam handling. Assigns ports now by webcam name so multiple webcams get always the same port. Disable printer GUI with config file.
- V10 Fixed problems with raspi cam not starting.
- V11 Ready for Raspberry Pi ZeroW on a Prusa MK 3 (or any Rambo Einsy board), wifi improvements.
- V12 Fixes usb automount problems added with stretch.
- V13 removed dtoverlay dwc2 from /boot/config.txt as that seemed to make problems with bandwidth.
- V14 Added remote desktop server.
- V15 Now based on Raspbian buster, Raspberry Pi 4 support, fixed USB stick mounting, chinese chars working.
- V16 Fixed webcam scripts to new V4L format.
- V17 Fixed wifi problem, 0.92.1 server version.
- V18 Access point handling changed, 0.92.2 server version.
- V19 Fixed setting static routes for wired connection.
- V20 Increased boot partition to fit Raspberry Pi 4 image as well.
- V21 New wifi management, more checks, armhf server as default.
- V22 New linux kernel 5.4.51, detect wifi driver crash, up to 3 usb sticks will automount.
- V24 New kernel 5.4.79, better wifi handling, Chromium 86.0.4240.197
- V25 Allows manual override of wifi configuration. See /boot/wpa_supplicant-wlan0.conf.sample
- V26 Add duet control server and duet web server, kernel 5.10.17-v7+
- V27 Modified chromium call to prevent incognito warning with latest chromium version
- V28 Fixed problem with new chromium stucking in incognito dialog, autoclose splash screen
- V30 Based on Raspbian Bullseye, repetier-setup command for easy configuration, kernel 5.15.32-v7l+.
- V31 Fixed pi camera detection and starting pi cam if not present.
- V32 Fixed pi cam for newer libcamera, repetier-setup improved.
- V33 Fixed issue with libcamera blocking list if streamer is running.
- V34 Improved repetier-setup, check and repair (if possible) filesystem on every start, kernel 5.15.76-v7l+.
- V35 Improved repetier-setup, repair only if selected in repetier-setup for faster boot time.
- V36 Improved repetier-setup. Changed http proxy to HAProxy. Configure https from Repetier-Server UI.
- V37 Based on Rasperry Pi OS Bookworm and supports the Raspberry Pi 5.
- V38 Big fixes, ssh support for sha-1 keys disabled, webcam fixes and updates.
About the Raspberry Pi Image
Knowing that many users are not familiar with linux, we made some extra work to make it easier than ever to use Repetier-Server on a Raspberry Pi.
Notice for Raspberry Pi users
The Pi is very power sensitive. If it does not receive stable 5V, you may experience stability issues like bad connections or temperature errors. Use a solid 3A power supply, best with 5.1 V output. Also a cheap usb cable with thin wires can cause voltage loss. We recommend an AWG20 USB cable.
Config Tool
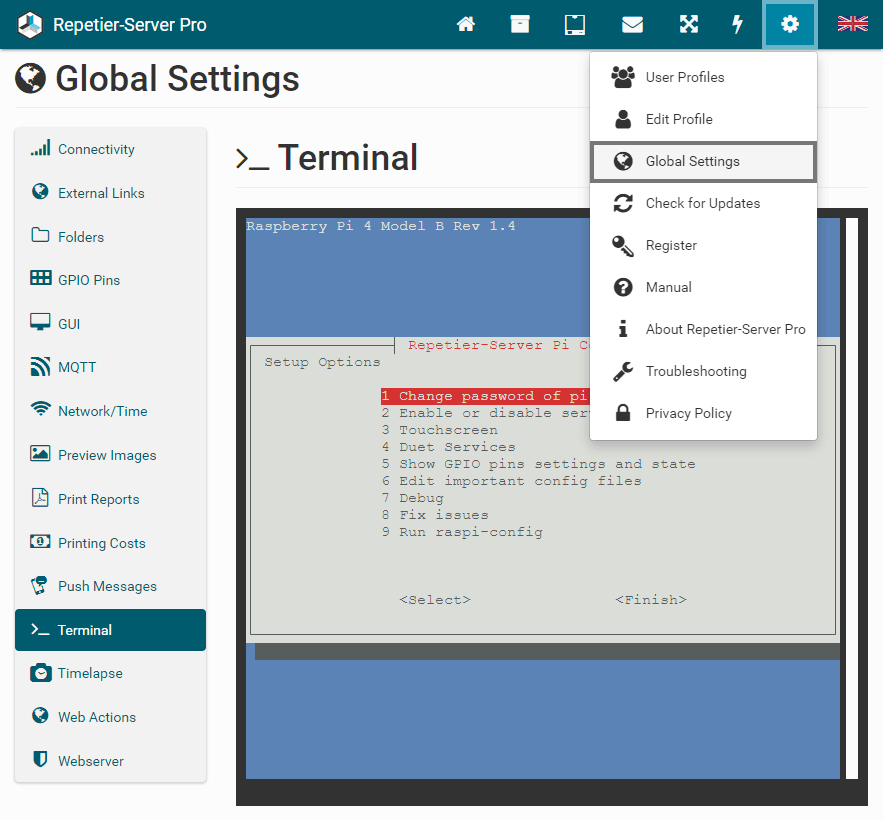
Most configurations can be started from our interactive Repetier-Server Pi Config Tool just by calling repetier-setup on the command line using ssh. Since Repetier-Server 1.4.0 you can even do this from the regular web gui. Just go to Global Settings Terminal and login as user pi with the known password (default: raspberry). It will start automatically. If you want to go to shell, just finish the config tool.
Installing the Image
There are two simple ways to write your Raspberry Pi image.
You need a 4 GB SD card or bigger. On a 4 GB card you have only 2 GB free space left, so a bigger card is a good idea. Our preferred size is 32 GB high endurance SD card, which offers a good compromise between space and price. Also bigger cards live longer as we have more blocks to write to. We recommend High Endurance SD cards for a long lifespan.
1. Raspberry Pi Imager
You do not have to download our image, but only the Raspberry Pi Imager, which then loads the current image from us.
Download Raspberry Pi Imager: https://www.raspberrypi.com/software/
Start the Raspberry Pi Imager, insert an SD card into the computer and follow the steps in this self-explanatory video:
2. balenaEtcher
After you have downloaded the image, you need to download the balenaEtcher to flash the image to the SD card.
Download balenaEtcher: https://www.balena.io/etcher/
Flashing ist really easy:
- Start balenaEtcher.
- Clicke Flash from file and select the downloaded Repetier-Server image as ZIP file.
- Select your SD card as target.
- Click Flash! and wait, until it’s finished.
First Boot and Server Access
The first boot up can take a while. The first boot will expand the file system to the size of your sd card and create ssh keys.
Next a script will test, which pi version you are running. If you are running a pi zero with arm v6 architecture, it will disable x window system and switch server to the arm el version, as the default arm hf version can not run on that processor.
To access the server after the first start, you have several options:
- If it is connected via ethernet cable it will query your routers DHCP server for an ip and is accessible at that ip.
- If it has a Wi-Fi adapter with access point support, it will switch Wi-Fi into access point mode with the SSID RepetierServer and default password 12345678. Use a smartphone to connect to the network and login to url: http://10.10.10.1 or http://RepetierServer.local if zero conf is supported. Select your router SSID with password and after that it should switch to your network if it is reachable.
- Bypass the Wi-Fi configuration through Repetier-Server. If a file /boot/firmware/ManualWifi.conf exists, we will install this file into NetworkManager for Wi-Fi configuration and prevent modification of Wi-Fi settings by Repetier-Server. The /boot/firmware folder is also accessible if you mount the sd card on a Windows computer, so it can be defined without direct access. Make sure to use unix line encoding! There is a sample config file /boot/firmware/ManualWifi.conf.sample for convenience which you can easily customize and rename.
First Steps and Securing the Installation
First steps should be to secure the installation. Change the default login password for user pi in the config tool! Also, by default the access point will enable with default password 12345678 – you should either always disable access point if you connect via ethernet cable (most stable solution) or define your own password, so no external users can use this to login. You might also want to change the access point SSID to make the name unique in case you have multiple Repetier-Server installations running.
If your Pi is reachable externally or by users you do not want to access it, you also need to add a user for Repetier-Server in the user manager.
You might also want to change the host name. With computers supporting zero conf host names, you can always access the gui with http://hostname.local – otherwise you need to use the ip number.
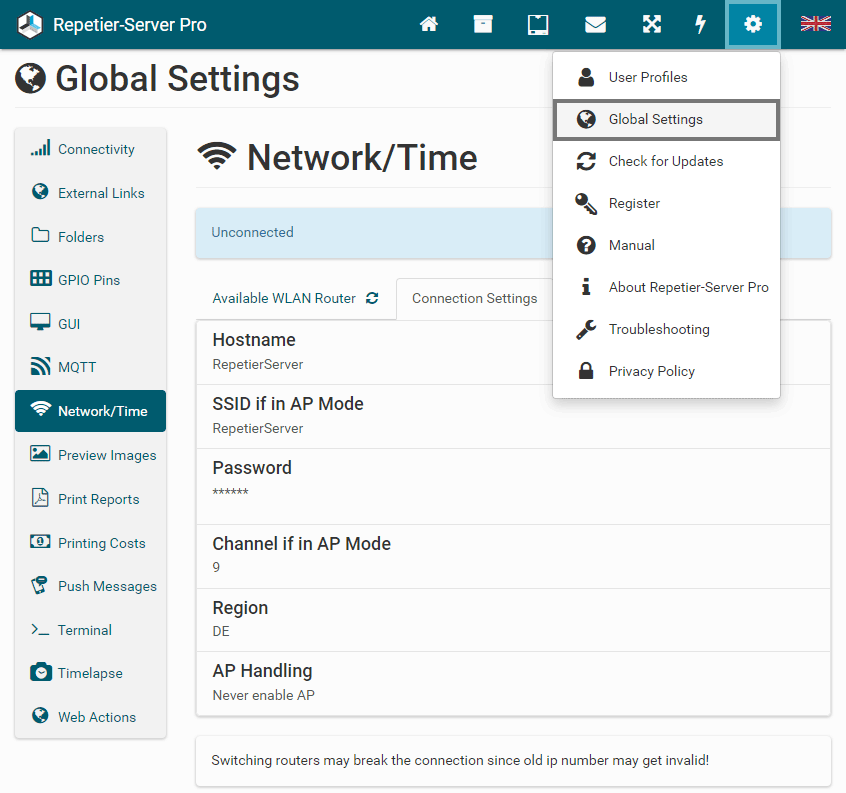
To change the host name and to disable access point mode, go to Global Settings Network/Time and select Connection Settings.
Click on Hostname to change your host name and click AP Handling and select Never enable AP if wanted.
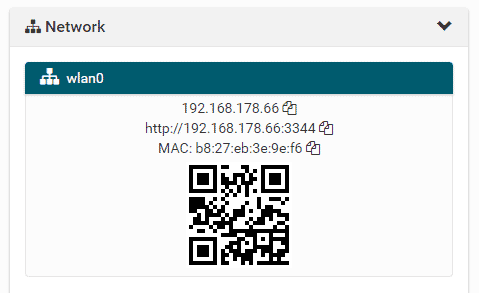
It is a good idea to configure your DHCP server (normally part of your router configuration) to always assign the same IP address. This is done by assigning a static IP to the MAC address. You find the Raspberry Pi MAC address in our web front end on the dasboard. Scroll to the bottom and you see for every network device the matching MAC address you should use in your router. All routers have this setting in their DHCP configuration, but since all differ we can not offer a detailed description for your router here.
Now plug in your printer and start configuring your first printer as described in the server manual.
Special Cases / Troubleshooting
No Display
If you have no screen on your pi, you can disable the start of x server and chrome. This reduces CPU and RAM usage. Especially if you have sometimes the problem that the printer disconnects from low power – this might help reduce or even remove the problem.
Open the config tool and login as user pi with the known password (default: raspberry). Then go to 3 Touchscreen 1 Touchscreen (Start Touchscreen) and select 2 Headless system (less ram and cpu for pi 0) to disable the graphical interface.
Rotate Display
Depending on how you have mounted the display, you may need to rotate the screen.
In version 37+ we use a Raspbian OS based on the new Bookworm image. By default the image has the new graphic driver installed. To change the orientation of the display, open our Config Tool and go to 3 Touchscreen 4 Screen Orientation OK.
A screen alignment tool will appear on your touchscreen. Make sure that the screen saver was not previously activated. You can use this to change the orientation. Select Layout Screens DSI-1 Orientation and select your orentation. To rotate by 180°, click on Inverted. Then go to Layout Screens DSI-1 Touchscreen and select your touchscreen. Only now save it by clicking on Apply. The change will then become visible and you have 10 seconds to confirm it by clicking on OK. Then close the program with Close. The start information on the text console is not changed by the setting.
If you are using the official Raspberry Pi 7″ touchscreen, you can also rotate it as described here.
Depending on the touch screen solution the inputs may still be signaled for the original orientation. In this case you can try to edit /usr/share/X11/xorg.conf.d/40-libinput.conf to rotate the measured position. Search the touchscreen section and add the TransformationMatrix option like this (180° rotation is selected here):
Section "InputClass"
        Identifier "libinput touchscreen catchall"
        MatchIsTouchscreen "on"
        MatchDevicePath "/dev/input/event*"
#if screen is rotated, you need to transform the touch-matrix as per the below:
#90 degrees
#       Option "TransformationMatrix" "0 1 0 -1 0 1 0 0 1"
#180 degrees
       Option "TransformationMatrix" "-1 0 1 0 -1 1 0 0 1"
#270 degrees
#        Option "TransformationMatrix" "0 -1 1 1 0 0 0 0 1"
        Driver "libinput"
EndSection
Scale Display
The sizes are made for regular dpi density. If you have a higher dpi display the buttons and fonts may look a bit small. You can change this size by forcing chromium to use a different scaling factor. To do this, go to Config Tool and select 3 Touchscreen 6 Touchscreen Scaling. Here you can now enter the new scaling factor and confirm with OK.
Non HDMI Display
There are several cheap LCD displays available, that you can simply put on the Raspberry Pi header pins instead of using the HDMI connector. Especially small displays with resolutions up to 480×320 pixel use this way. In that case the images need to be rendered in a frame buffer that gets send via spi to the display. If you have such a display, follow the instructions of your display vendor to configure the display. After a final reboot the printer front end should then start automatically.
Disable Display Power Saving
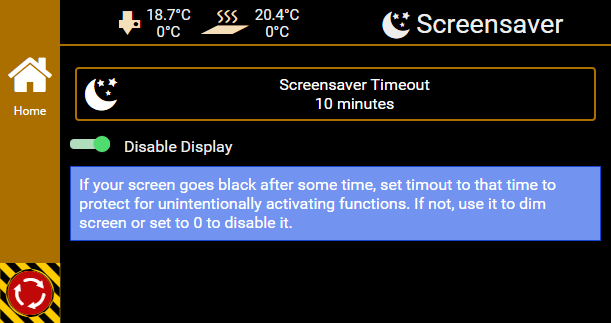
In the screensaver settings you can activate/deactivate the hardware screensaver, that turns the display off. Some users report that sometimes the active hardware screensaver does not come back. This is a function from Linux/X11 and we only set the timeout using the xset command. If that is the case, please disable hardware screensaver. Your image will still darken after timeout, just not try to disable the hardware light as it would try to do with hardware screen saver. If someone has a hint what prevents linux from wakeup the screen, please let us know.
Webcam Support
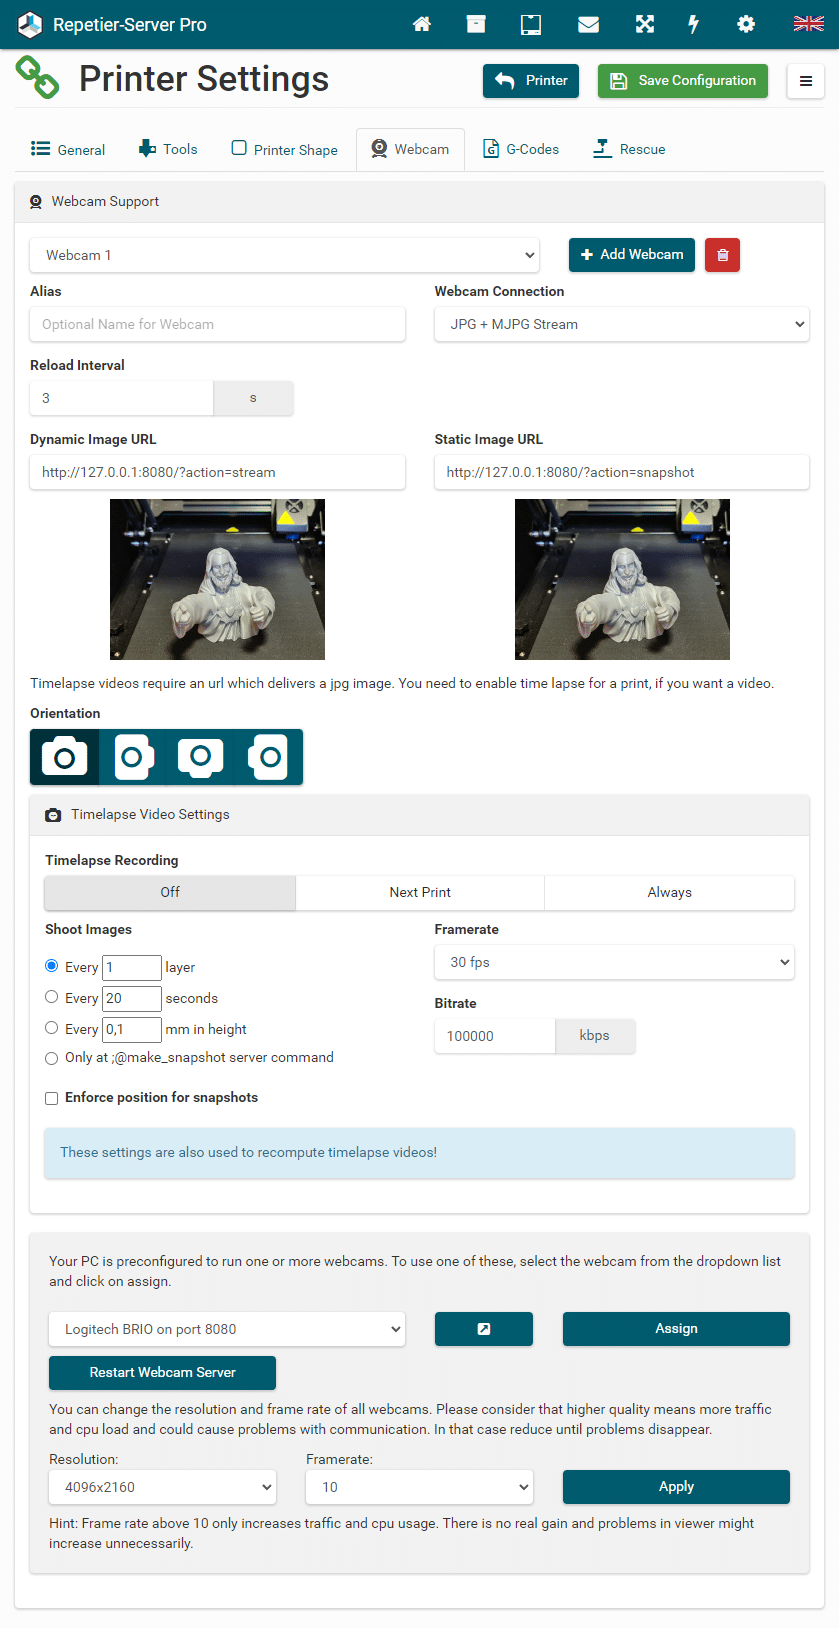
The image is preconfigured to handle a USB or Raspberry Pi webcam. We have implemented an autodetect for webcams. To configure it, simply go to Printer Settings Webcam, add a webcam and select the webcam at the bottom and click Assign.
It will start the webcam server and fill in the correct settings. If you have unplugged the webcam, the webcam server will start automatically when you plug in the webcam. Additionally you can set webcam resolution and framerate. Consider that higher resolutions and frame rates need more bandwidth and CPU usage. If this causes any problems like delays or blank screens, reduce them.
You can also open the webcam selected at the bottom left in the MJPG-streamer by clicking on to the right of it, if you are in the same network. You can then specify the webcam parameters manually in the MJPG-streamer under Control, which is often useful for creating smooth time-lapse videos.
Import from USB Stick
Initially the server is preconfigured to import files from a USB stick. Just insert a USB stick and it will auto mount the drive. If you then select the import function it will show the files on the USB stick.
Pi Zero Mounted on Printer Motherboard
Read Prepare Prusa MK3 if you use the image with a Pi ZeroW. It contains useful informations how to connect to it headless and how to secure your image.
Breaking Changes
GPIO
If you used wiringpi on older images you should know that this library is now officially deprecated in Bullseye and not available. To show all pin states use gpioreadall in terminal or open our config tool and select 5 Show GPIO pins settings and state. As replacement for gpio use raspi-gpio (does not run on Raspberry Pi 5). Run raspi-gpio help to list the parameter possible. Pins use BCM numbering scheme!


