Repetier-Server Manual
Installation
First you should download the latest version of Repetier-Server from our homepage at https://www.repetier-server.com.
- Open the downloaded installer.
-
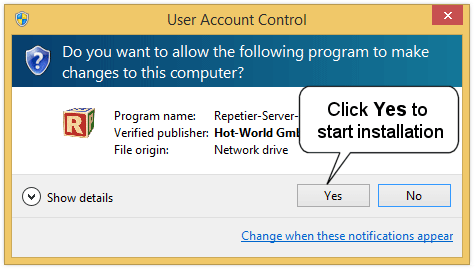
Click on Yes to start installation.
-
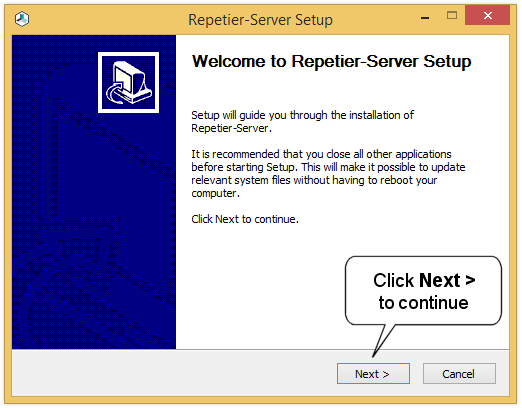
Click Next > to continue.
-
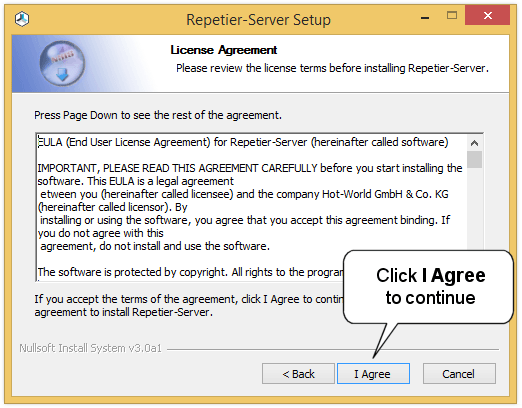
Click I Agree to agree to our licence agreement and to continue.
-
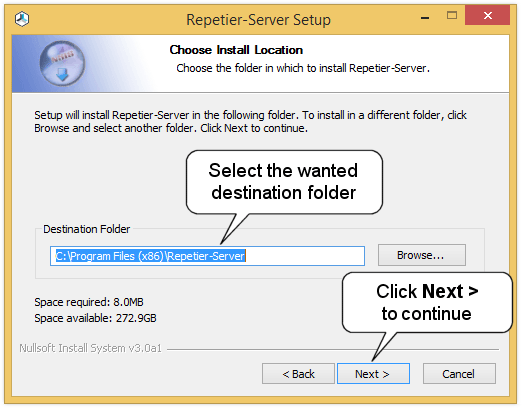
Select the destination folder and click Next > to continue.
-
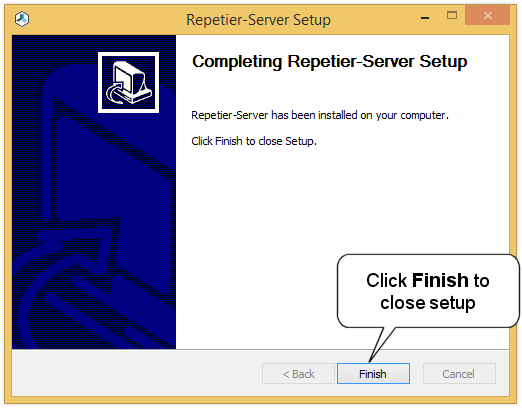
Click Finish to close setup.
-
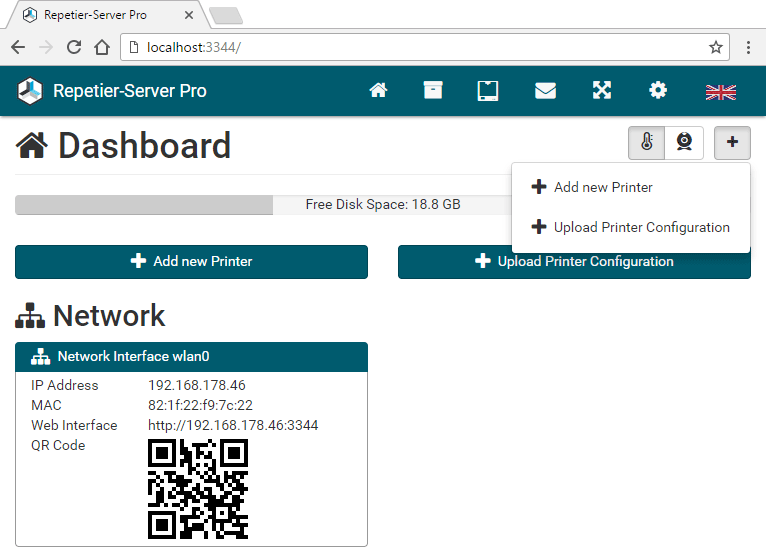
Repetier-Server starts automatically a new browser window.
The local URL is: http://localhost:3344
Important
Data Storage
By default the server stores all data in a global directory, which is normally located at C:\ProgramData\Repetier-Server\. This directory gets never deleted by updating or uninstalling the server to prevent data loss. If you want to backup your current state, just backup this directory.
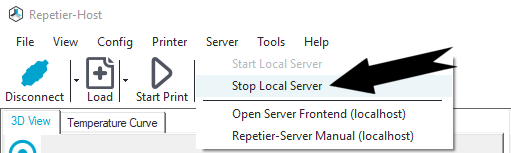
Start, Stop and Rerstart Repetier-Server
The Server works as a background service. For this reason, you will never see it in the
list of running programs and you never start it directly. It will be started automatically
at startup of windows, so you can access it any time with your browser. To start, stop or restart it
manually, you can do this in Repetier-Host:
Alternatively, you can follow these steps:
- Right click on the Windows Taskbar and start Task Manager.
- Click the tab Services.
- Right click on RepetierServer and select start, stop or restart. That's all.
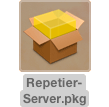
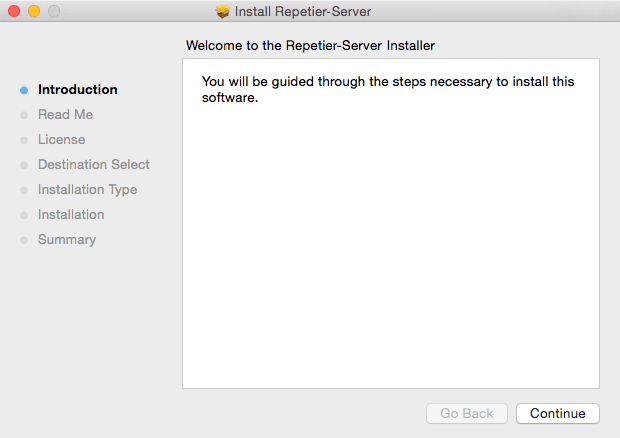
- Open the downloaded file.
- Click Continue to skip introduction
page.
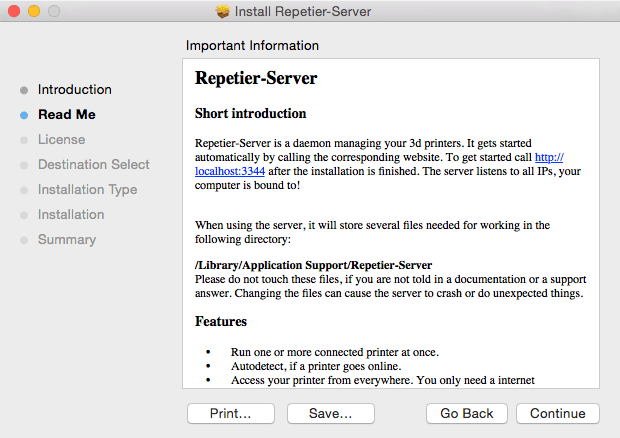
- You get a read me with short introduction, click on
Continue.
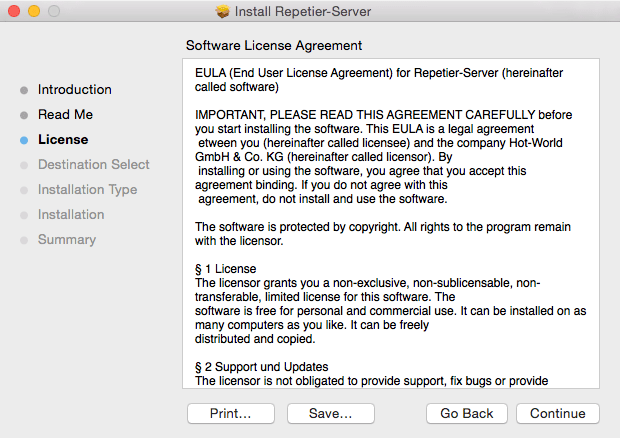
- You see the EULA, click Continue.
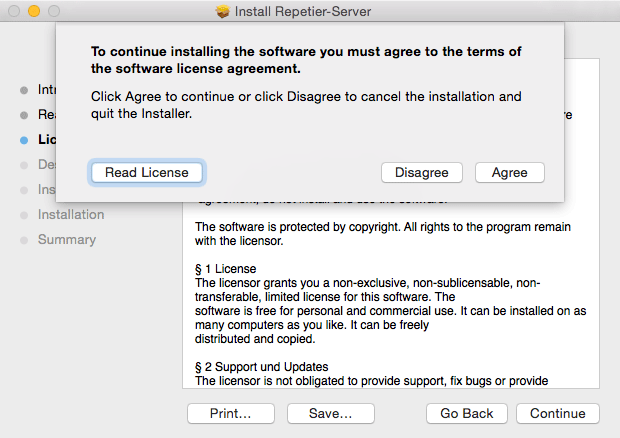
- Click Agree to continue.
- Choose the install location and click
Install.
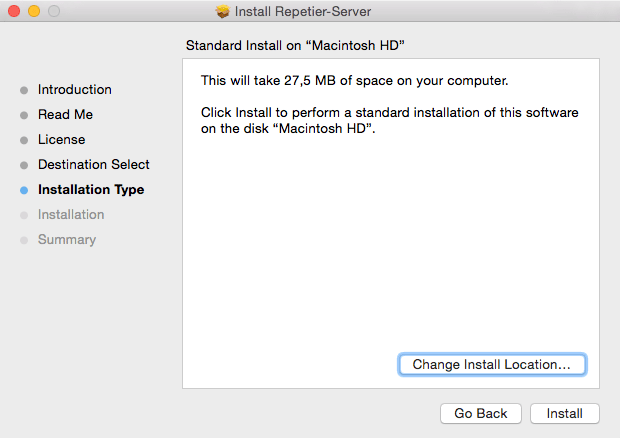
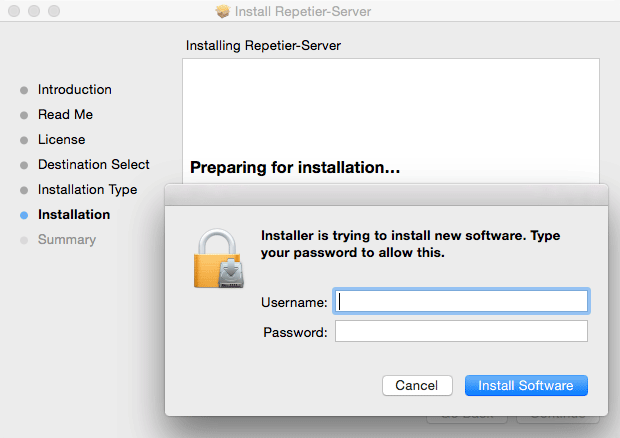
- Enter your username and passwort to allow installation and click Install
Software.
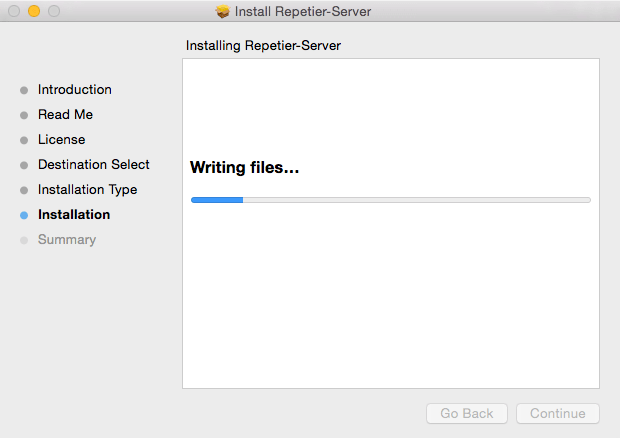
- Wait a while for the installation to finish.
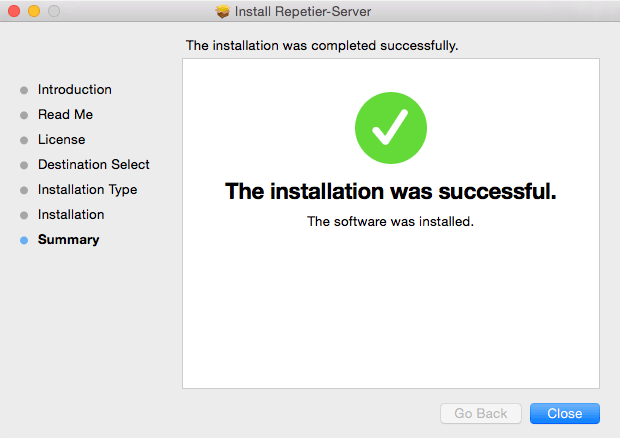
- Click Close to finish installation.
Important
Data Storage
By default the server stores all data in a global directory, which is normally located at /Library/Application Support/Repetier-Server/. This directory gets never deleted by updating or uninstalling the server to prevent data loss. If you want to backup your current state, just backup this directory.
Start and Stop Repetier-Server
The server works as a background daemon. For this reason, you will never see it in the list of running programs and you never start it directly. It will be started automatically start with the first initated connection with your browser. To start and stop it manually, open a terminal windows and enter
# Stop server
sudo launchctl unload /Library/LaunchDaemons/com.repetier-server.RepetierServer.plist
# Start server
sudo launchctl load /Library/LaunchDaemons/com.repetier-server.RepetierServer.plist
To install a new version of Repetier-Server download the version matching your computer and open a terminal and go to the download directory. There you enter:
sudo dpkg -i NewRepetierServerVersion.debAfter this, the server should already be running and you can access the interface with http://localhost:3344 or http://<ip address>:3344 if you are running it on a remote linux computer.
Important
Data Storage
By default the server stores all data in a global directory, which is normally located at /var/lib/Repetier-Server/. This directory gets never deleted by updating or uninstalling the server to prevent data loss. If you want to backup your current state, just backup this directory.
Start, Stop and Restart Repetier-Server
The Server works as a background daemon. It will be started automatically at startup of linux, so you can access it any time with your browser. To start, stop or restart it, enter the following command in a terminal:
# Start server
sudo service RepetierServer start
sudo /etc/init.d/RepetierServer start
# Stop server
sudo service RepetierServer stop
sudo /etc/init.d/RepetierServer stop
# Restart server
sudo service RepetierServer stop
sudo /etc/init.d/RepetierServer restart
In newer systems with systemd init configuration, you need to use the service command. The init.d version only works on older systems!
Configuration
Upload Config File
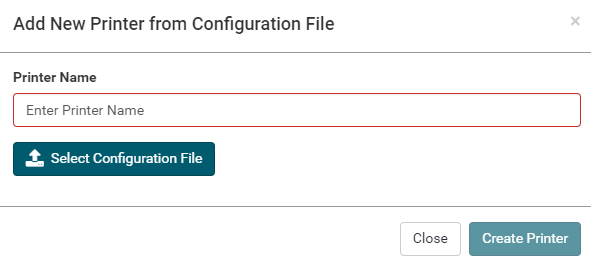
The easiest way to set up a new printer is to upload an existing config file. Go to
and click on Upload Printer
Configuration. Enter a printer name, select the configuration file and click Create
Printer.
That's all. Maybe you need to change the serial port.
To set the port, select your new printer on the dashboard and go to Printer Settings.
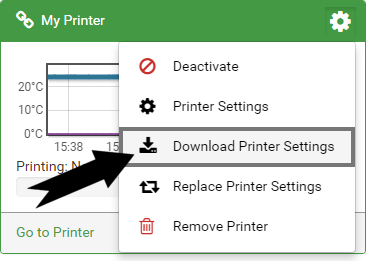
To create a configuration file, go to and click
Download Printer Settings in the printer
overview.
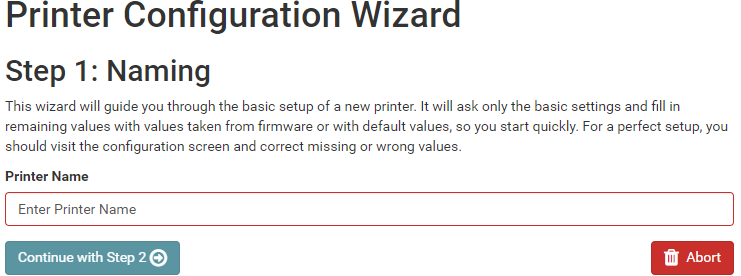
Configuration Wizard
Another very simple way to add a new printer is our Configuration Wizard. Go to and click on + Add new Printer.
-
Step 1: Naming
In the first step you just have to enter the printer name and click Continue with Step 2 .
-
Step 2: Connecting printer
Here you have to select, which firmware is used (Marlin, Repetier-Firmware, RepRapFirmware, Smoothieware), you have to set the Connection Method (Serial Connection, Pipe/UNIX Socket, TCP/IP Connection) and the connection method depending parameters. For the serial connection the baud rate can be set to autodetect, which will test the typical rates. In case autodetect fails, you have to set it yourself.
To speed up communication, the server sends as many commands as possible in a row. To prevent data loss, it is essential to know how many bytes the firmware can store, before the firmware buffer overflows. All known firmwares support at least 63 bytes. Firmwares normally support 127 bytes. If you see a lot of resend requests in the log while printing, the value is too high.
Click Continue with Step 3 to connect the printer.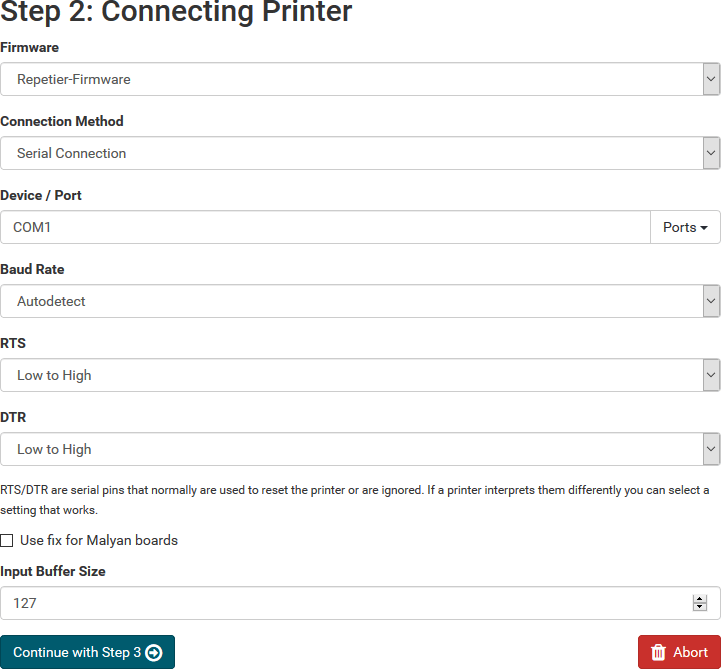
The configuration wizard now tries to read as many data as possible from the firmware. Whatever it detects gets set to the detected values. In the following pages detected values are marked with grene circles.

-
Step 3: Geometry
Here you can set the dimensions and bed shape of your printer. Then click Continue with Step 4 .

-
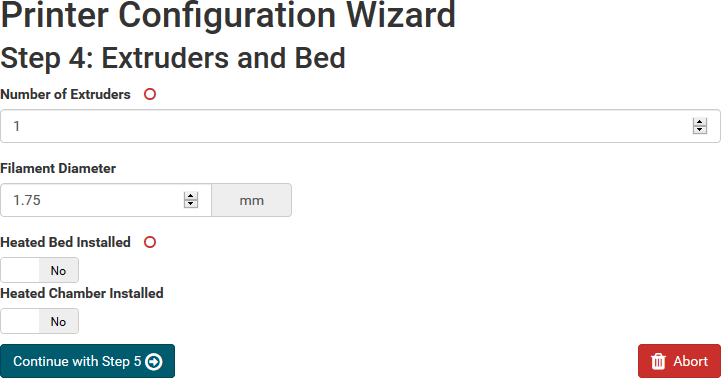
Step 4: Extruders and bed
Set the number of extruders and the filament diameter. Typical filament diameters are 1,75 mm and 2,85 mm. Then click Continue with Step 5 .
-
Step 5: Features
Check if you have installed fans and if you can enable main power with software command. Then click Finizsh Wizard . That's all. Now the most importnant values are set and you should be able to use the printer already. To get most out of your printer, you should visite the printer settings and fine tune the remaining values, e.g. for better time prediction and easier use.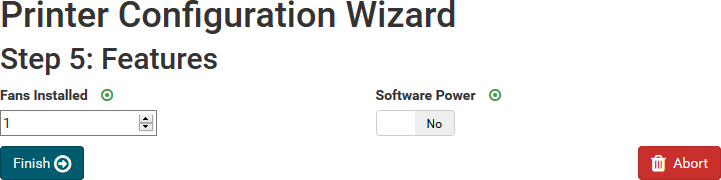
Printer Settings
Select your printer on the dashboard and go to Printer Settings.Here you can set all printer related parameter. So it is a good idea, to check these settings once your printer works. The settings are split into several categories to make navigation easier. To save the changed settings, press Save Configuration. If you leave settings without saving, you will get a security question to prevent accidential data loss. For parameters which may be difficult to understand you get a popover with detailed information when you click on the text field.
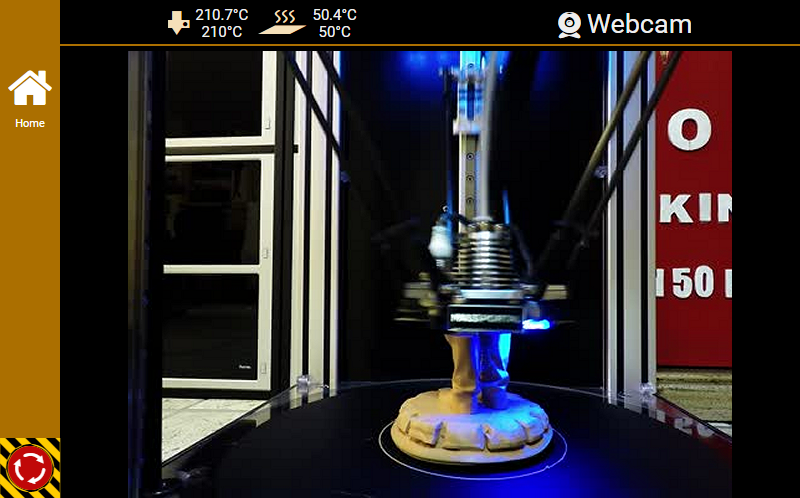
Here you find a manual how to set up a webcam for Windows, Linux and Mac.
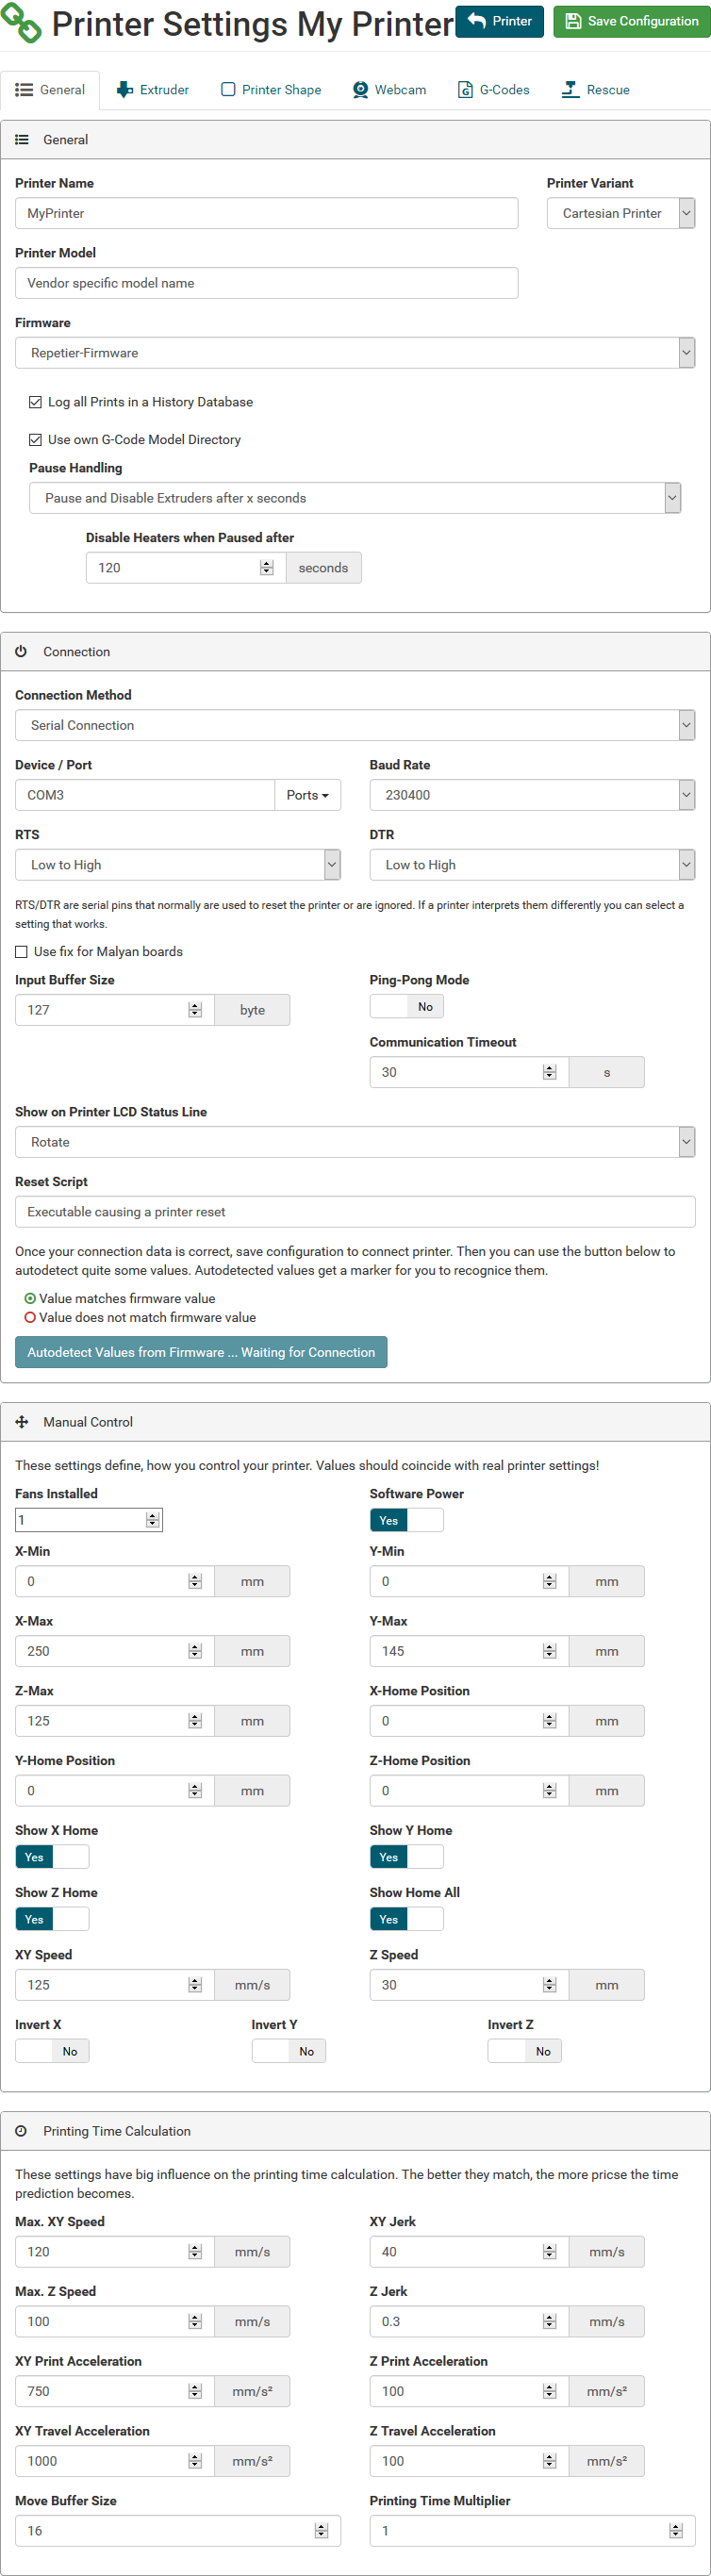 Show an Printer LCD Status Line
If your printer has a LCD display, you can select what will be shown in the status line (Do not set status, Show ETA, Show ETE, Show Layer, Rotate).
Reset Script
Here you can set an executable command to reset the printer. Normally not needed as toggling DTR signal will reset printer, but for special solutions you can define a script here.
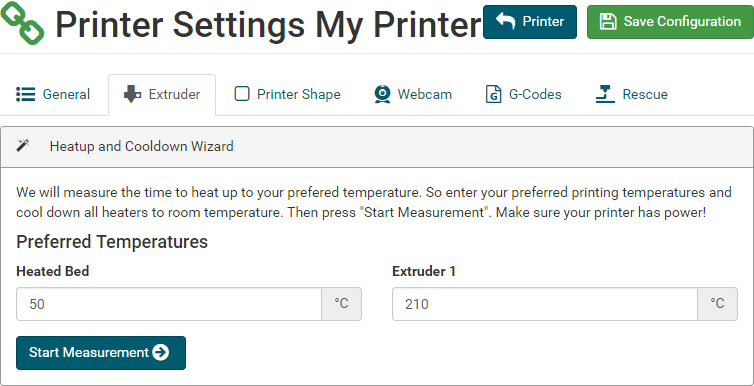
Heatup and Cooldown Wizard
To calculate exact printing times, you should run the Heatup and Cooldown Wizard. This feature measures heating and cooling speed needed for accurate printing time prediction.- Go to your printer on the dashboard and click
Printer Settings
Extruder and click
Start
Wizard.
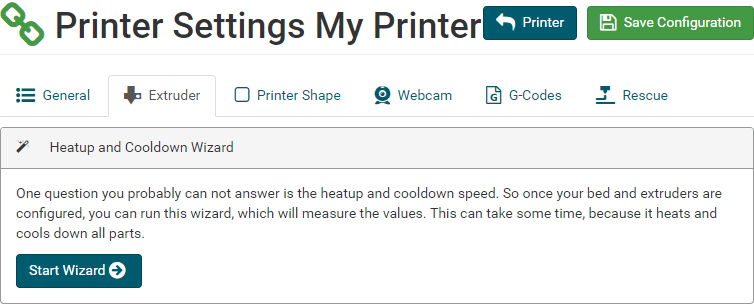
- Make sure your printer has power! Then enter typical temperatures for extruders and beds, then click
Start
Measurement.
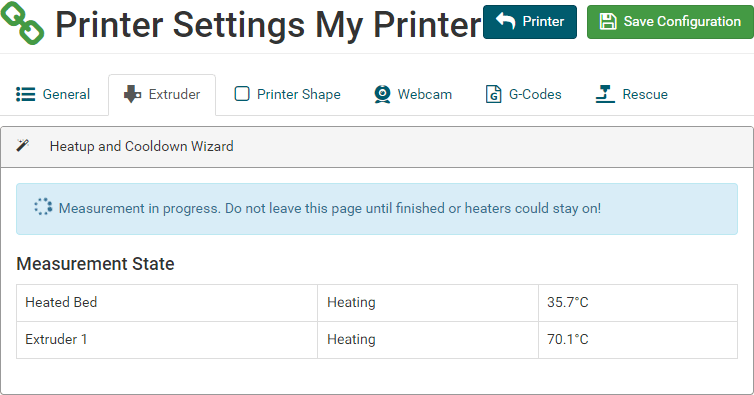
- Now you have to wait. The wizard tracks the warming and cooling speeds, which will take some time, especially
the cooling of the bed is time intensive.
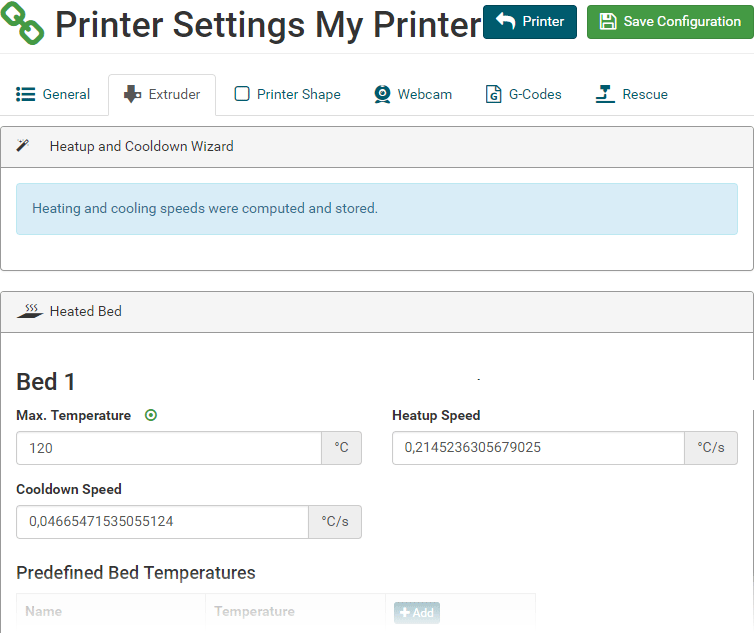
- When you see Heating and cooling speeds were computed and stored., the wizard is finished.
The exact values for Heatup Speed and Cooldown Speed are stored autamatically.
Push Messages
3D printing is cool, but it always takes some time and nobody wants to spend all the time sitting next to the
printer.
This is where the Repetier-Informer app
(the required app is available for Android and iOS devices) enters the scene. This will give you the desired
status reports via fast and
free push messages to your smartphone and/or tablet.
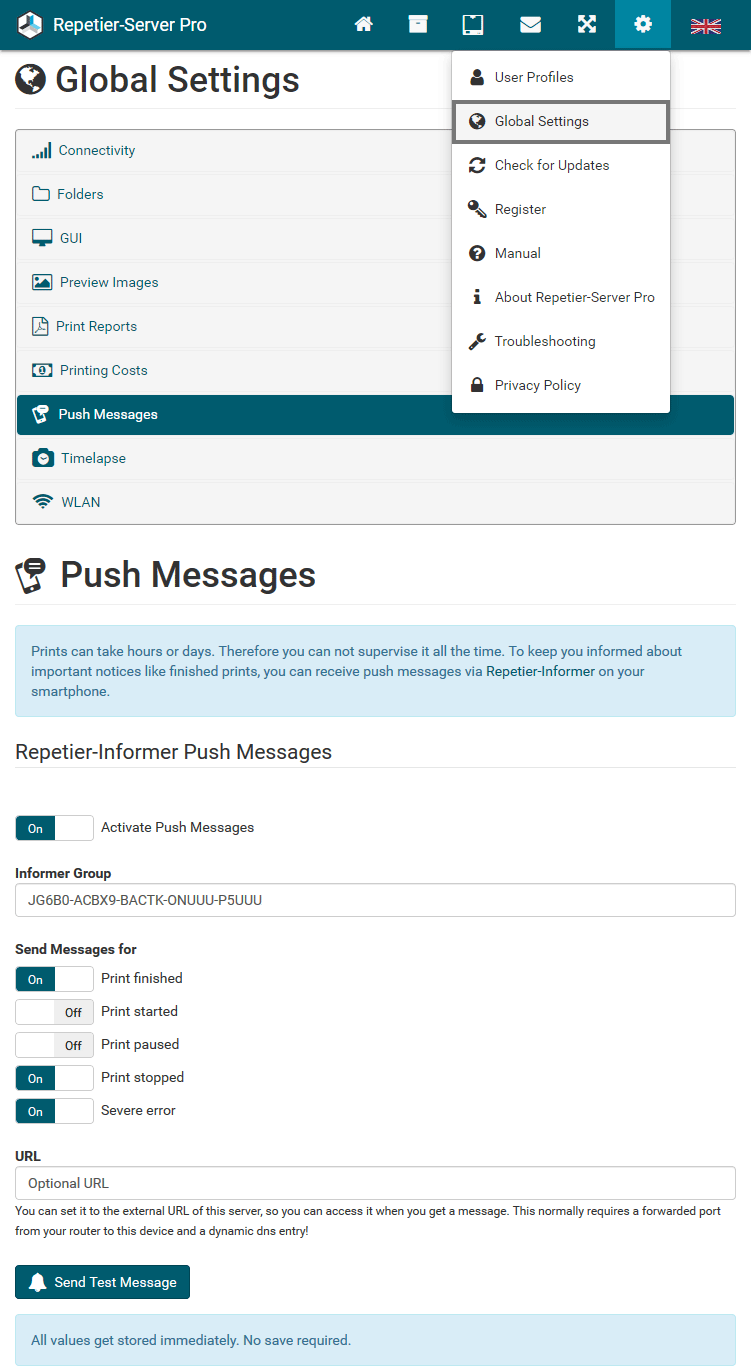
 Click
at top right of the browser window on the gear and choose
Global Settings
Push Messages to configure your push messages.
Here you have to enter an informer group you
have created in your app and you can specify for which events messages are sent:
Click
at top right of the browser window on the gear and choose
Global Settings
Push Messages to configure your push messages.
Here you have to enter an informer group you
have created in your app and you can specify for which events messages are sent:
- Print finished
- Print started
- Print paused
- Print stopped
- Severe error
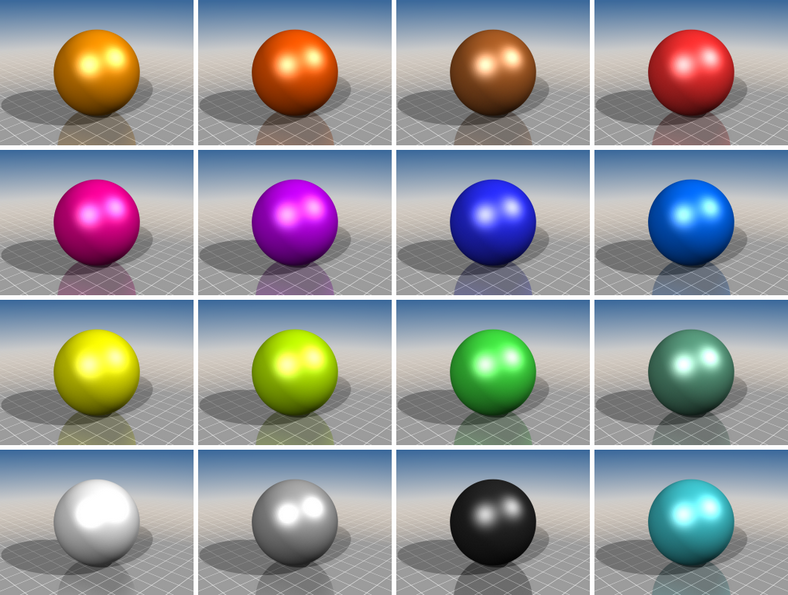
Preview Images
Repetier-Server creates preview images for all uploaded g-codes and STL files, so that you can easily browse through your models and see them. To set the quality and colors, go to and choose Global Settings Preview Images.
Here you can set the material colors for each extruder. The color settings are used for all printers, so here may be more extruder displayed as you have.
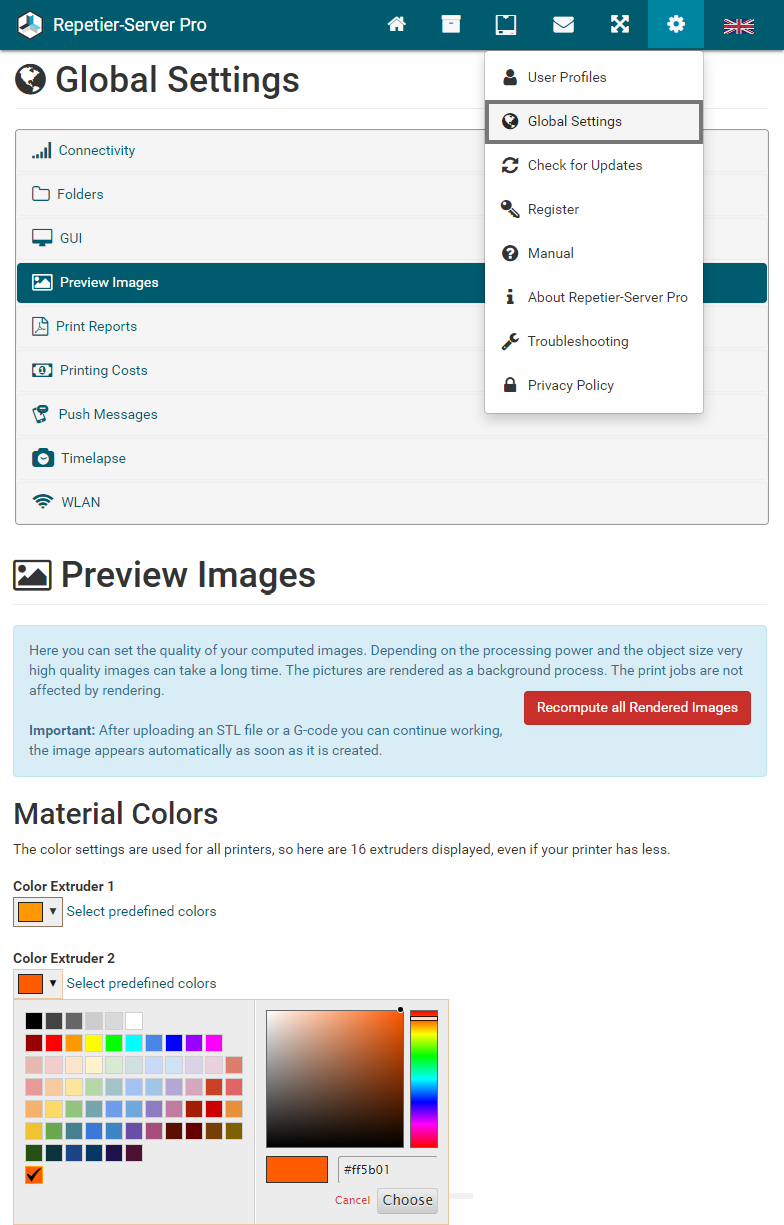
To set the color you can enter the rgb values in hexadecimal format, use our color picker or click Select predefined colors and choose one of our color proposals.
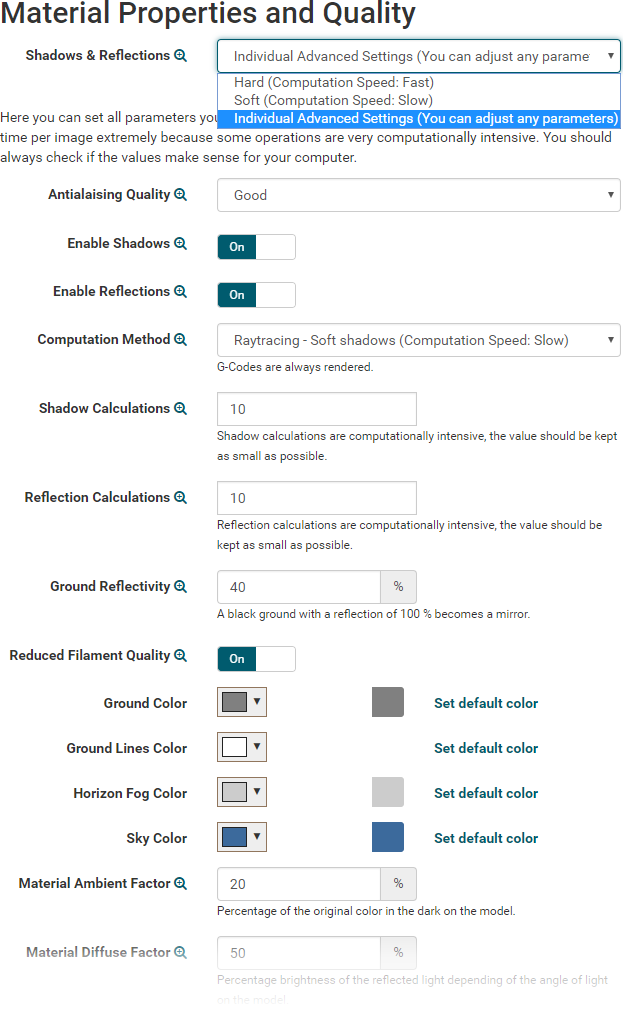
Normally you just have to choose between hard and soft shadows for STL files (G-Codes always have hard shadows). Soft shadows take much more time for rendering. If you select Individual Advanced Settings, you can set all parameters like antialaising quality, shadows, refelctions, colors of bed and horizon, lights, ... manually. Note that some settings can extremely increase the computing time. For all the parameters you will get examples by clicking on .
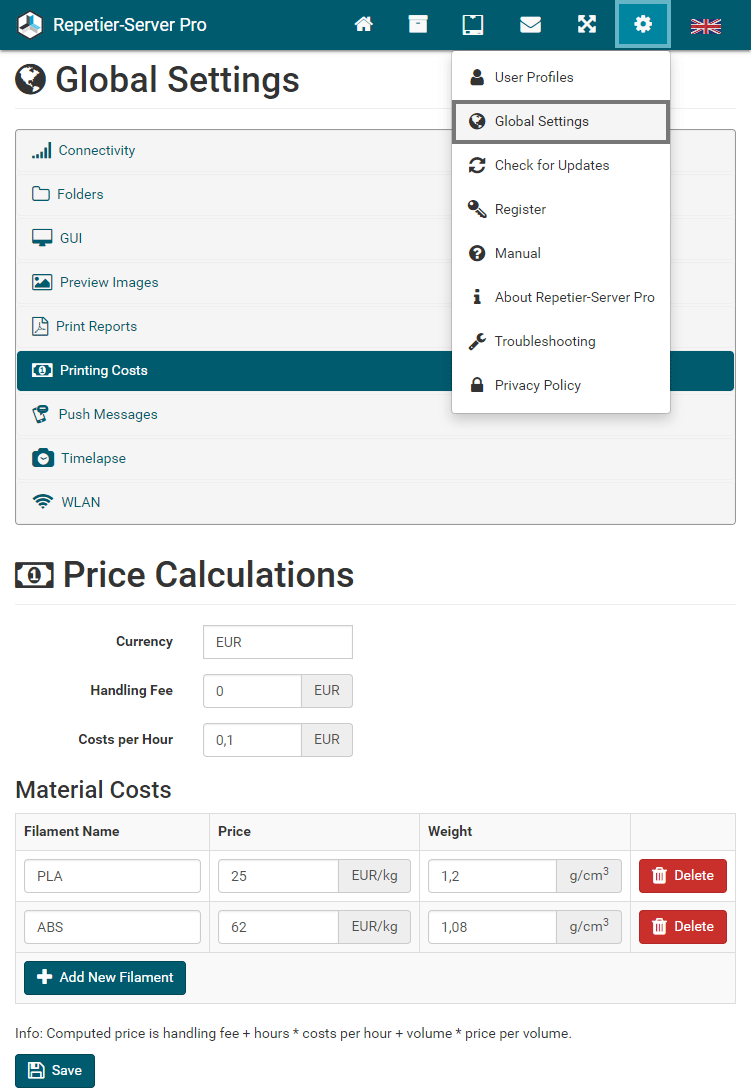
Printing Costs
With Repetier-Server you can calculate in advance what a print will cost.
Click at top right of the browser window on the gear and choose
Global Settings
Printing Costs to configure your price calculation.
Here you can set your currency, a handling fee (for professional offers) and costs per hour (e.g. electricity
prices, hourly usage charge and printer wear).
Then you can create any number of filament types and for each a price per kg and a weight per cm³.
Connectivity
API Key
With the API key in your Global Settings you can get complete
access to the server. This is used to allow servers to communicate with each others or to add connectivity with
other software without the use of login/password. Keep it secret or change it if you think it got compromised.
To change the API Key, klick the button Replace with new API Key.
If you do not want to give complete access to the server, use the API Key from a User at
User Profiles. Here the server gets the same rights as the choosen
user.
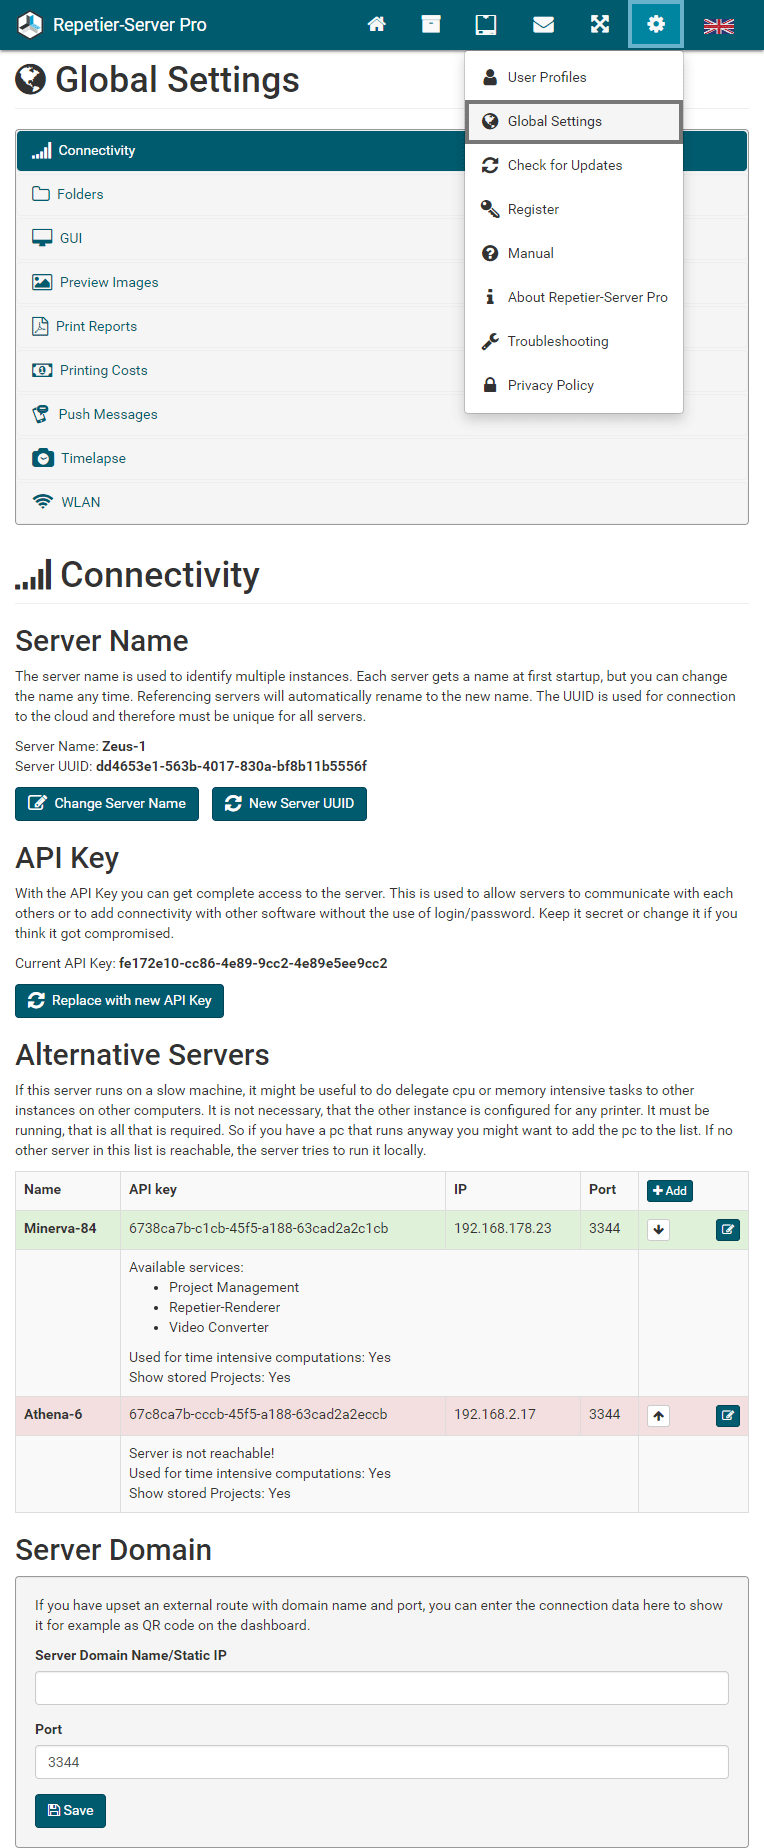
Server Name
Each server installation has an own server name and helps to identity your installation when running multiple instances and when you use the cloud to control all your instances. If you change your server name, referencing servers will automatically rename to the new name. To connect to the cloud, you need the UUID, which must be unique. If you copy an running server image, you might copy the UUID, so you could get two installations with the same id, which will cause troubles when you connect to the cloud. In this case, click New Server UUID before connecting to the cloud.
Alternative Servers
If your server runs on a slow machine, it might be useful to delegate cpu or memory intensive tasks to
other Repetier-Server instances on other
computers. It is not necessary, that the other instance is configured for any printer. It must be running, that
is all that is required. So if you have a
pc that runs anyway, you might want to add the pc to the list. If no other server in this list is reachable, the
server runs the task locally.
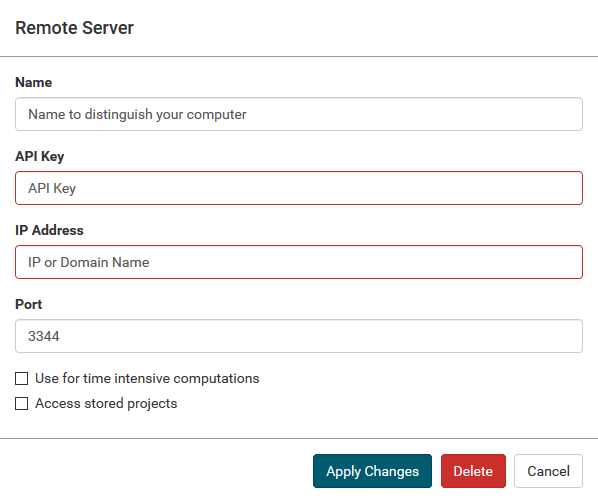
You can set if the remote server is used for time intensive computations and if it has access to stored
projects.
To add an new Repetier-Server instance, click the button
Add, enter a name, the API key
of the instance, the IP address and the port and click the button Apply Changes.
Notice: The server will always try to outsource computations, if there are cloud computers
specified. Therefore it is important to set this only
to more capable and faster computers. The first accessible computer from the top of the list is used, so that
the fastest computer should stand at the top.
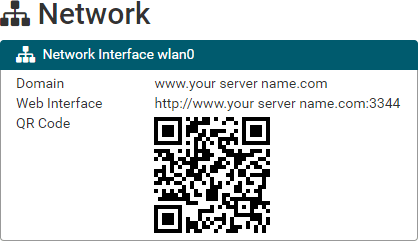
Server Domain
If you have upset an external route with domain name and port, you can enter the connection data here to show
it for example as QR code on the dashboard.
Depending on the NAT roules in your router, the port may differ from the port the server really uses.
Timelapse
If a webcam is activated in the printer settings, you can specify that images are taken at predetermined intervals. These images can be played via the website like a video. If you want to export it as an mp4 video, you must install FFMPEG. Free download of FFMPEG (version 1.1 or newer) for all operating systems: http://ffmpeg.org/download.html
After installing FFMPEG you have to enter the path (eg C:\ffmpeg\bin\ffmpeg.exe or /usr/bin/ffmpeg), that's
all. If a remote server is connected, rendering will be outsourced, if the remote server has also FFMPEG
installed.
Notice: Alternatively you can install avcanv
instead of FFMPEG. Everything will work the same except repeat first/last frame, which will be replaced with no
repetition. The executable must be named avconv to be detected automativally.
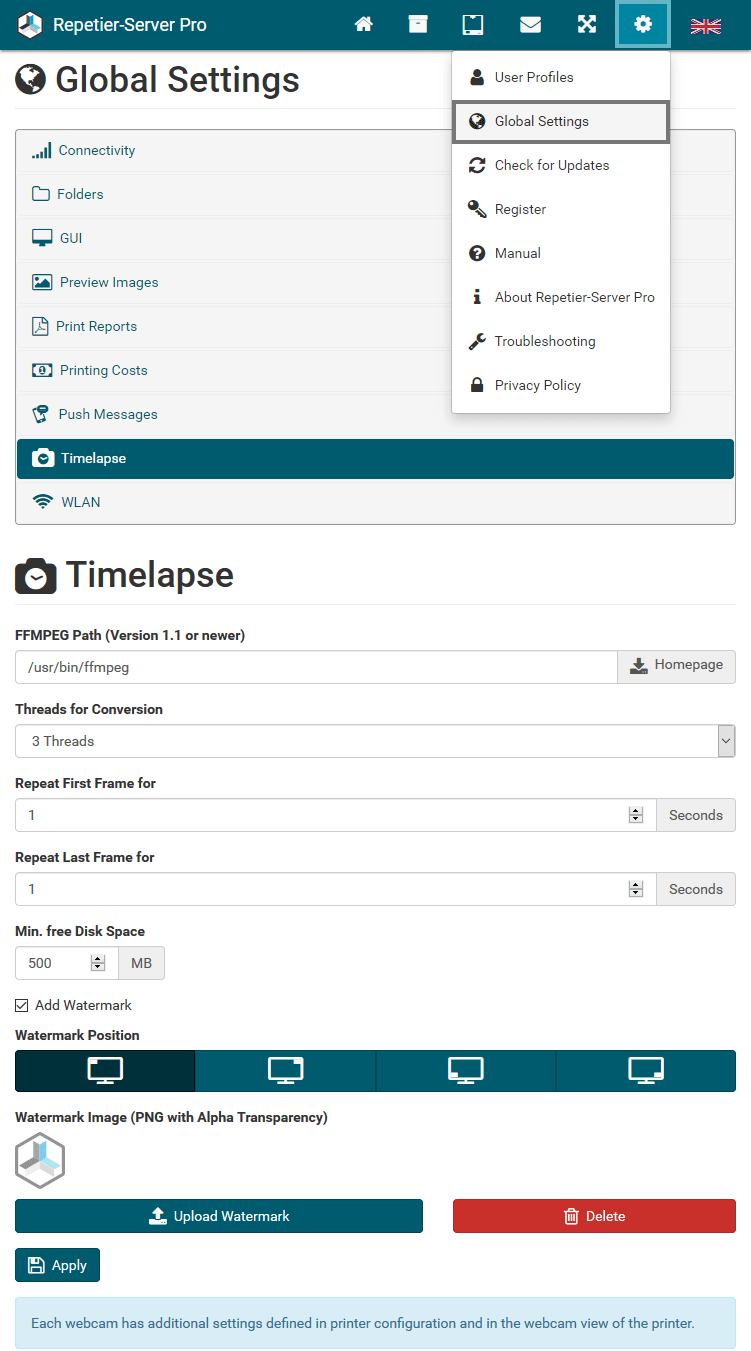
Threads for Conversion: If you have a multi-core processor, you can specify here how many threads will be used simultaneously to render the video.
Repeat First Frame for: Thus the print does not start immediately on the video, the first picture can be repeated for x seconds.
Repeat Last Frame for: Here the last picture can be repeated for x seconds.
Min. free Disk Space: To avoid that hard disk space runs out while the video is created, here you can specify how much disk space must be at least free, so that the video rendering will start.
Add Watermark: Here you can specify if you want to embed a watermark in the video.
Watermark Position: Here you define, in which corner the watermark appears.
Watermark Image: Here you can upload your own image, which is used as a watermark. The image must be a PNG and may have alpha channel transparency.
Notice: Each webcam has additional settings defined in printer configuration and in the webcam view of the printer.
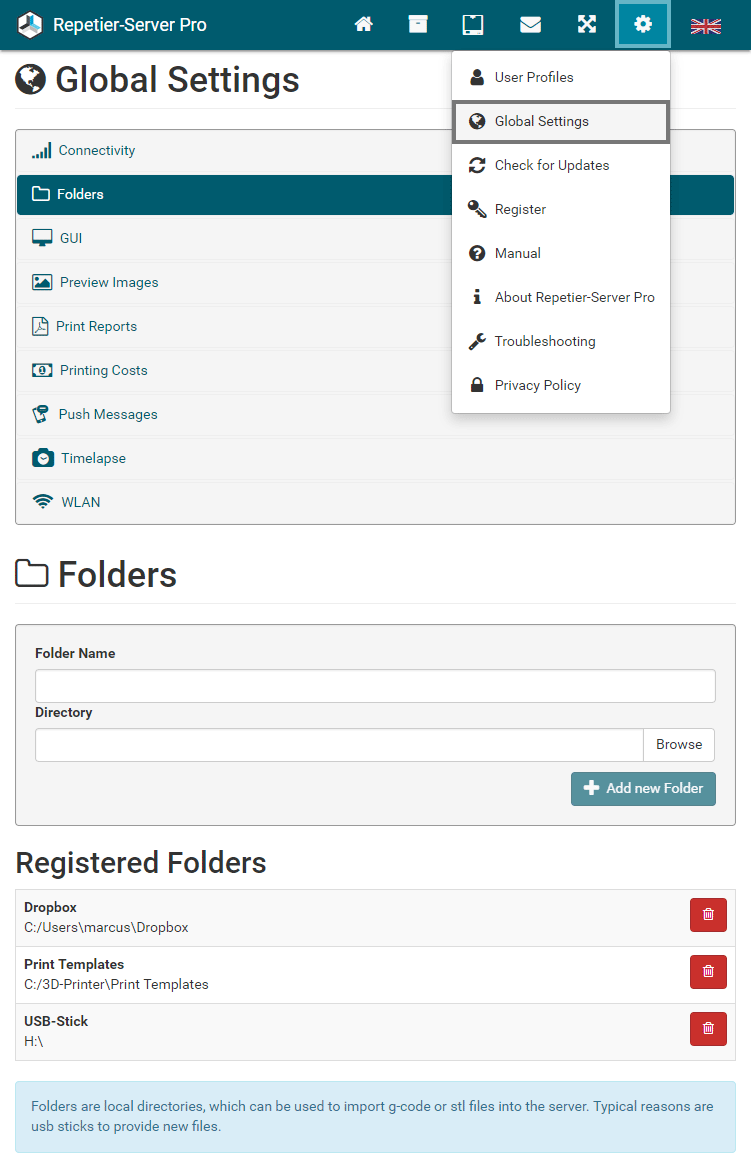
Folders
Here you can register local folders, which you can use to import G-Code or STL files into the server. Typical
reasons are usb sticks or frequently used folders to provide new files.
You can enter a folder name for each folder. Click Browse to select the folder and
Add new Folder to save the folder.
WLAN
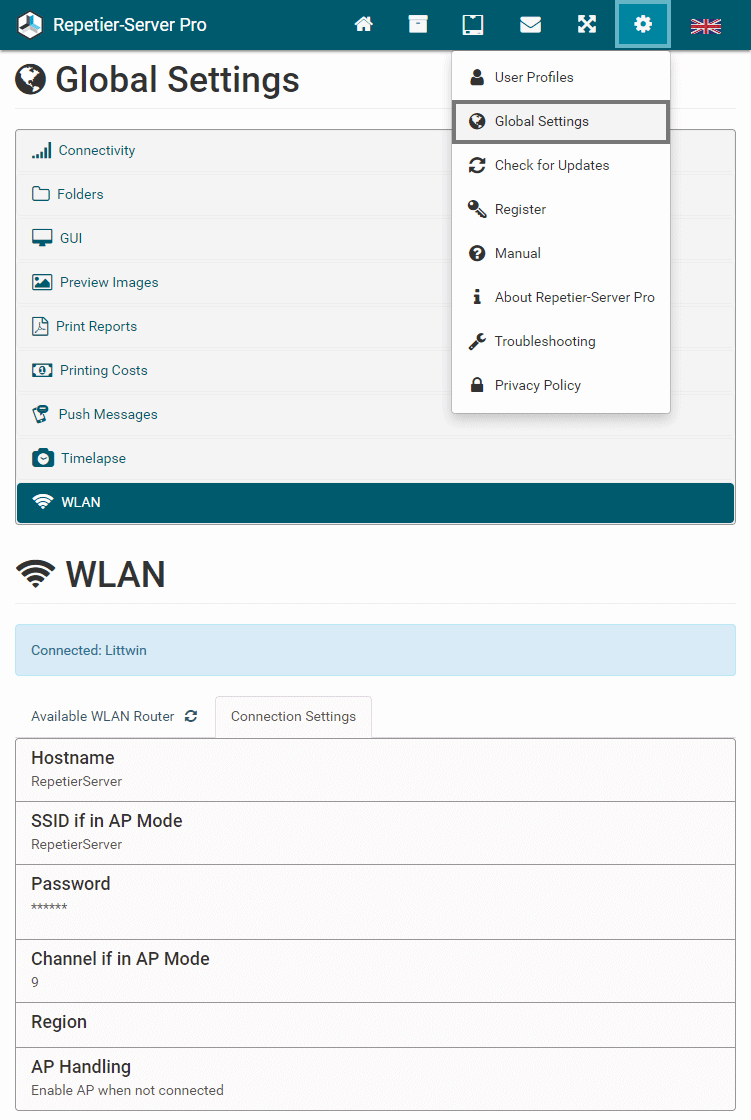
If you use our iamge for Raspberry Pi, you can configure WLAN via acces point mode. For details click here: https://www.repetier-server.com/download-images/ With such a setup you can configure your WLAN in Global Settings WLAN. You can configure your PC to connect to an existing WLAN or to act as an access point. The settings have two blocks. The first block configures some general parameters:
- Hostname - The name of your PC. It will appear with this name in your WLAN.
- SSID if in AP Mode - When working as access point, it will show this name as route name.
- Password - Here you can change your Passwort for access point mode. The default passwort is 12345678.
- Channel if in AP Mode - The channel used for transmission. Depending on your country not all channels are allowed.
- Region - The country you are in. This determins which channels are available. You need to reboot to activate the changes.
- AP Handling - Define when the server should act as an access point.
The second block shows all available WLAN routers. Here you can connect to one of these. Click on the wanted router. If it is encrypted or the password is not stored you will be asked for the passwort.
GUI
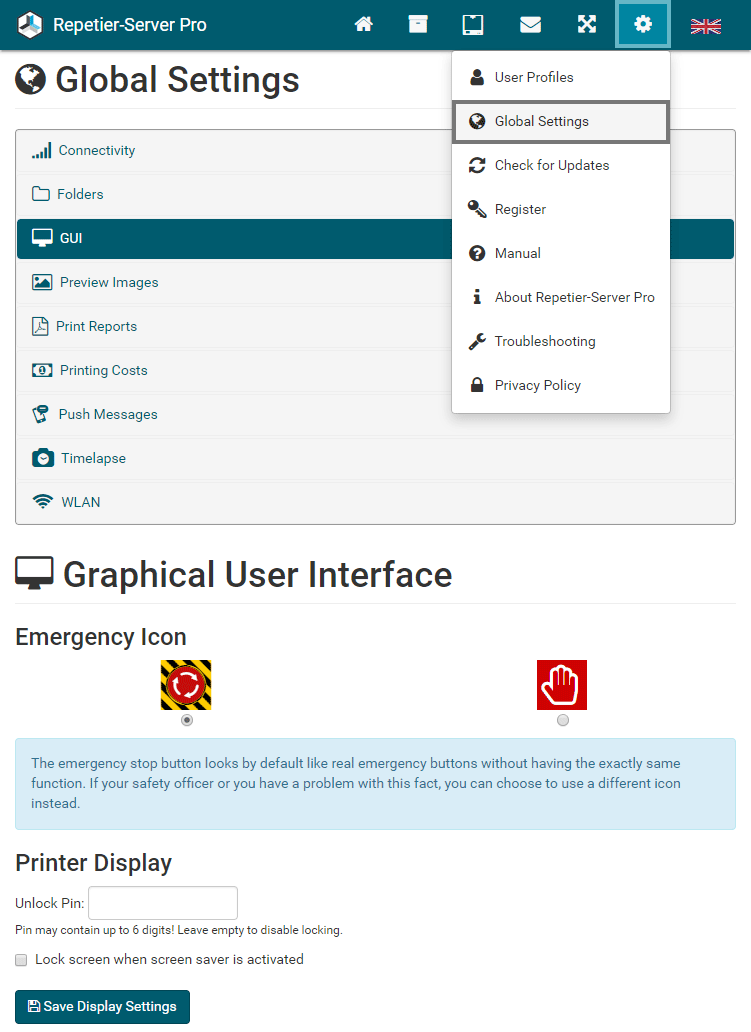
Emergency Icon
The emergency stop button looks by default like real emergency buttons without having the exactly same function. If your safety officer or you have a problem with this fact, you can choose to use a different icon instead.
Printer Display
If you use our touchscreen interface on your printer, you can set a pin to unlock the display after the screen saver is activated, so that no unauthorized persons have access. You can enter a pin with up to 6 numbers. Then you can lock the printer discplay manually. Without a pin, you can not lock it. To activate the lock automatically when the screen saver startes, select Lock screen when the screen saver is activated. Because the printer display has no users, there is only one pin for all users.
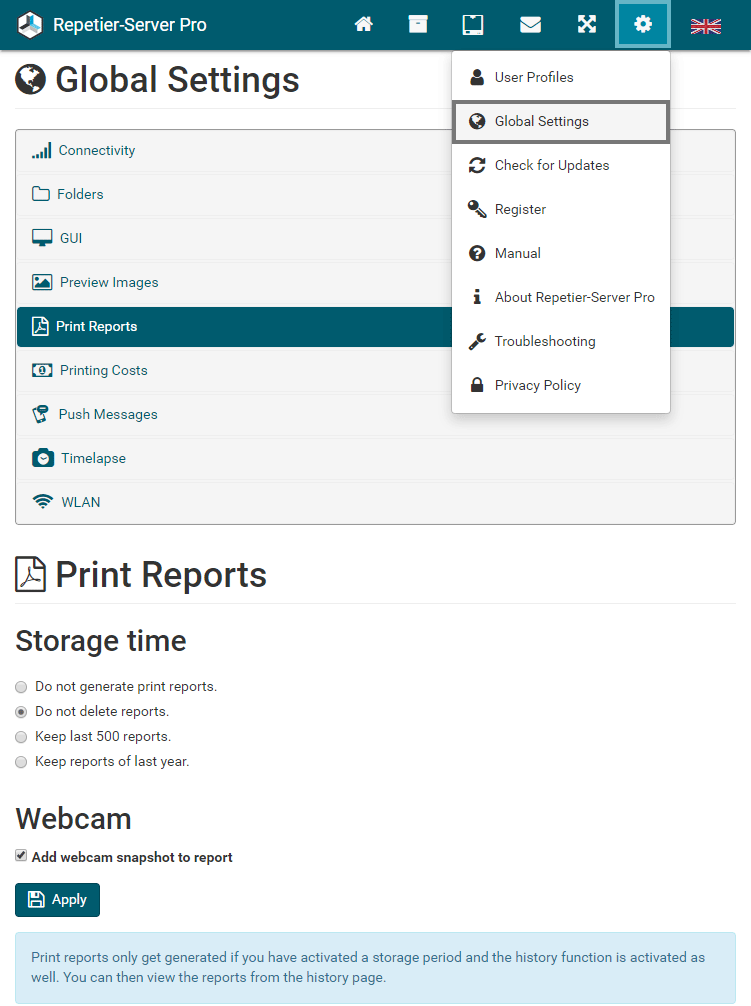
Print Reports
While you can already see in your print history when you printed which file, the reports added to the history offer more details about the prints and are also a great way to document your work in downloadable pdf files eg. if it is a commissioned work and you want to deliver a print report.
The report contains a rendered preview image and if you have a webcam you can add a webcam snapshot of the finished print to the report as well. Due to the embeded images the reports can be up to one MB, so you might want to reduce the number of stored reports or disable them completely. Deletitions will happen on the next report generation. If you select Do not generate print reports., the saved reports will not be deleted.
Why Adding a User
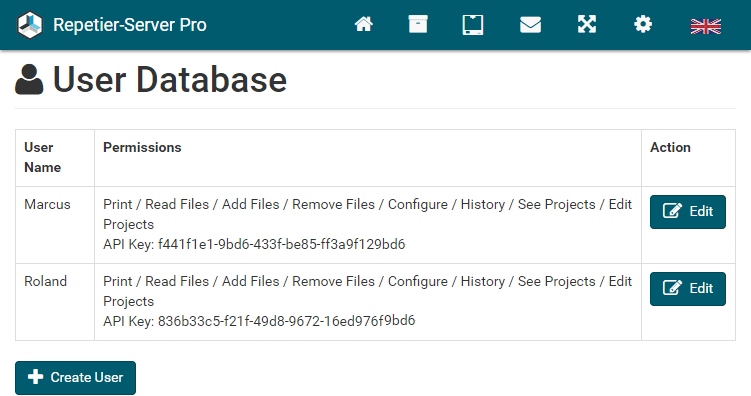
Repetier-Server has a user management to assign individual users specific legal rights. Anyone who uses Repetier-Server alone and only in the home network does not necessarily need a user management. But if you would like to have access to Repetier-Server over the internet from anywhere, you should definitely create a user account, otherwise hackers may have access to the your server.
The first created user is a superuser with all rights. Then more users can be created with specialized rights, so that they eg can not change the printer settings.
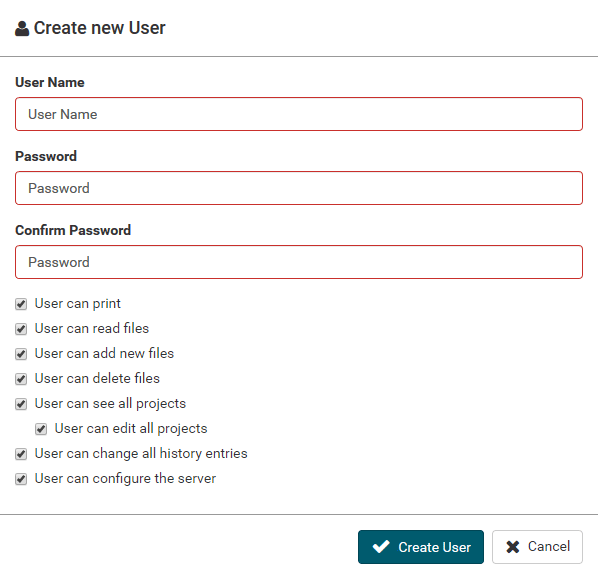
Add a User
Click at top right of the browser window on the gear and choose
User Profiles.
To add a new user click Create User. You just have to set a user
name and a password, mark the wanted rights and click Create User.
The first created user is a superuser with all rights.
After you have created a user, you need to sign in
to get access to Repetier-Server.
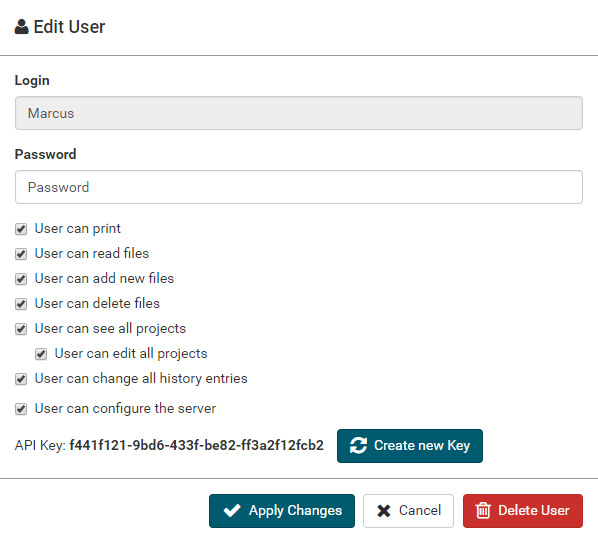
API Key
Every user has an API key. With this API key you can get access to the server with the selected rights.
This is used to add connectivity with other software without the use of login/password. Keep it secret or change
it if you think it got compromised. To change the API key, click the
Edit button for the user and then click the button Create new
Key.
Password Forgotten
If you have forgotten a user password, you can reset it if you have another user with configuration rights. As the last radical solution follow these steps:- Stop Repetier-Server (see installation)
- Delete the file storagedirectory/database/user.sql
- Start Repetier-Server
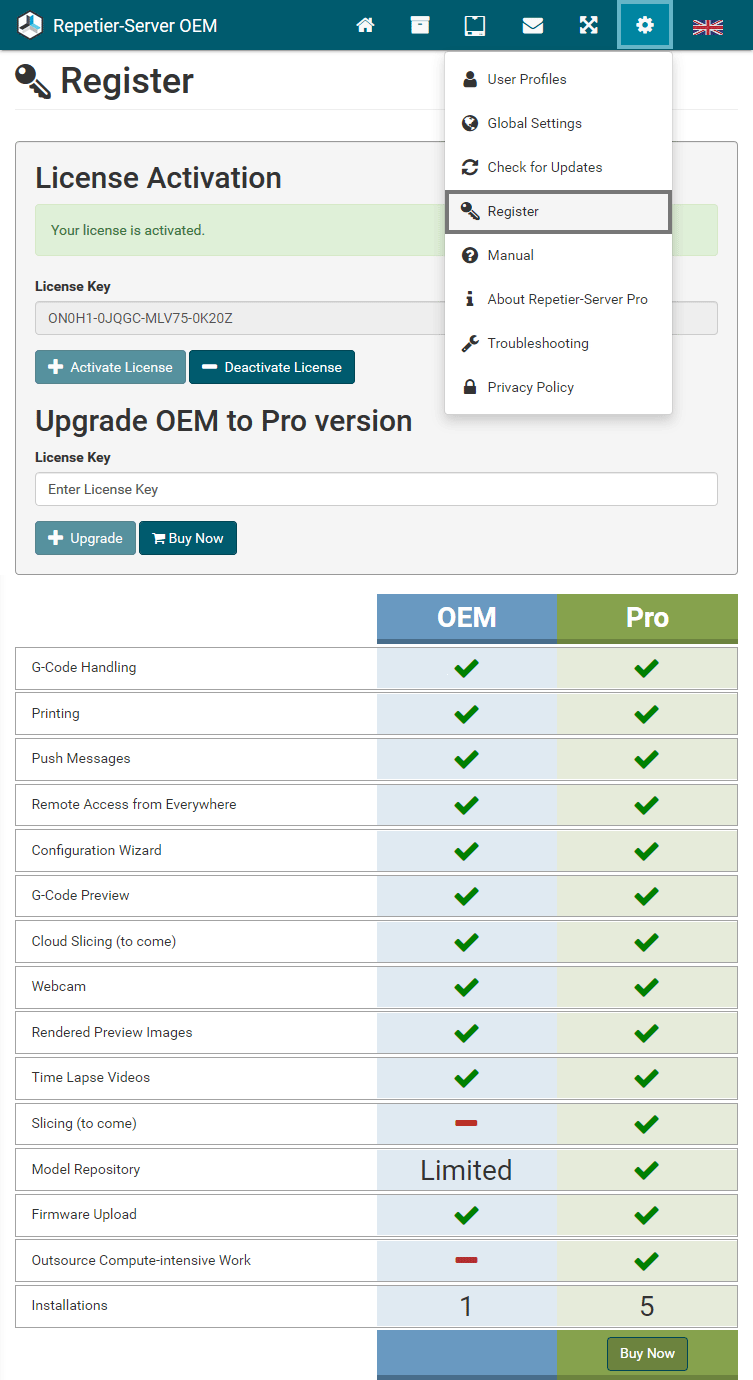
But there are some good reasons to upgrade now from the Free to Pro version:
- If you upgrade to the Pro version now, you can use the license key for 5 parallel installations.
- After expiration of the beta status you can use all functions regularly.
- For updates you automatically receive in the future all the new features.
- Your contribution helps the programmers to cover a part of the current development costs.
To upgrade Repetier-Server to Pro version, go to Register, enter your License Key and click Activate License. To activate the license key an internet connection must exist.
To deactivate an existing license key, click Deactivate License. To activate the license key an internet connection must exist. When the license is deactivated, the key will be stored and displayed in the license key field, so that you can activate it at any time easily.

Update Repetier-Server OEM to Repetier-Server Pro
If you bought your printer with an OEM version of this software, we offer a discount to upgrade to the Pro version. One OEM license can only be used on one computer. When you upgrade to the Pro version, you can use the new license for 5 installations to outsource computationally intensive work and you get all functions.Here you can upgrade Repetier-Server OEM to Repetier-Server Pro.
Access a device from everywhere is a bit tricky, if you haven't done it before. First you should make sure that the computer running the server always has the same ip address. You can give it a static ip address or you teach your DHCP server to give it always the same ip address. For this, DHCP servers can bind a ip address to the computers MAC address. You can see the MAC on the dashboard . For those still wondering where this DHCP server is - it is typically a part of your network router connecting you to the internet. You should run this step even you do not want a worldwide access, simply to make it easy to access your printer and your webcam inside your house with the same URL.
Your router has only one external ip, so it is normally not possible to access any device behind this from outside. Most routers allow a trick called network address translation. Lets assume your server computer always gets the local ip address 192.168.0.22 and runs there on port 3344. Now we add a new entry in the NAT table on your router. We say it should map port 2000 to 192.168.0.22:3344. From this time it is now possible to enter your external ip with port 2000 and you will see the server user interface.
If you do not have a static ip address, like most of us, you are still in trouble. Your ip might change any time and then you can not connect from outside. The solution here is DynDNS. It allows a nameserver to change the ip, when your router gets a new ip address. Most routers support DynDNS out of the box for some systems. If it does not or if you want a free DynIP solution, have a look at https://duckdns.org. They provide a free entry and also show how to set it up for many platforms. Once you have set up your DynDNS solution, you have a simple url that works as long as your router is online and the server computer running. It could then look like mycoolprinter.dyndns_vendor.org:2000. The name comes from your DynDNS setup and the 2000 is the port you have set in your router NAT table.
Note: Since IP V4 address pool is used up, providers start using IP V6 to IP V4 mappings. Depending on the used solution, port forwarding may not work for you.
This page guides you to the best pages to solve problems. In addition it will offer solutions to some complicated
fixes that might be necessary.
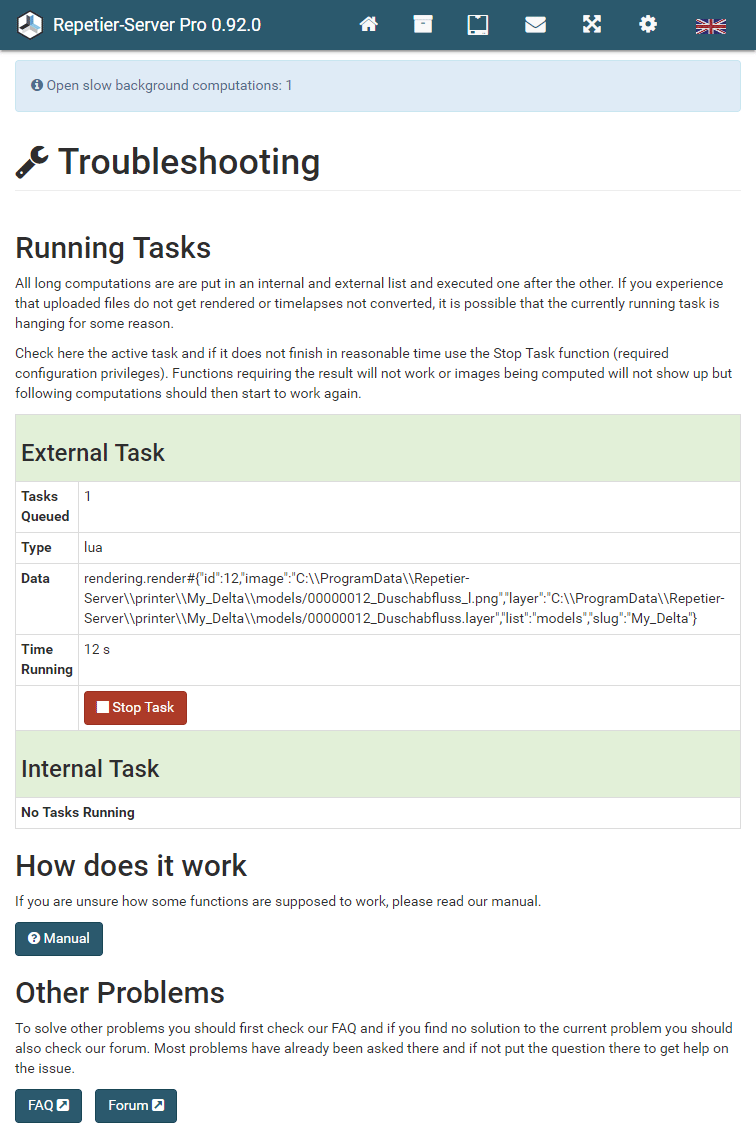
Repetier-Server tries to not overload your computer. Therefore all long computations are queued into two lists.
One handles calls to external programs and the other internally computed tasks.
With some files or settings it can happen, that a task never finishes, also this is only a very rare case.
The fact that only one of these processes runs at a time, a blocking process means that all further computations will not happen.
As an indication you see the slow background computations do not decrease and new uploads do not get rendered.
In this case you can stop the task using the Stop Task button.
This will kill the running process an continue with the next. As a result that file will never get rendered or
whatever the task was for will not finish.
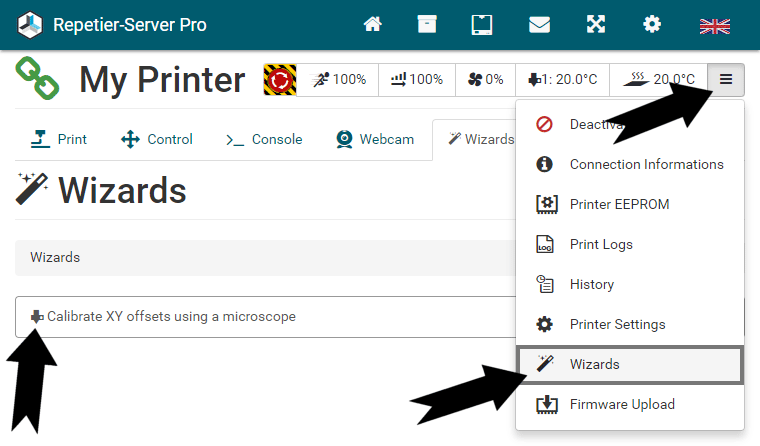
Printer Control

In the top navigation bar, you can access the following menu items:
- : Click here to go to the dashboard.
- : Click here to go to your projects.
- : Here you can switch between all printers. You also see the current
printer status of all printers.
- : Here you get messages for special events like print finished or paused. You need to delete them in the menu by clicking the red button. In case of a paused message, the print will continue when you click on the red button.
- : Here you can switch between full screen and normal view in the browser.
- : Here you get to the main configurations, register the pro version, open the manual and you can log out.
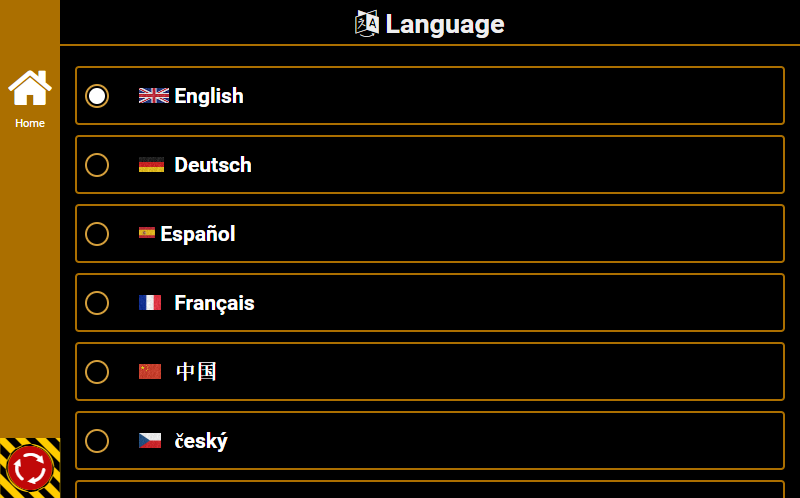
 : Here you can select your language.
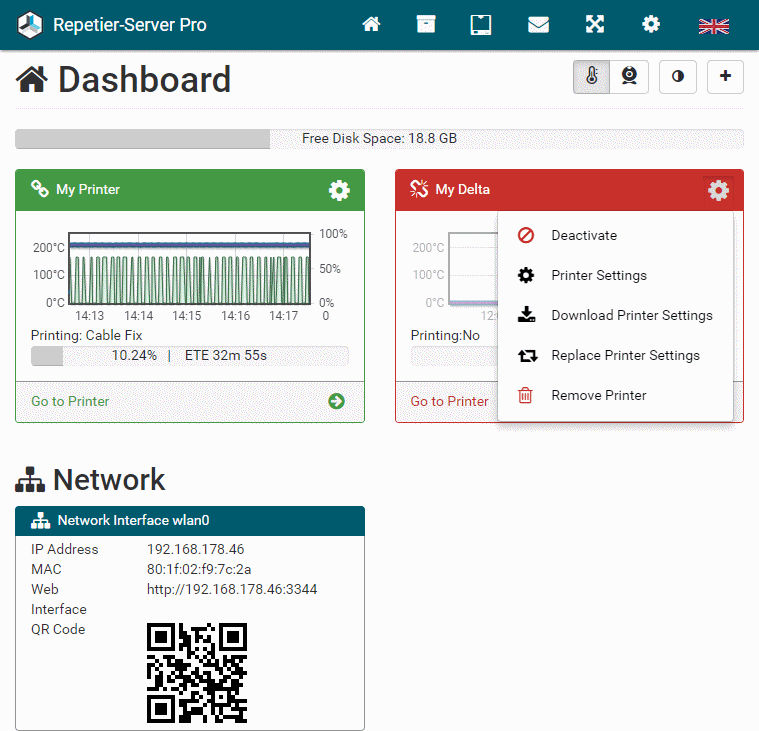
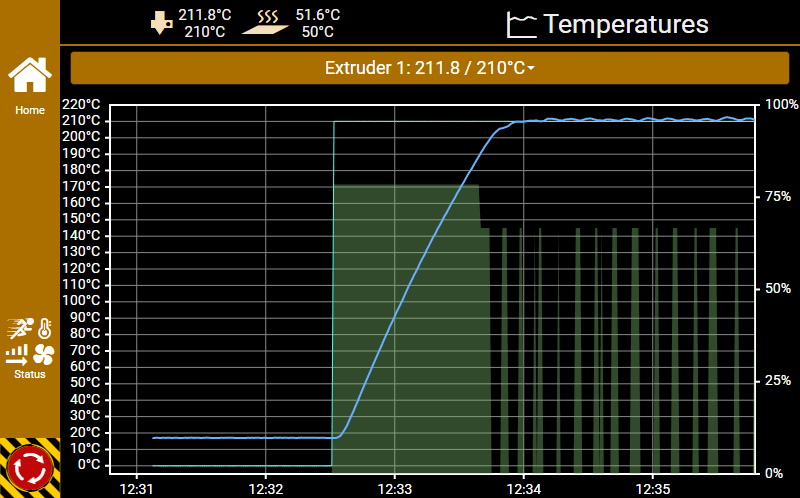
This is the starting point where you get a quick overview of all printer activities. For each printer you see:
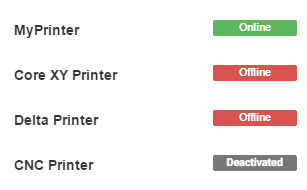
- The color of the headline indicates the connection status (green = online, red = offline, grey = deactivated, orange = connected, but no communication).
- The menu allows you to Activate / Deactivate the printer, edit Printer Settings, Download Printer Settings or Replace Printer Settings and Remove Printer.
- The temperature graph shows the temperature of the current extruder.
- The progress bar shows the printing progress and job being processed.
- The Go to Printer button sends you directly to the printer control page.
Under Network you can see your IP address, MAC address and the URL to access the server with a different PC, smartphone or tablet. Also you can scan the QR Code with a smartphone or tablet to open the URL.
With the Dark Mode we have added an additional layout that can be selected on the dashboard.
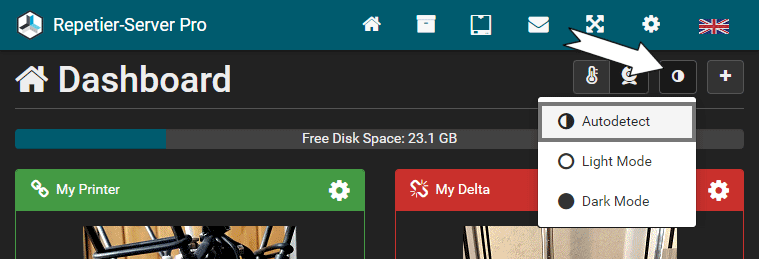
Click to change between Autodetect, Light Mode and Dark Mode. The setting is saved for the current user. If you select Autodetect, the light/dark theme set in the operating system will be used if your browser already supports this function.
Autodetect is supported from the following browser versions:
- Firefox 67
- Chrome 76
- Safari 12.1
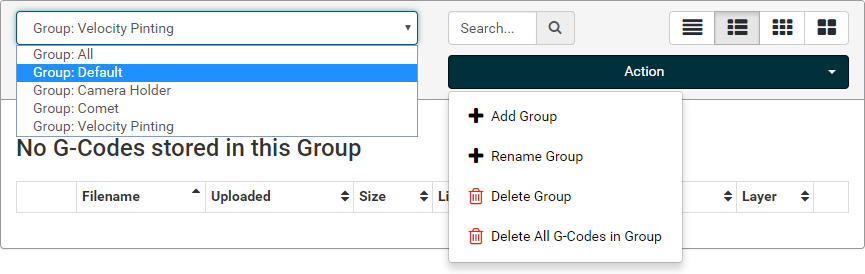
All G-Codes are stored in groups, so that related objects can be managed clearly in a separate group. If no group is assigned, the group DEFAULT is used automatically. Click Actions Add Group to create a new group and Delete Group to delete the selected group. If the group is not empty, you get a security question. Here you have to chose if the files shall be moved to default group or if the fils in this group shall get deleted.
Important: All imported files get stored in the selected group. If the current group is ALL, it will be stored in the DEFAULT group.
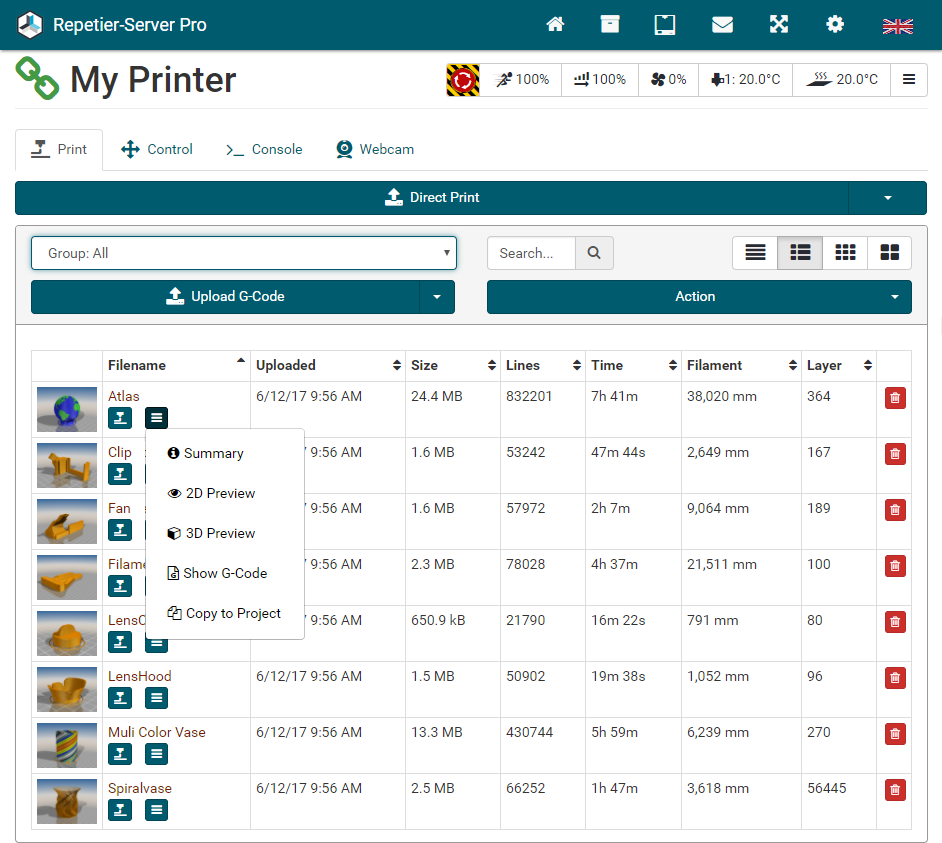
To upload new G-Codes click the Upload G-Code button. To upload and start printing directly, use the Direct Print button.
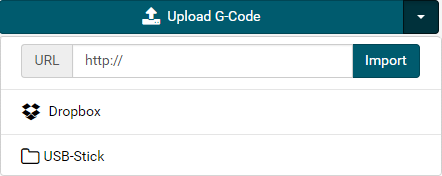
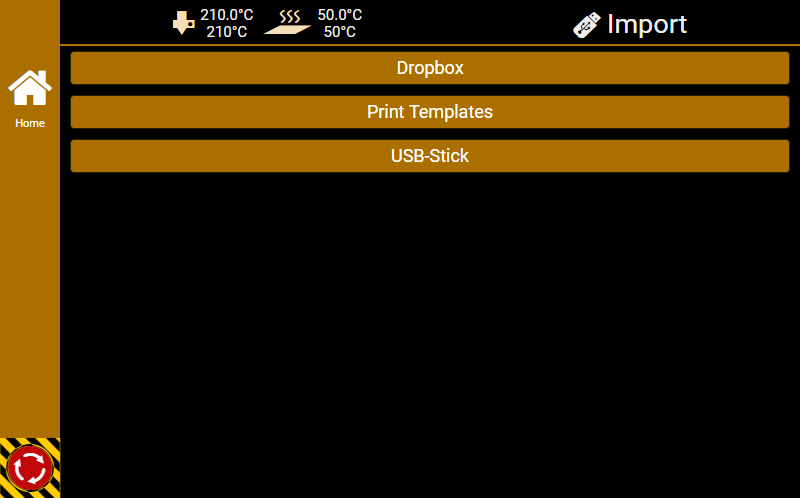
Click on the right side of the Upload G-Code button to open the dropdown menu. Here you have three more options to import G-Codes:
- Enter an URL to download and import a G-Code from the internet.
- Click Dropbox to open your Dropbox online account. This fiels only appears, if the domain is localhost or 127.0.0.1. If you are not online, this field will not also appear. If not already done, you have to log in with your Dropbox access data. The selected files will get downloaded and imported.
- If you have defined folders in Global
Settings
Folders, they are displayed here. Click on the folder to browse through the folder content.
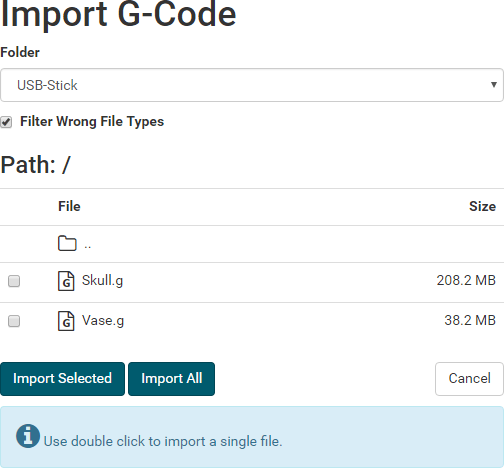
Here you can import multiple G-Codes. Use double click to import a single file.

The search box allows you to search by file name in the selected group. The results are automatically displayed as you type.
Here you can select the display types of your G-Codes:

G-Code information without images
G-Code information with small images
256 pixel wide images without G-Code information
512 pixel wide images without G-Code information


By clicking a heading in list view you can sort all entries ascending or descending.
Click to start printing. If a job is already running, this will add the job to the print queue.
Click to delete the object.
Click 2D Preview to get a 2D Preview.
Click 3D Preview to get a 3D Preview.
Click Show G-Code to show G-Code.
Click Copy to Project to copy the G-Code to an existing project. The printer to which the G-Code belongs is displayed in the project. The G-Code can also be sent from the project to other printers.
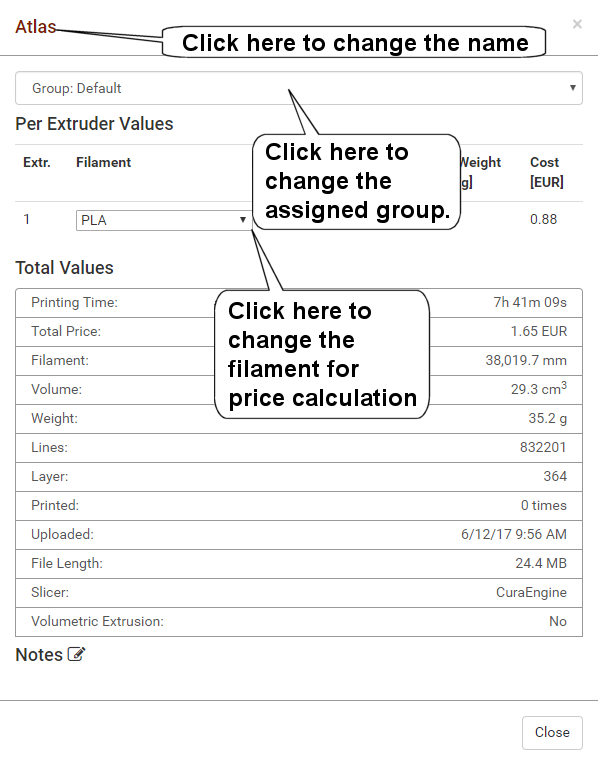
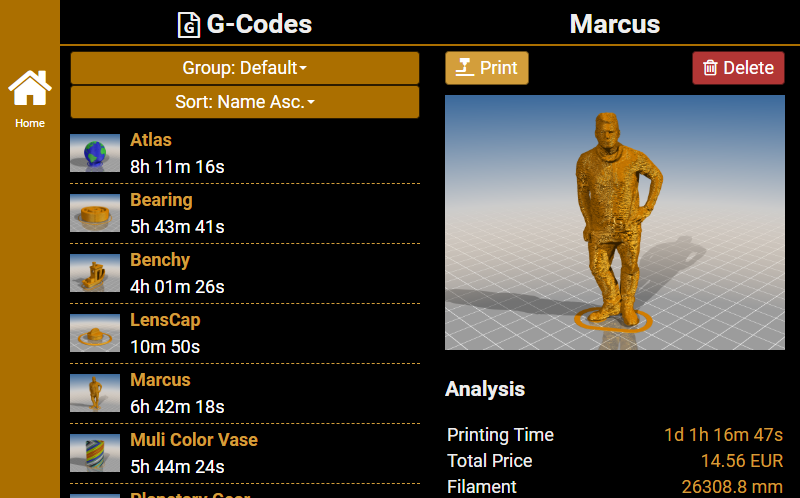
Click Summary to get detailed information including price calculation:
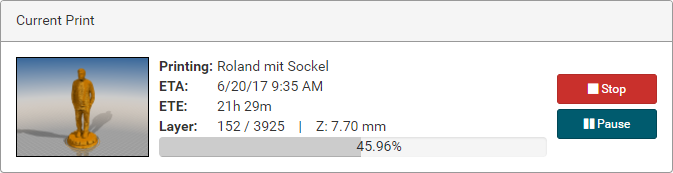
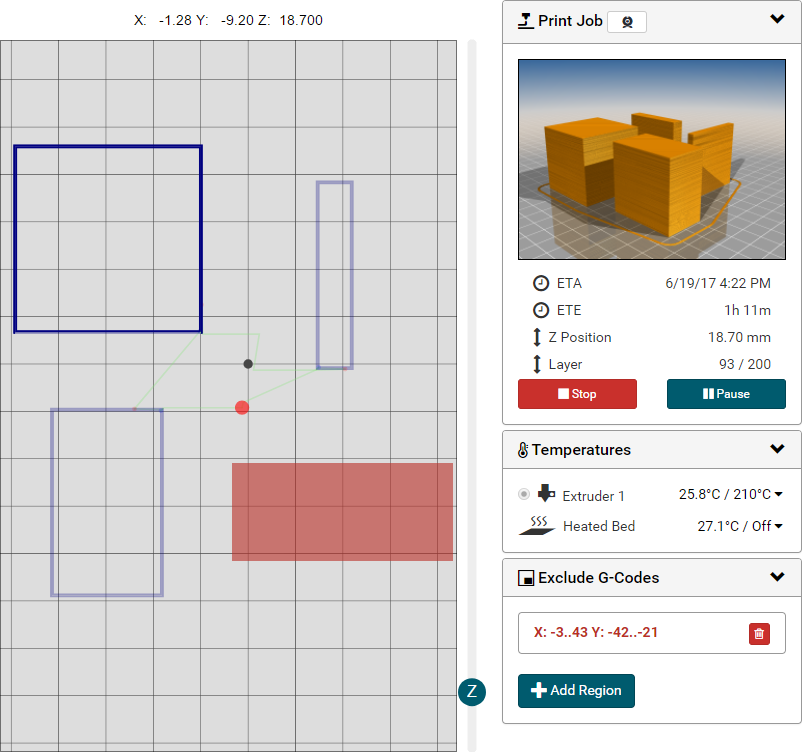
When a job is running, you see a progress bar with ETA (Estimated Time of Arrival) and ETE (Estimated Time Enroute) and you can pause or stop the job.

If you start more than one job, you get a print queue. After a job is finished, you have to start the next job by clicking .
G-Code Preview
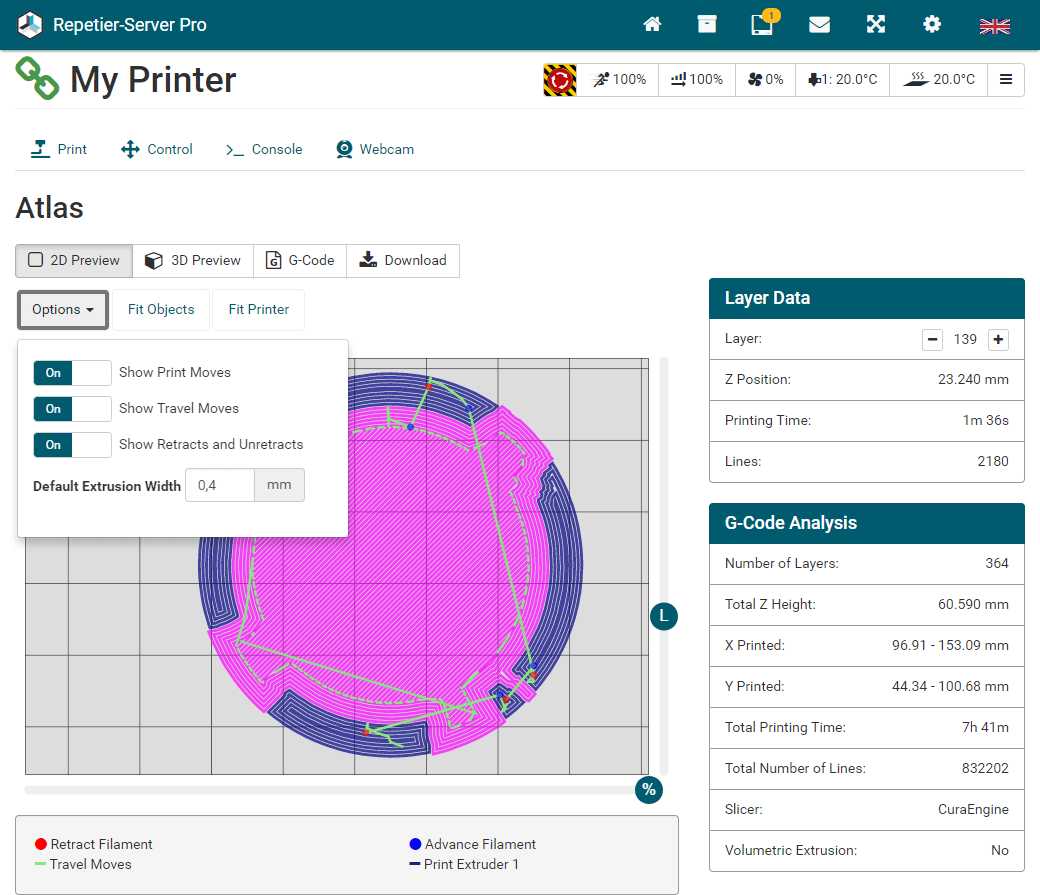
Here you can check and visualize your G-Code before you print. In 2D Preview you always see the currently selected single layer. That way we can visualize even very big G-Codes, which normally would not fit into RAM. The server also only downloads the currenty viewed layer to minimize traffic.
With
 you can slide through the layers or use
  for
exact layer navigation.
for
exact layer navigation.
With
 you see the move order for this layer.
Click Download to download the G-Code. Click 3D Preview to see a rendered image of the model.
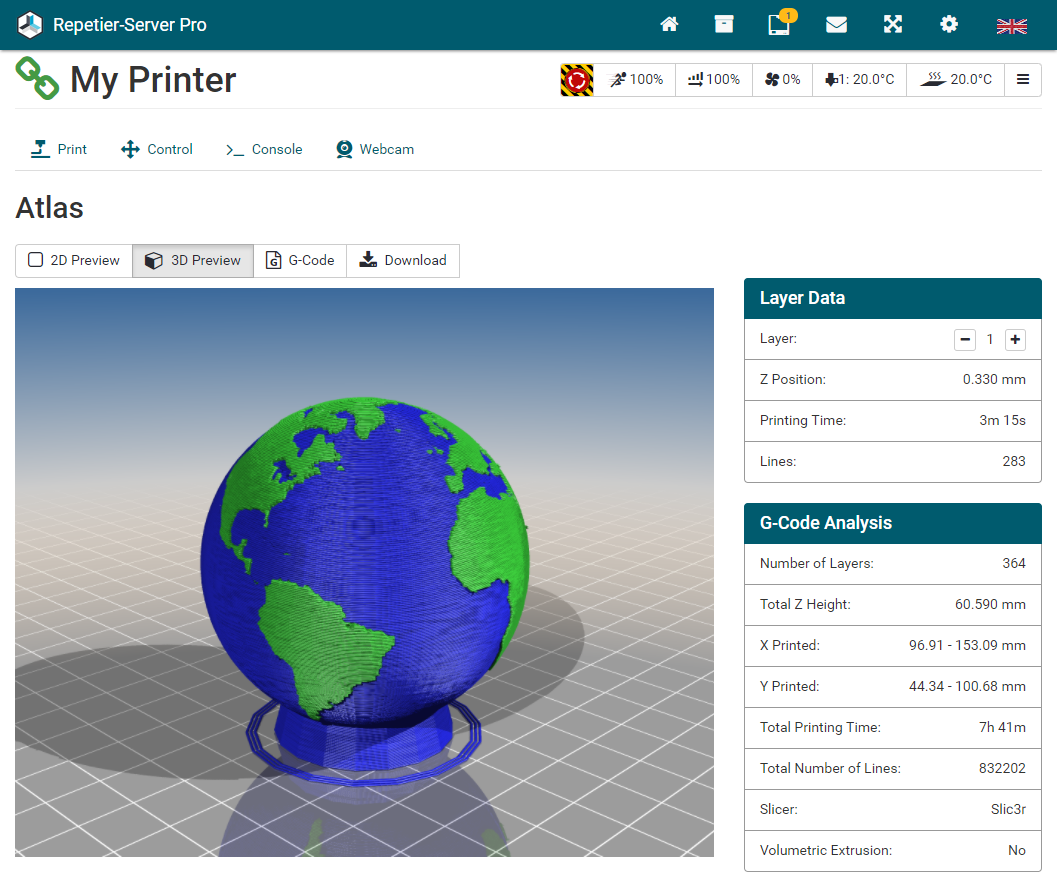
When you click on G-Code you see the complete G-Code of the current layer. You can navigate through the layers by clicking + and - in Layer Data blog. To switch back to preview click 2D Preview.
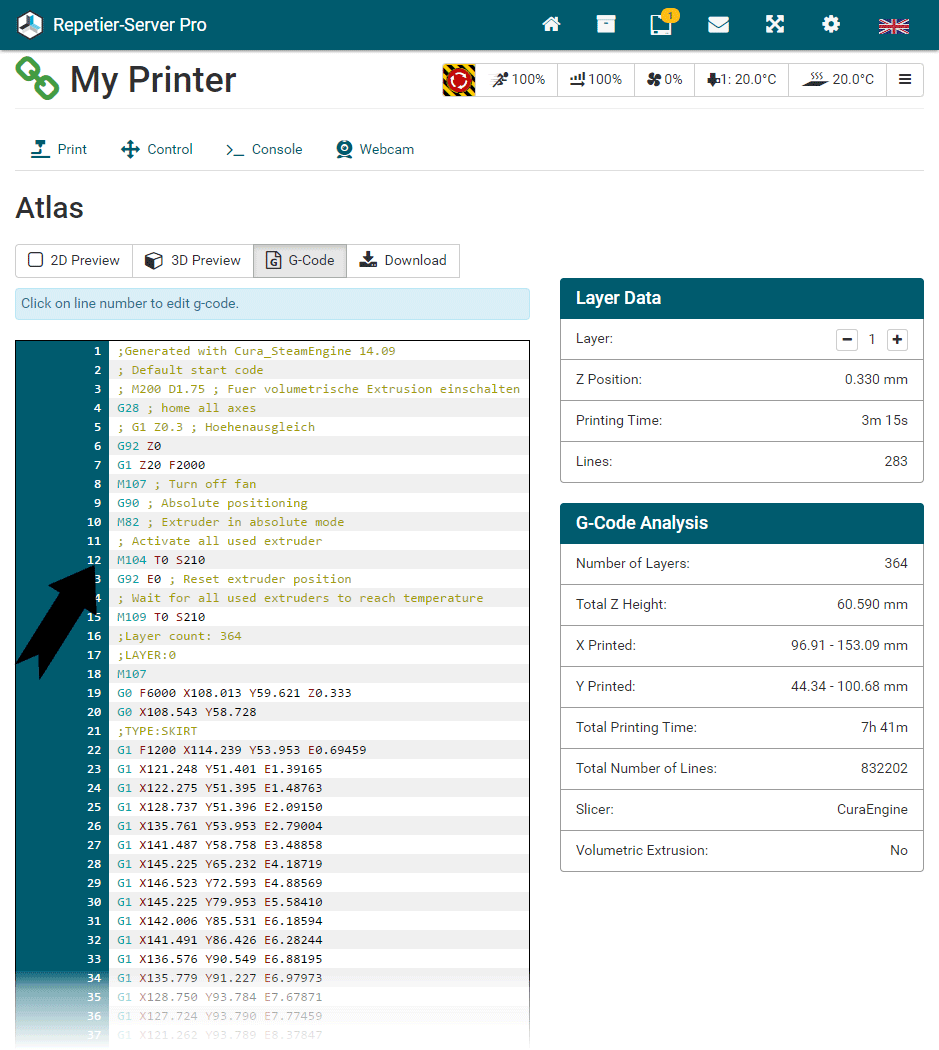
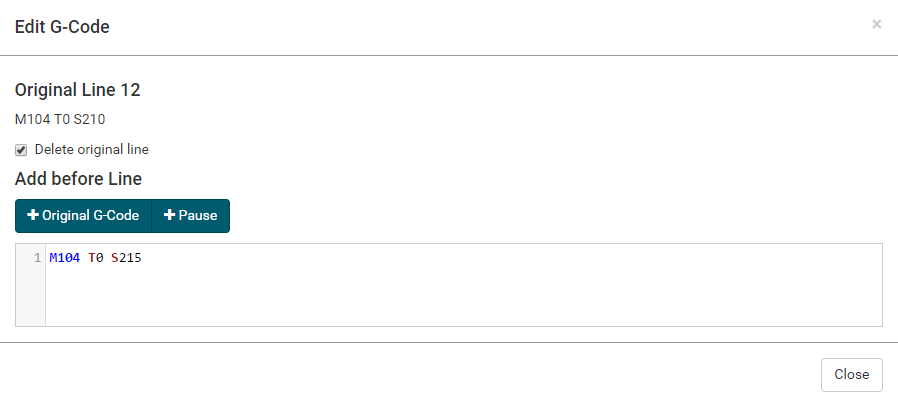
To edit the G-Code, click on the line numer you want to edit. The editor will pop up and show you the selected line. You can choose to remove the line and/or add new G-Code before that line. To edit the selected line, click Original G-Code. This will copy the line and select delete original line. This is useful if the command is correct and you want to change parameters. Pause is adding a pause command.
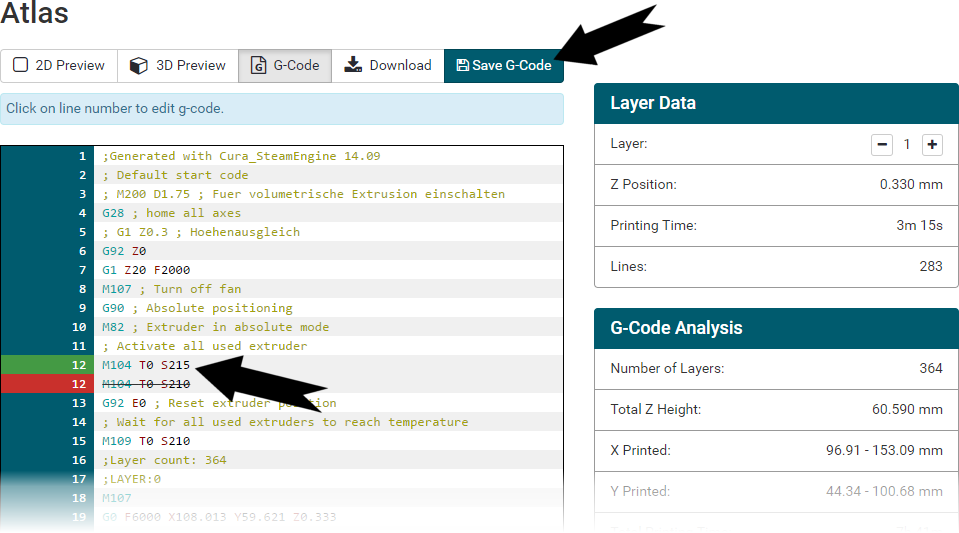
After closing, you will see the changes in the G-Code. You need to press Save G-Code to save this permanently. These changes do not modify the original file. Instead you edit a patch file. For this reason you should limit yourself to small changes. Saving the changes will trigger a recomputation of printing time.
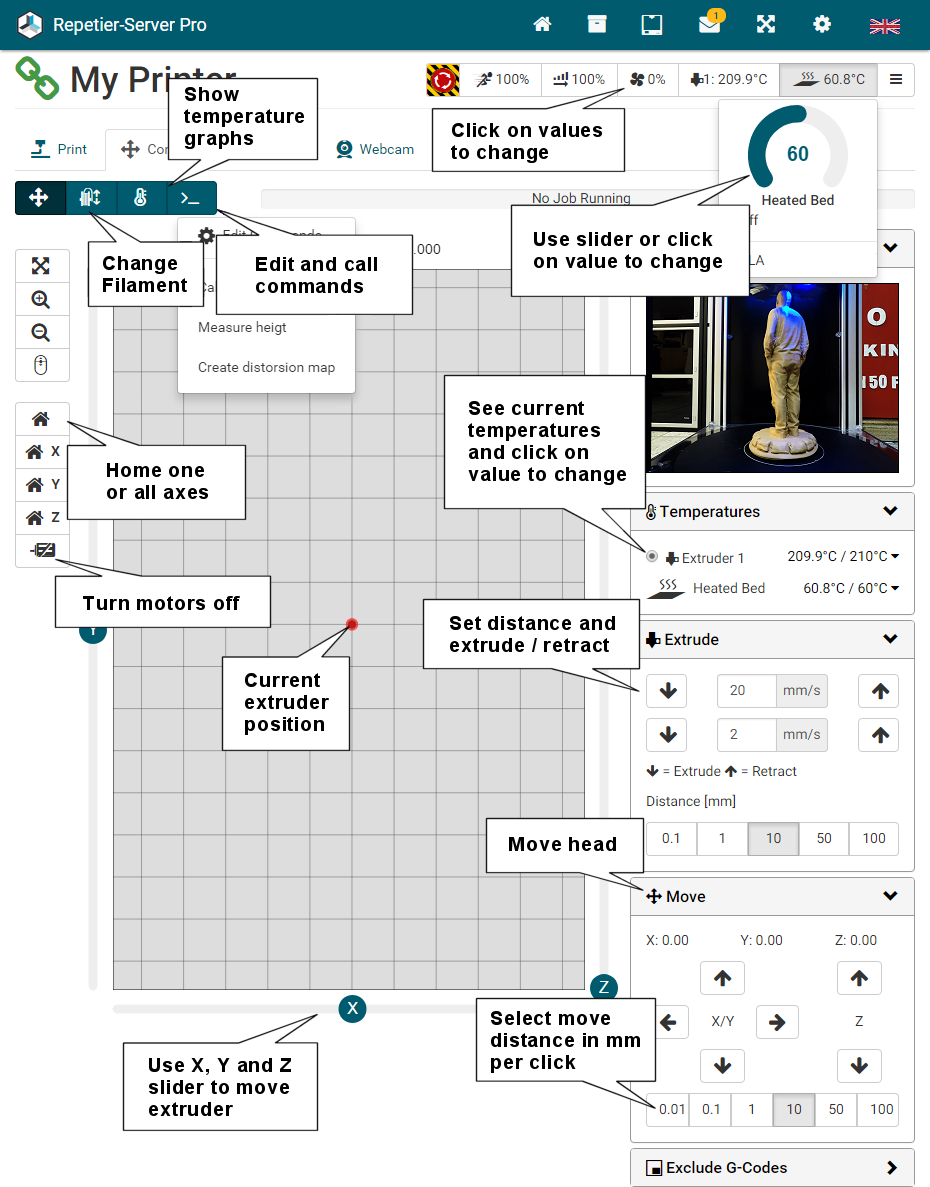
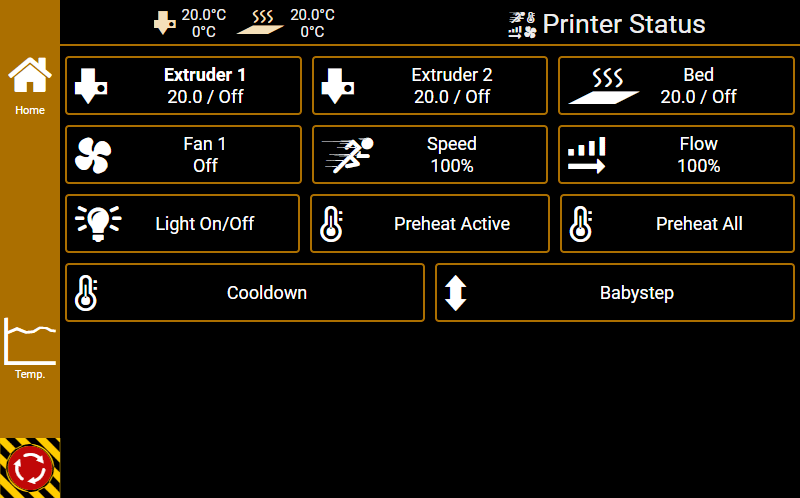
You find these basic controls on all printer pages ( Print, Control, Console and Webcam):

If you click on the respective button, the corresponding control panel will open.
Emergency Stop
In the case of an emergency, a hardware reset is the best and quickest solution. If the printer does not have a reset button or you are not near your printer, you can use our emergency stop button . This will send a M112 command to your printer. The command is not processed until the buffer is empty, it may therefore take a few seconds to affect. For M112 different actions can be set in the firmware. Please test in advance what happens when you click .
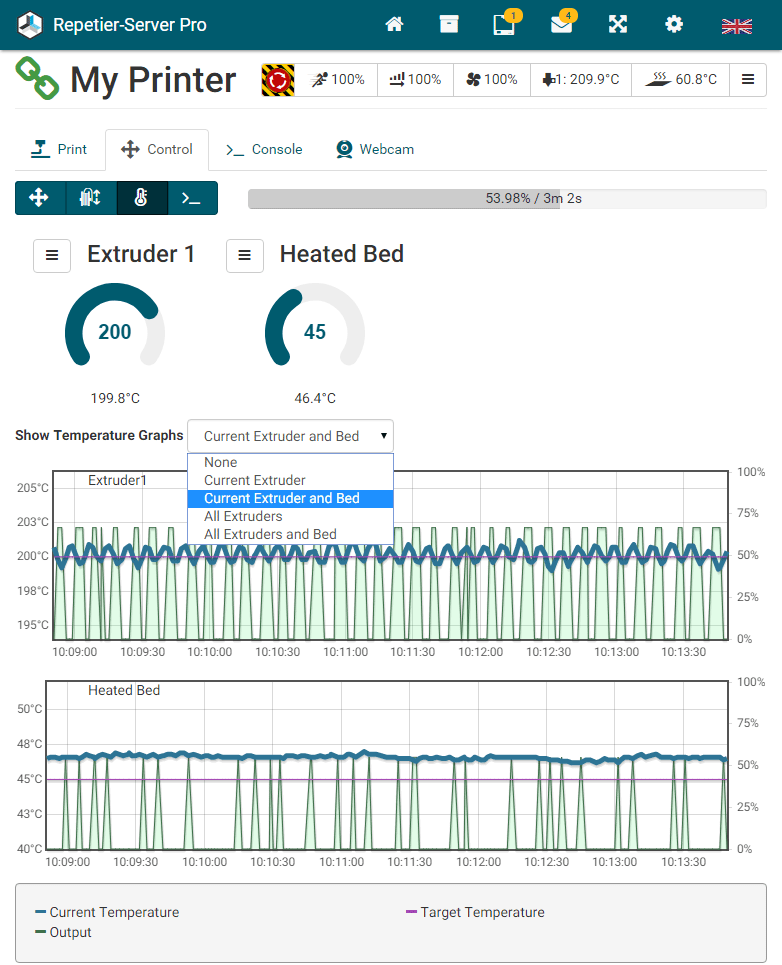
Speed

You can quickly change the speed with the round slider or by clicking on the number in the middle. The speed is relative to the G-Code speed, so 100 means original speed and 150 means 50% faster than planned. Changing the speed will not changed the calculated times correctly. If you have changed your speed, you do not have to change the flow. Increasing speed may reduce the print quality.
Flow

You can quickly change the flow with the round slider or by clicking on the number in the middle. The flow changes the amount of extruded filament. If you see that you get not enough extrusion, you can increase the value. If you see filament piling up to high you should reduce it. Ideally your slicer should contain the right flow multiplier, so that you always print with 100%. If you change the speed, you do not have to change the flow.
Fan

You can quickly change the fan speed with the round slider or by clicking on the number in the middle. If you are printing, the G-Code may contain fan controlling commands which can overwrite your settings. Below the slider you can switch the fan power on and off without changing the value.
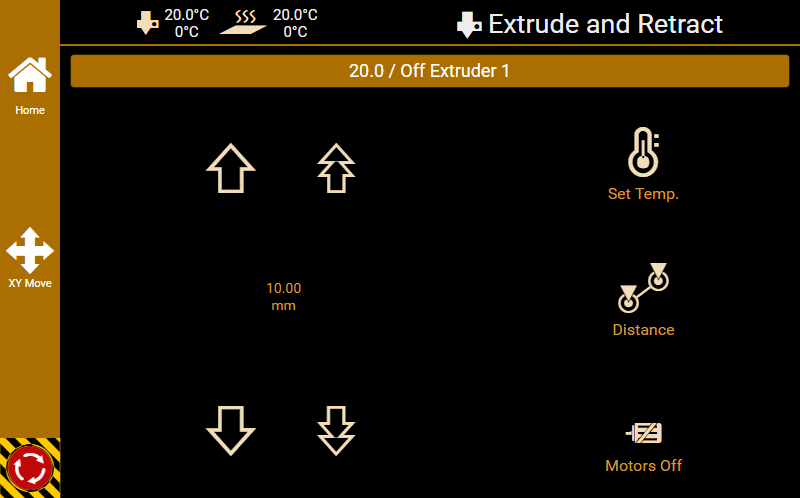
Extruder
You can quickly change the temperature of the current extruder with the round slider or by
clicking on the number in the middle.
If you have defined temperature values in your printer settings, they get displayed below, so that you can
click them directly.
To set these predefined values go to
Printer Settings
Extruder
Predefined Extruder Temperatures.
Heated Bed
You can quickly change the bed temperature with the round slider or by clicking on the
number in the middle.
If you have defined temperature values in your printer settings, they get displayed below, so that you can
click them directly.
To set these predefined values go to
Printer Settings
Extruder
Predefined Bed Temperatures.
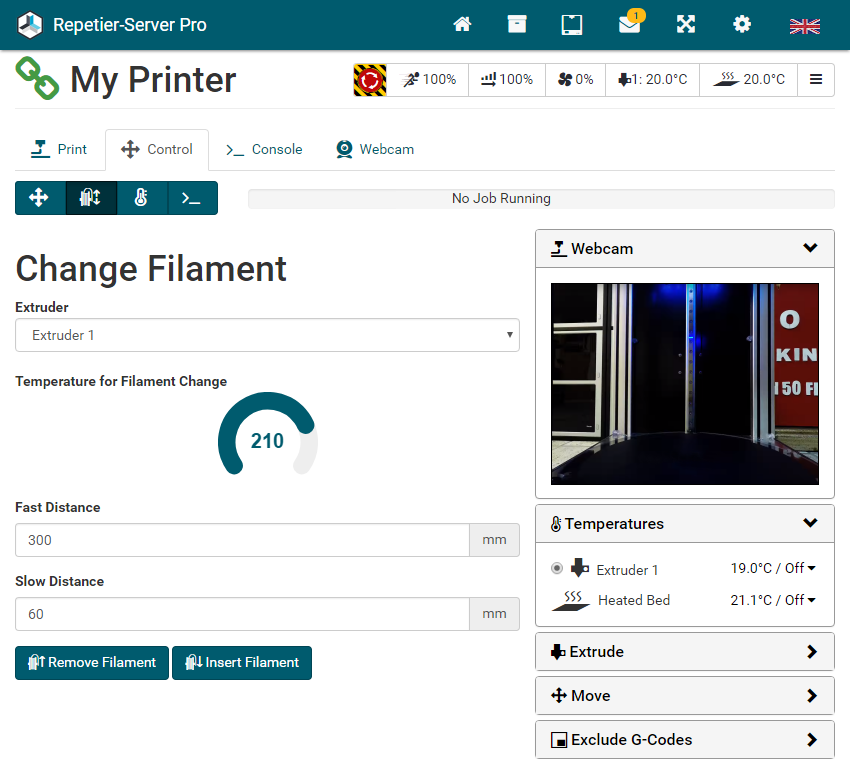
Change Filament
With this function it is easy to change your filament.
- Extruder: Select the desired extruder.
- Temperature for Filament Change: Set the temperature for the filament used. The temperature of the last print is always suggested.
- Fast Distance: If you insert filament, this distance will move first with the retraction speed set for the extruder.
- Slow Distance: If you insert filament, this distance will move with the extrude speed set for the extruder. In case of filament removal, this will also remove fast.
- Click Remove Filament to remove the filament or Insert Filament.
- After selecting Remove Filament or Insert Filament you see an info with the temperature. Click Finished to canel heating. When heating is finished, the insert/remove procedure starts. In case of insert, you have to click the Start button, so you have time to insert the filament. Afterwards you can inser or remove more filament in 10 mm steps if needed.
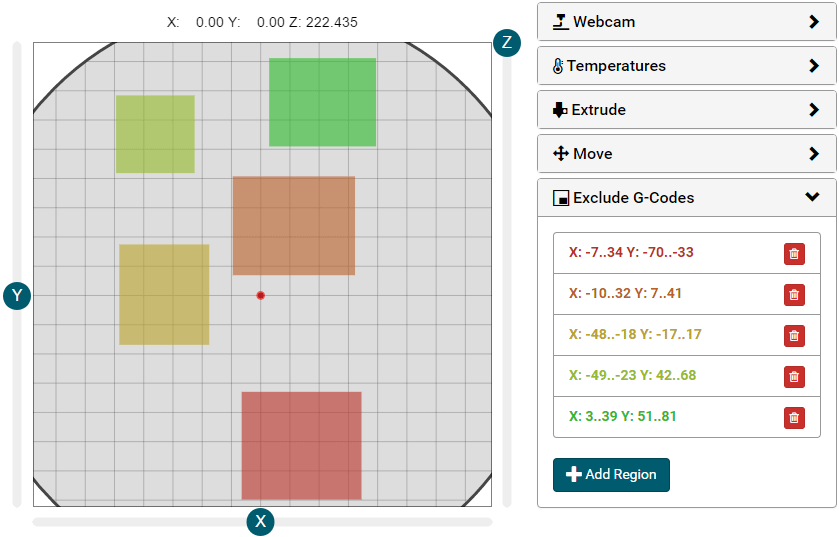
Exclude G-Codes
If you are printing several objects in parallel, it can happen, that one object failes or you just do not need all objects. For this case you can add rectangular regions, where nothing gets printed. Click Add Region to add a rectangle on the print bed while pressing the left mouse button. You can add multiple regions. Each region gets a separate color and is listet with this color in the Exclude G-Codes list, so you can find and delete the corresponding region easily.
You can add new regions anytime before or during print. They take effect immediately after adding. After a print job is finihed, all regions get deleted.
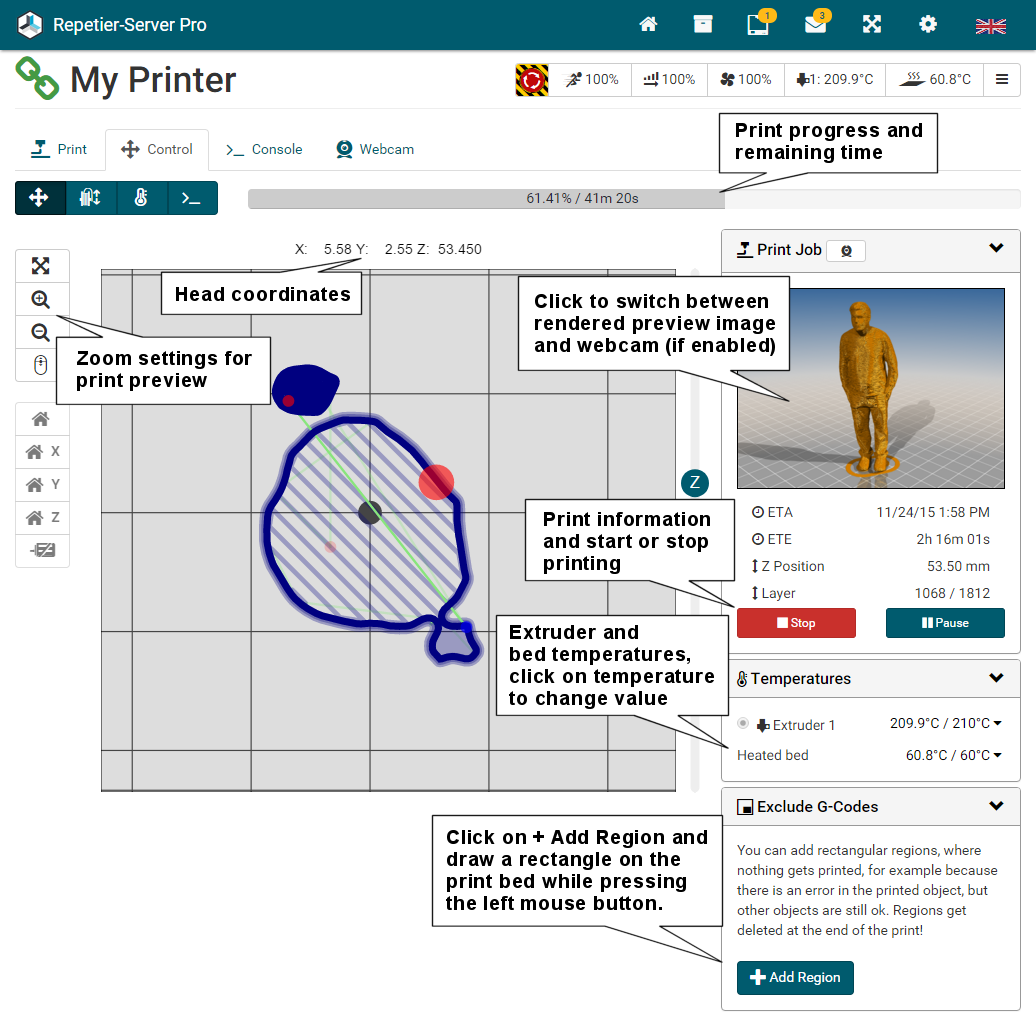
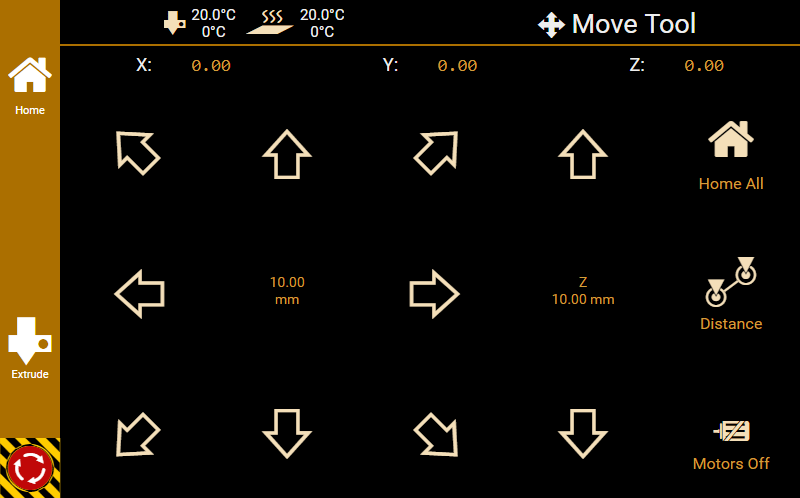
On this page you can control and visualize your printer. The left top shows your print bed with current coordinates. If you are not printing, you also see three sliders which you can use to move your head. Make sure you have homed before you do this!
On this page you find these additional controls:
- Zooms to fit the complete bed.
- Zoom in
- Zoom out
- Enables scroll wheel for zooming.
- Homes one or all axes axis.
- Turns motors off.
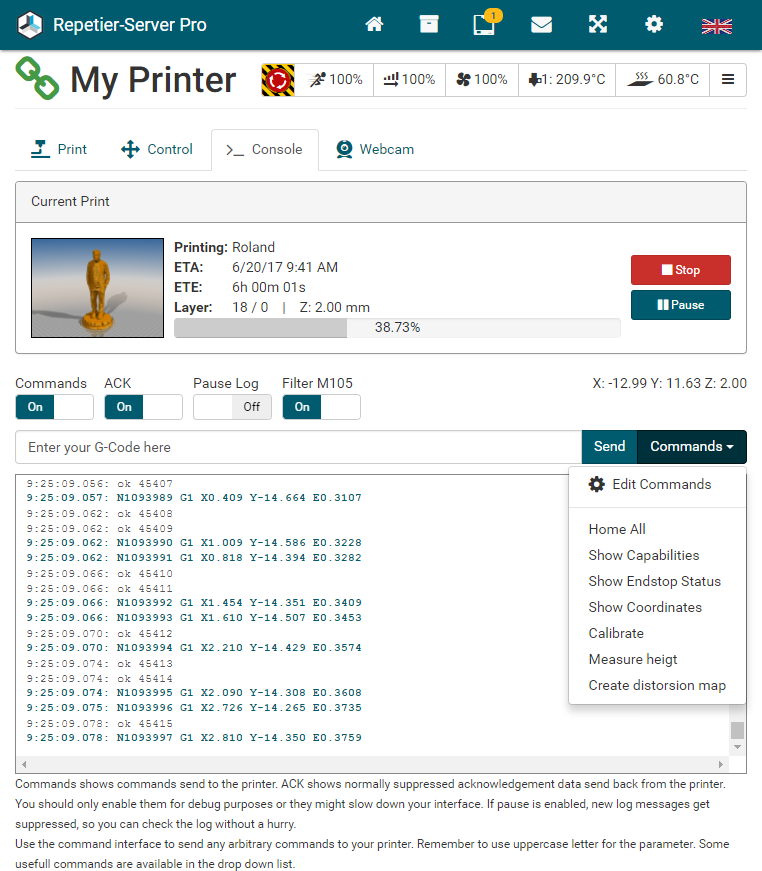
ACK filters background handshake which is normally of no interest.
If Commands is enabled, you will see all comands send to the printer.
The Pause Log switch pauses logging until disabled. This allows you to scroll through the last stored lines.
Below the switches comes the command input. Enter your G-Code and enter Return or click Send to submit your G-Code. The Commands menu allows you to send predefined scripts to the firmware.
Hint: If you need to send a non g-code command, e.g. for firmwares accepting shell commands you need to prepend a # char to the line. In that case, the line will be send 1:1.
Timelapse
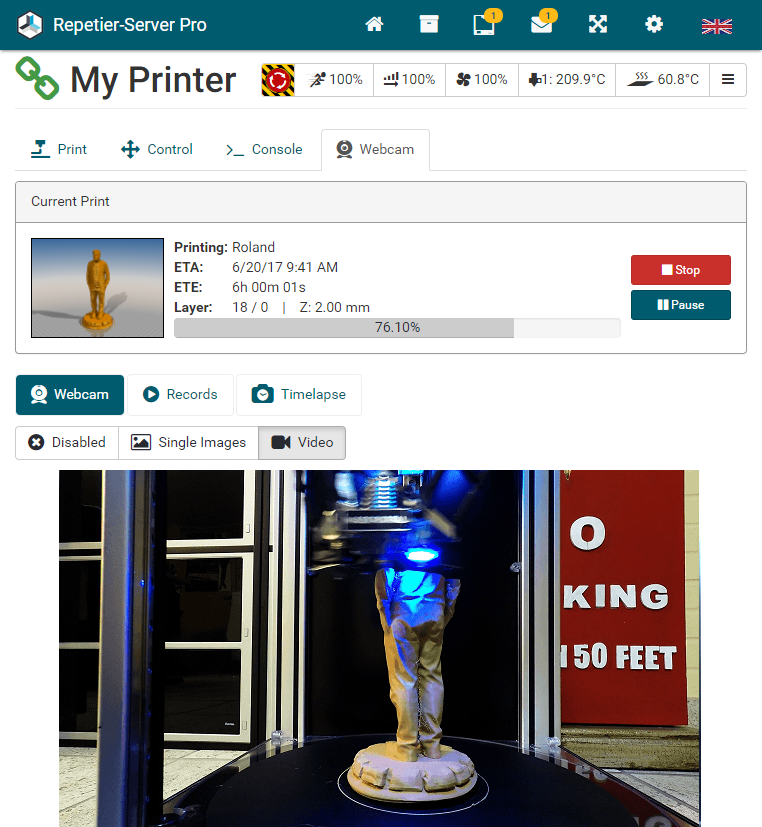
Another really cool feature is our timelapse function. To use this you have to set the Static Image URL for your printer in Printer Settings Webcam (see configurations for Windows, Linux and Mac). Here you also can set the orientation of your webcam ( ), so that it gets displayed correctly.To make timelapse videos click Webcam in your printer and click Timelapse:
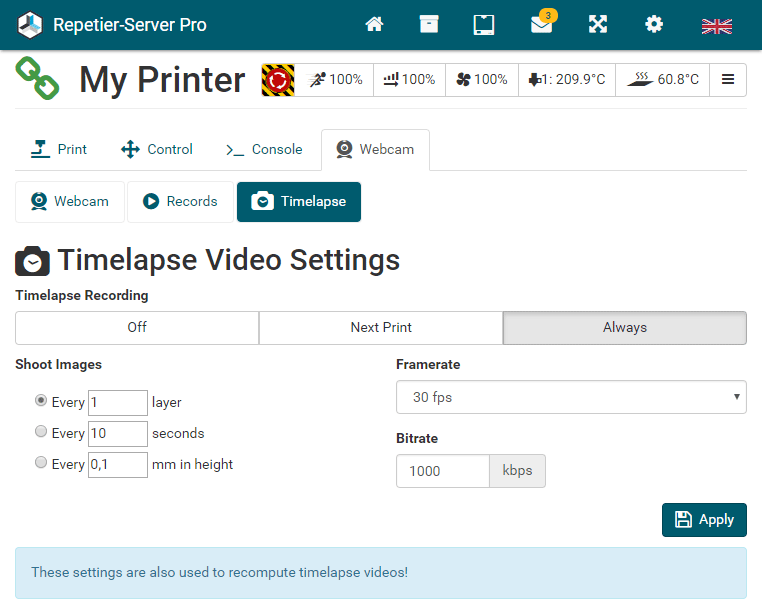
Here you see the Timelapse Video Settings for your printer.
You can set Timelapse Recording to Off (no images get stored), Next Print (only for the next print images get stored) or Always (images get always stored). While capturing the
 image is
displayed on the webcam video.
image is
displayed on the webcam video.
Under Shoot Images you can set how often an image shall be saved. You can can save pictures every x layer, seconds or mm in height. Notice: Every x layer will not work if you print in vase mode.
If you have entered the path to FFMPEG in Global Settings Timelapse, you can define a Framerate and a Bitrate for the generated mp4 video. If you did not install FFMPEG, you can still record images and view them like a video with our image player.
Records
To view, download or delete existing records, click Records .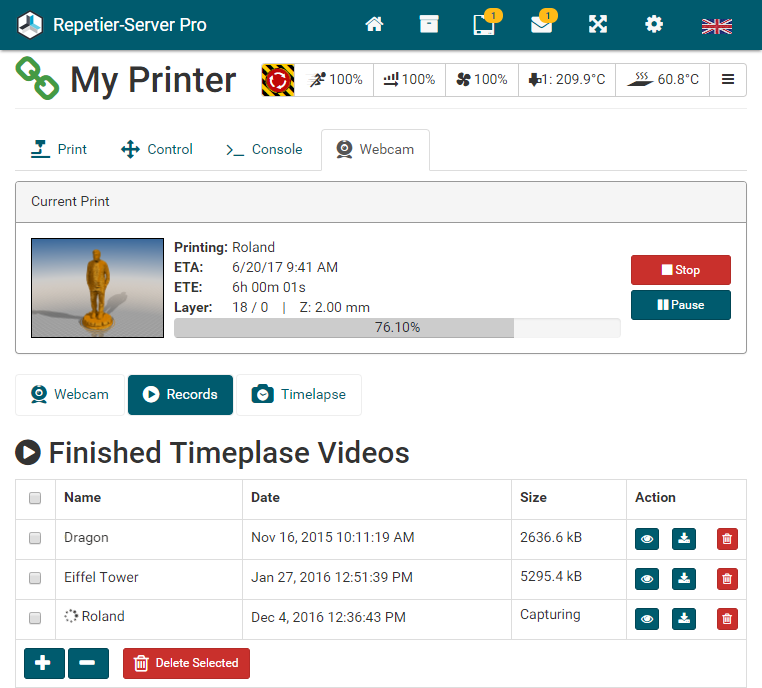
Here you see all captured timelapse videos, images and the current capturing.
View video, images and details
Download mp4 video
Delete images and videos
Stop running record
To delete multiple videos, you can select them and click Delete Selected. Use to select all and to deselect all.
Video
If you click in Records you will see some details and the image video player below.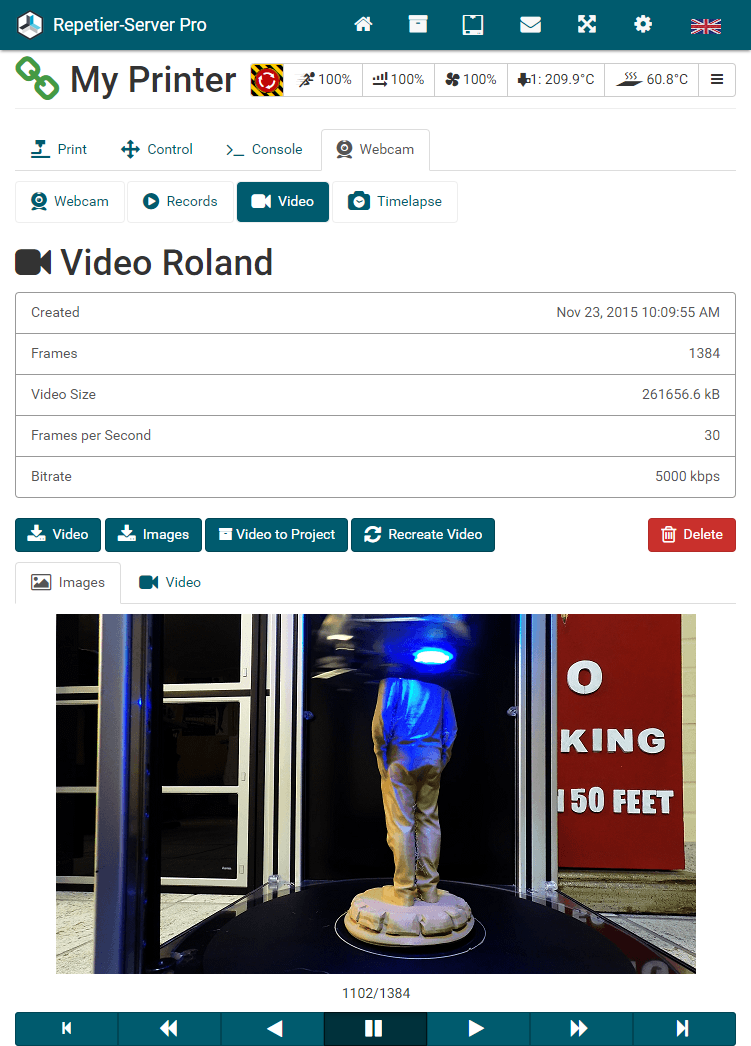
Click Video to download the mp4 video and Images to download all captured jpg images in a zip file. Use Video to Project to copy the mp4 video to an existing project. If you want to render the video with new bitrate and/or framerate settings again, click Recreate Video. Delete will delete the video and all images.
Below you see the image video player, where you can scroll through using the buttons:
Stops playback
Plays the video at normal speed
Plays the video quickly
Plays the video backwards quickly
Shows at pause the next image
Shows at pause the previous image
With Images and Video you can switch between image and video player.
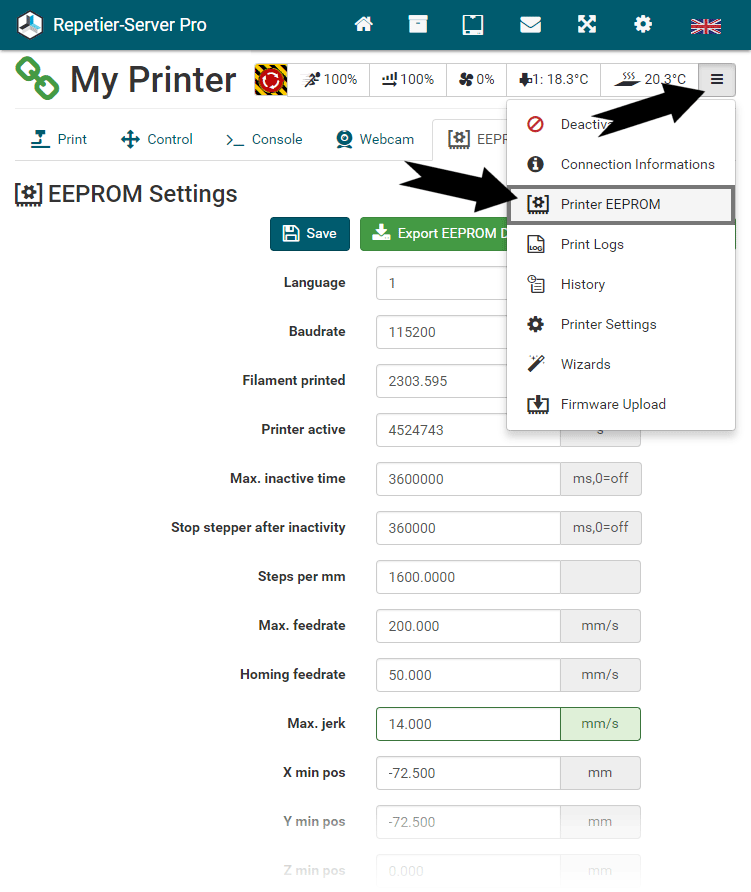
Changed values are marked in green, as long as they have not been saved. Incorrectly entered values he will be marked red. Click Save to save changes.
If you want to change some values, you should export and save your current eeprom settings. Click Export EEPROM Data to save the current settings as .epr file. If you want to load saved settings into the editor, click Import EEPROM Data. The loaded settings that match position and type of the viewed settings will be replaced by the loaded values. To store them into eeprom, click Save.
Repetier-Server has a rescue system, that can help you to continue prints that were aborted due
to connection or power loss. Before you enable this feature in
Printer Settings you need
to understand how this works and how it can be improved.

When the rescue system is enabled and you start a print, it will write an additional file with the extension
.recover, which contains lines send and acknowledged. If a connection is lost it will also mark the exact
position and close the file. A bit more difficult is the case of power loss. If printer looses power the
server will most likely also loose power, so it can not flush and close the file safely. So the last lines send
might be missing and it also depends on the os ability to recover the file. With some luck the firmware
has a power loss detection and can inform the server. If you have told Repetier-Server what the
firmware sends on power loss it will also as fast as possible flush and store the file. If the PSU last long
enough this means we have the last lines saved and restarting is easier. After server is up you will see the
reason for failure. If we were fast enough you will see power loss, otherwise unknown reason.
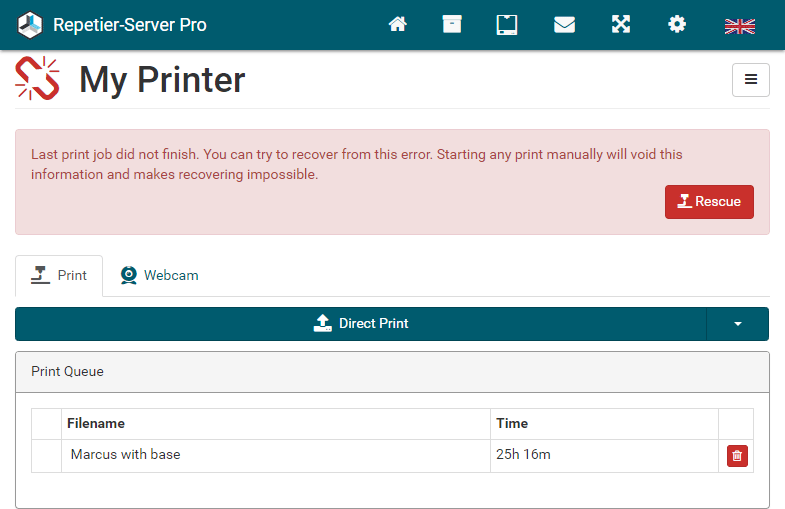
In any case you will see in the web frontend a message that the print failed and you can go to the rescue
page. Meanwhile the server will try to reconnect, enable heated bed and chamber (if configured to do so)
and run a recover connection script. The script is just a entry point to help increasing the likelihood of
recovering the print. For example if z moves easily it might be a good idea to enable motors to prevent z
axis from moving and hence loosing the position. On the other side if you home to z max that makes it easy
to get the right position after failure.
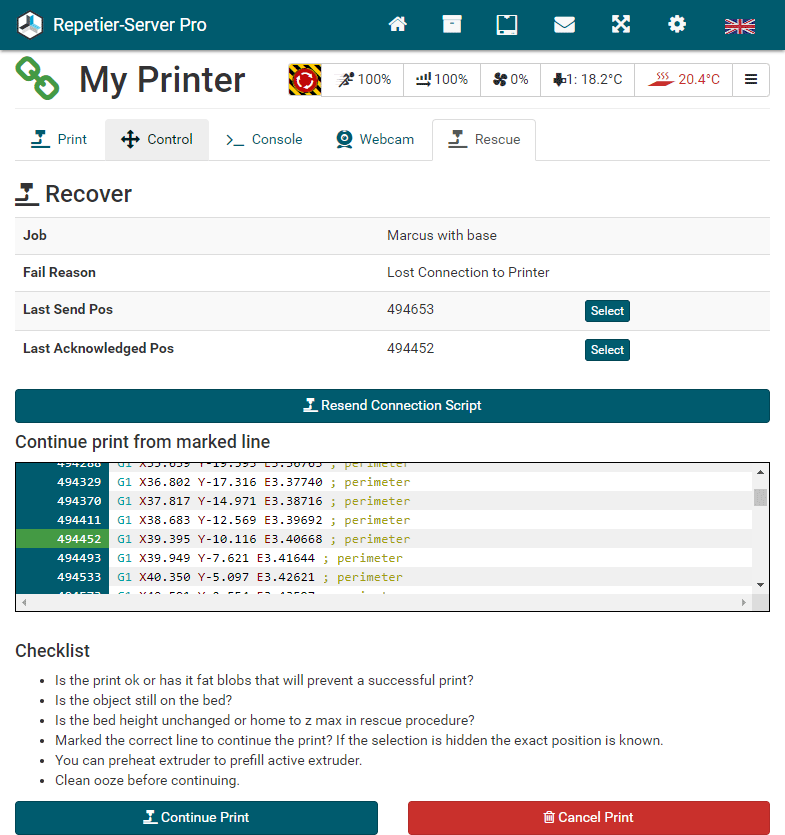
To continue the print, you have to tell from which point to continue. If the firmware supports the host
rescue protocol we might get the last printer position from the firmware and you can not choose. In all
other cases you see the g-code around the time of failure. You can mark last acknowledged and last send
line with a button or click in the g-code listing on the left side to mark a different line. Then make
sure everything is as needed to continue and hit Continue Print. This will replay the
g-code to the marked position internally and only send some state changing commands to firmware. Once the
position to continue is reached the process script gets exectuted and then the normal print will continue. The script
will be called after the last temperatures are set, except if the script contains the command @waitForAllTemperatures,
in that case your own script has to define where to wait and with which tolerance.
Typical actions and problems to think about
- Your printer homes to z-min. This means after a reconnect z is unknown by the printer. So you must guess the right z height and hope z does not change until you continue. Enable z motor as soon as possible. Repetier-Server will send a G92 Zxx to set the Z position.
- Your printer moves to z-max. You can add a home to z max in your connection or process script. That ensures the correct z position when you continue.
- Firmware supports the HOST_RESCUE capability. In that case firmware will store last send position and move the extruder out of the print area. After reconnect it will know the position to continue and also knows the own position. This even allows automatic continue after a failure.
- Firmware moves Z up on power loss. If power loss was recogniced the difference gets corrected it you set the raise distance of your firmware in the rescue configuration. If a power loss was not detected but printer did rise, you need to lower z manually that distance before continuing!
- To ensure correct x and y positions we recommend homing x and y axis in the process or connect script.
- With a cold bed or cold heated chamber your build might get loose. For that reason you can configure the rescue system to enable them on reconnect.
- If your firmware does not proactively help on connection loss/power loss the extruder will ooze on your print and burn a bump into your print. Moving on connect might then pull off the print from the bed. If that can happen it might be a good solution to heat extruder until plastic gets weak and then move up and to the side using x/y homing and down to original z position. Then check the print carefully before continuing. Cut away where plastic gets higher to prevent a crash with hardened plastic.
- Depending on your print and printer geometry you might be able to home to z. In that case it is important to go back to the original z position.
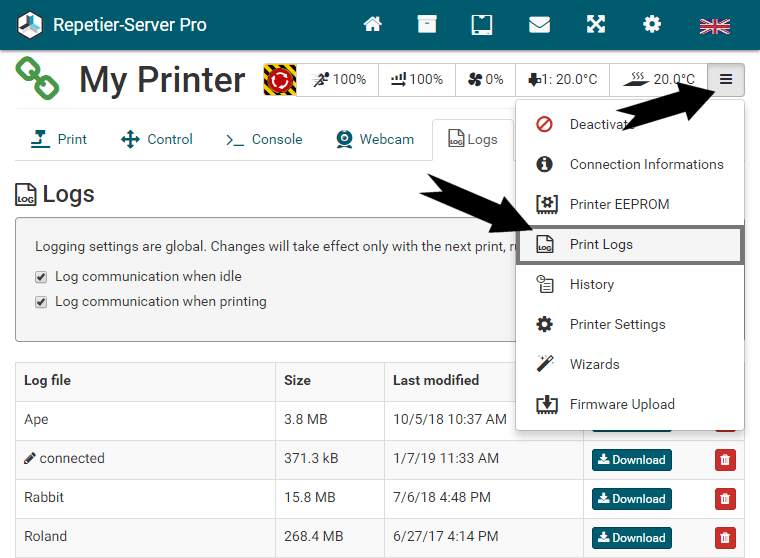
With these printer logs it is easy to find the log which contains the communication you are interested in. The number of logs is limited to 5, so if the limit is reached and a new log gets created, the oldest log gets deleted automatically. The log which is currently being written is marked by a before log name. To see a log you have to download it and watch it with an external text editor. The text file is with unix file separators, so you need a text editor that handles this correctly (not Notepad, but WordPad works).
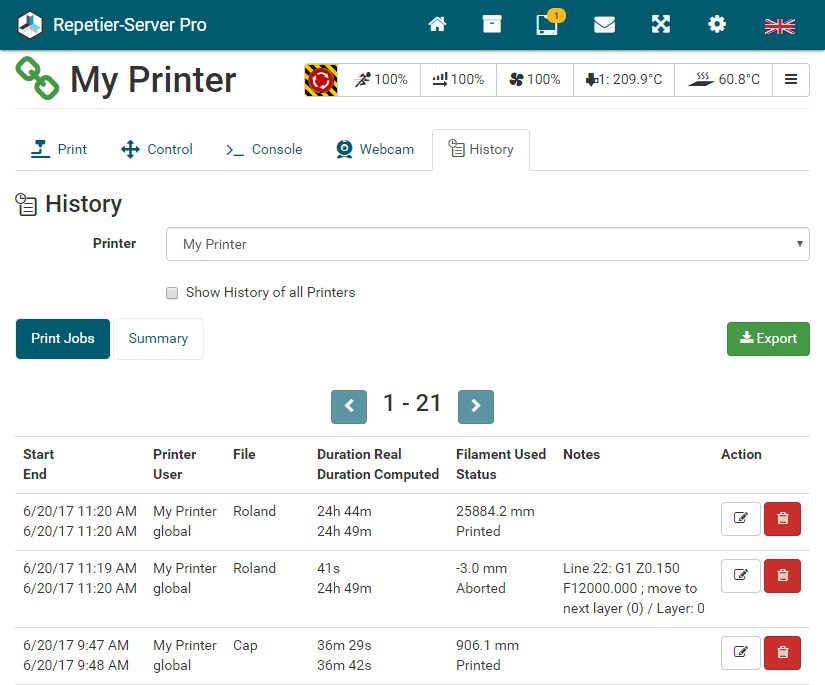
If you have enabled the creation of print reports in Global Settings Print Reports, you will see a pdf icon in the Action column. This will open the pdf report in a new window. The reports look like this:

The achived temperature precision is a statistically analysis of the temperature deviation from the set temperature during print moves. The Avg column shows the average error. The Dev column shows the standard deviation of the error. The following rows show the distribution for different temperature ranges. Inf means temperature deviation is more then 10°C.
In Notable Events you see start, stop, pause and continue events.
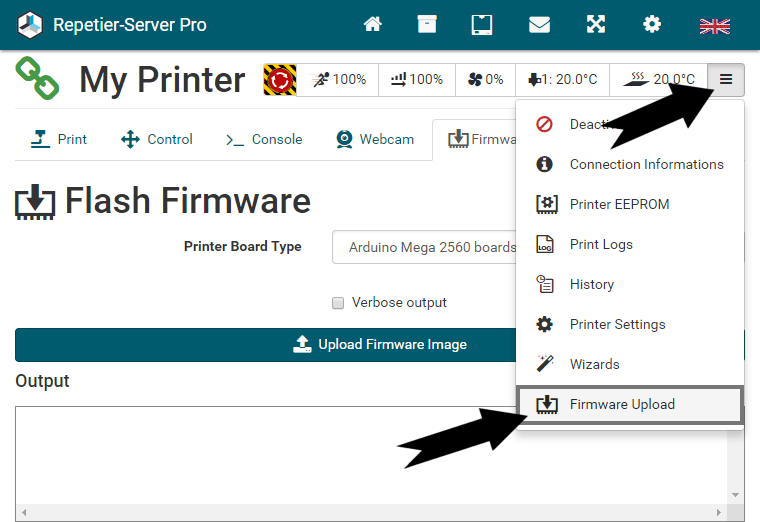
Here you have to select your printer board type, upload your new firmware hex or bin file and wait until it is finished. Firmware updating has never been easier.
Where to get your firmware hex or bin file?
If you have a preassembled printer, you might get it directly from your printer vendor. If you have sources, you most probably need to compile it yourself using the Arduino IDE. Follow the normal instructions for your firmware. The only difference is, that at the end you do not hit the upload button, but the Verify button left to the upload button. This will compile the firmware and create the image file. If you had enabled Show verbose output during compiation in Arduino IDE preferences, the log will show you the storage directory.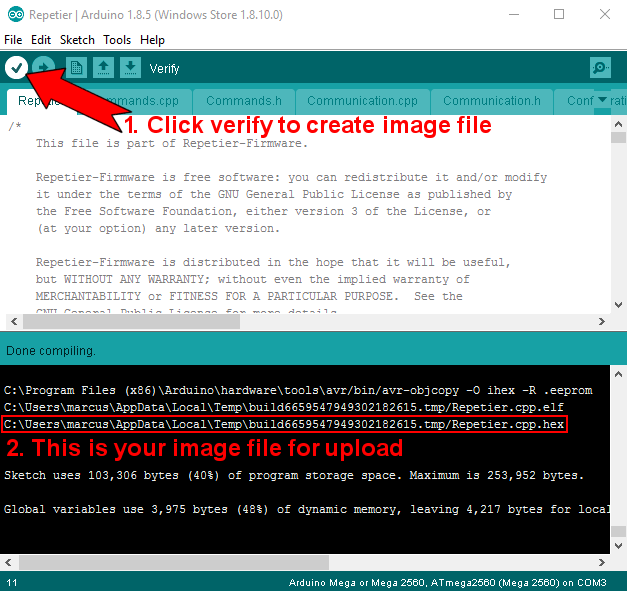
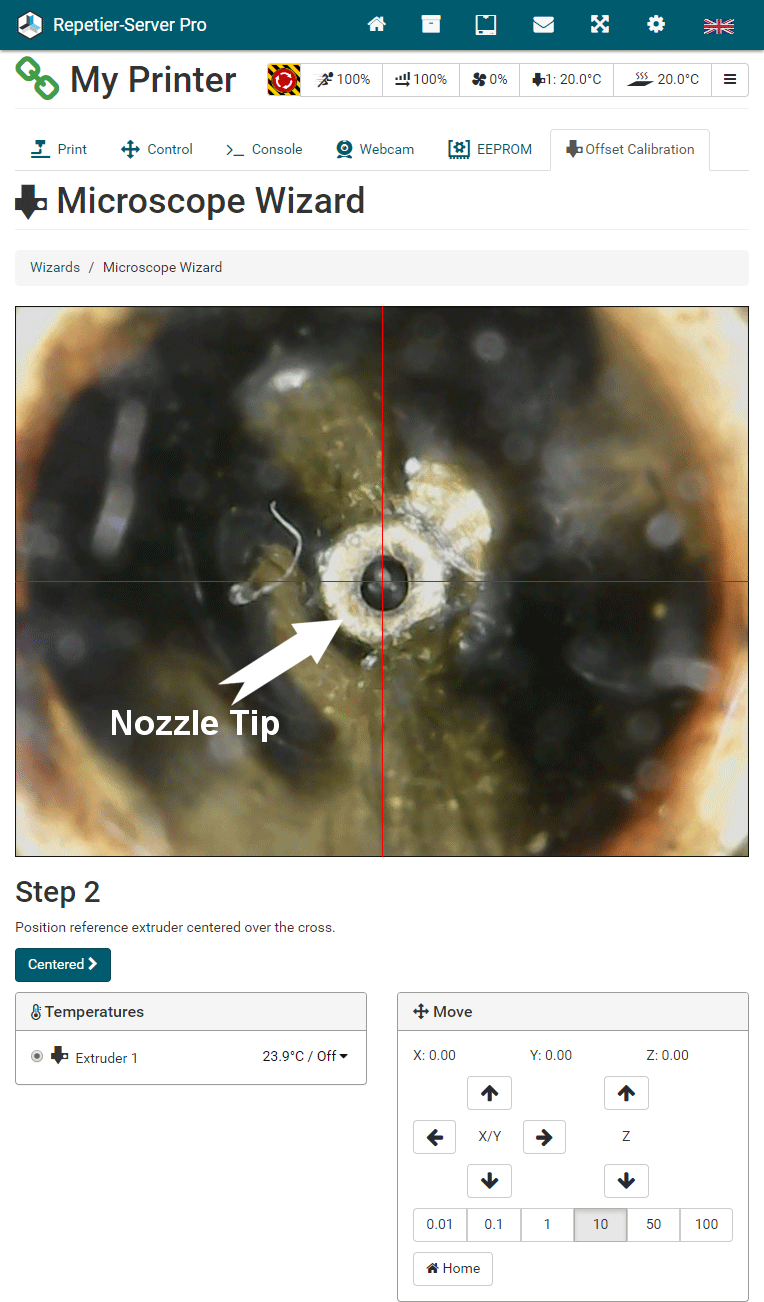
Microscope Wizard
You use a usb microscope mounted on your bed looking upwards. You move the extruder nozzle over the microscope so that you can see the opening sharp and position it to be in the center of the cross. You acknowledge the position and click Centered to switch to the next extruder. Firmware will probably move it but maybe not 100%. You justify it again and click Centered , then we can calculate the error. Depending on your firmware the error then can be corrected automatically or you use the knowledge to fix it in firmware yourself.
Preparations
- Clean both nozzles so that you can clearly see where the nozzle hole is.
- Make sure you have homed your printer and that the microscope does not move. Fix it with some tape. If it moves your data gets wrong, if you do not home you might not be able to after fixing the microscope without hitting it.
- Make sure you have configured the usb microscope in in printer configuration as webcam. We support multiple webcams or if you already have a webcam you can plug in this one often and it still works. Depends on computer and webcam provider.
Projects
In Projects you will find your model manager for stl, obj and 3mf files. You can see projects on alls connected Repetier-Server instances. Click on in the top navigation to open your projects.
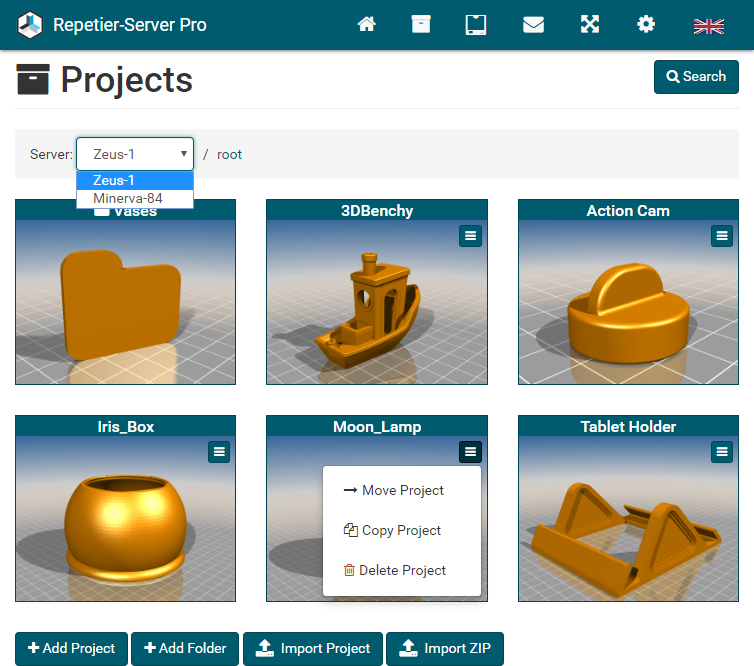
In each project you can manage any number of related 3d models as well as save further files and information, so that you have everything compact and clearly arranged. Projects can be sorted in folders and subfolders. You can use breadcrumb navigation to select connected servers or jump to parent folders.
Click on an image to open the folder or project. Click on the file or folder name to change it.
Using in the preview image you can copy or move the project to another folder or to other Repetier-Server installations and delete the project. Depending on the size of the project, copying and moving may take some time.
Click Search to search in all projects.
Click Add Project to create a new project in the current folder.
Click Add Folder to create a new folder in the current folder.
Click Import Project to import a project, that has been created with Repetier-Server. These files have the extension .rsproj. The advantage of these files is that all files and additional information are contained in the correct format and that everything is already rendered, so that the import is completed very quickly.
Click Import ZIP to create a project named like the ZIP file that will contain all included files. This works great with ZIP files you downloaded from thingiverse.com, youmagine.com or other model repositories.
If you have opened a project by clicking on the preview image you will find the rendered images and the uploaded images with sliders above.
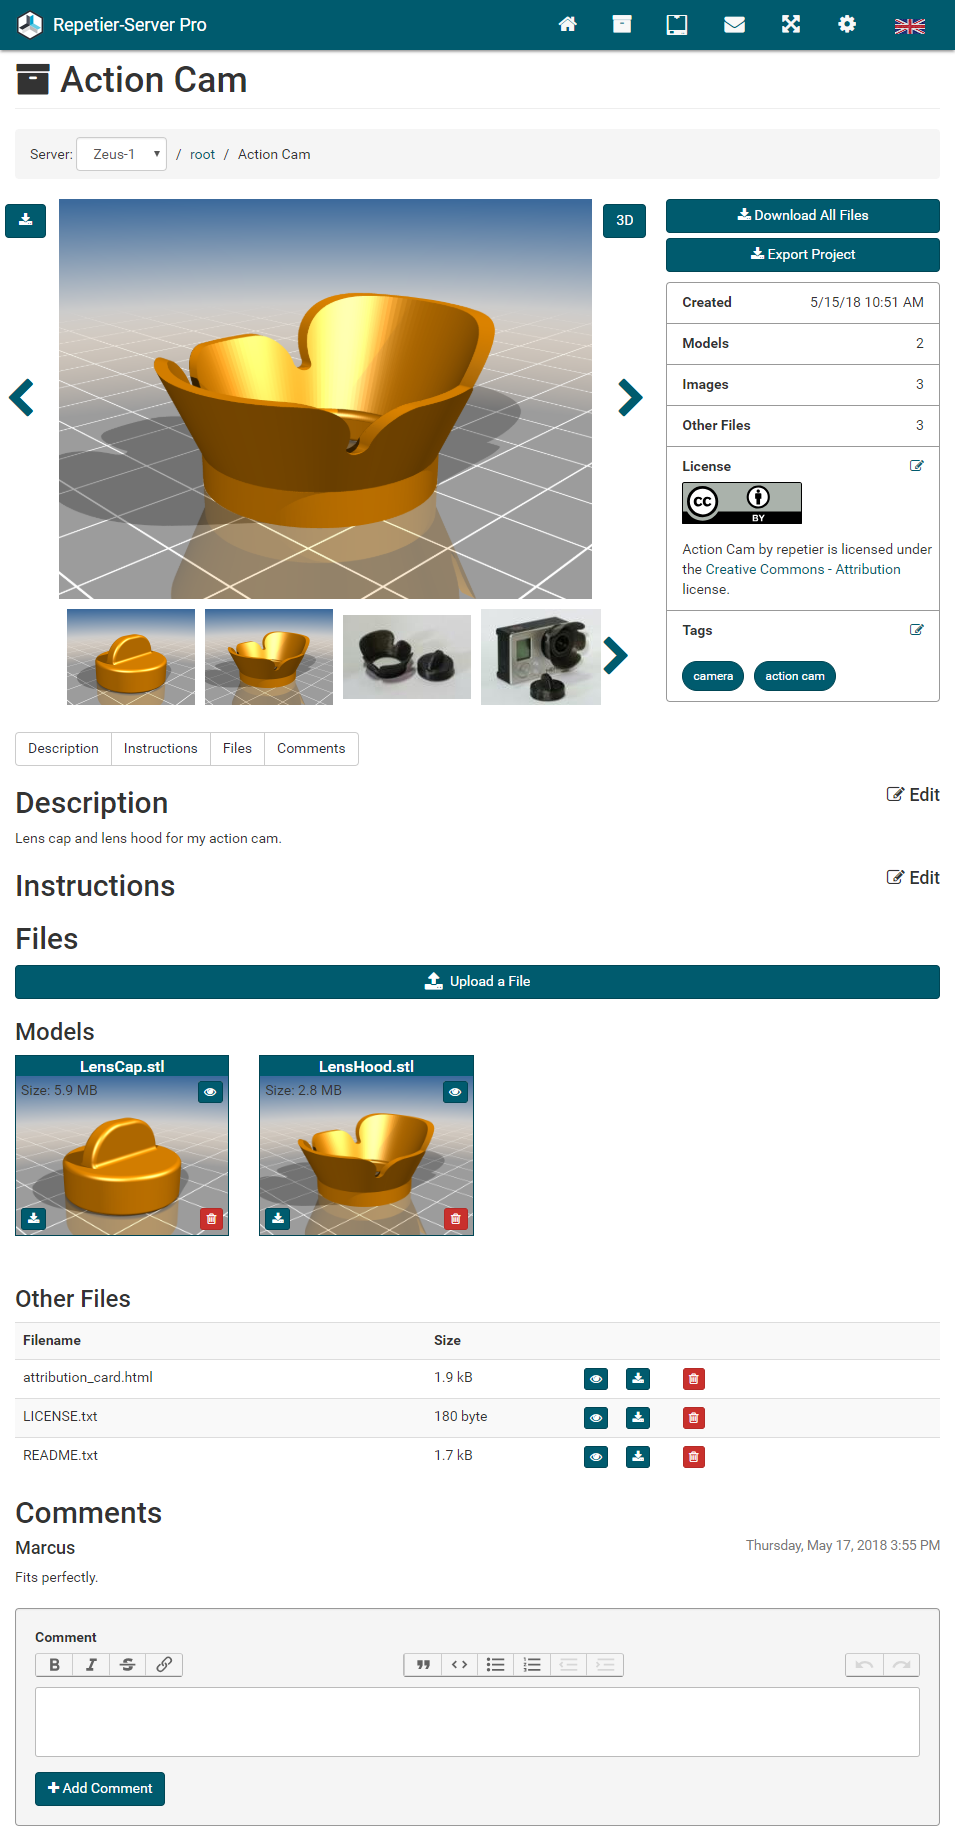
Click to download the image and 3D to open the 3d view of the model.
In the 3D view you can rotate the object by holding down the left mouse button. To move the object, hold down the right mouse button. Use the mouse wheel to zoom in and out. With the elements of the 3d view you can switch autorotate on and off, center the object, change the object color and switch to full screen view.
Click Download All Files to download a ZIP file with all uploaded files of the project. The rendered images are not included. After clicking the button, the download will start automatically after a while, depending on file size and computer speed.
Click Export Project to download a .rsproj file with all uploaded files and all data. After clicking the button, the download will start automatically after a while, depending on file size and computer speed. The advantage of these files is that all files and additional information are contained in the correct format and that everything is already rendered, so that the import is completed very quickly.
You can set a license and add some tags to find this project afterwards.
You can also set a description of the project and instructions.
Click Upload a File to upload any file. If you upload a stl, obj or 3mf model, a preview image is created. This can take some time. This work can be outsourced to a more powerful computer (see Global Settings Connectivity Alternative Servers). Uploaded images will be shown at the top. All other files will be listed at Other Files. If you upload a html, txt, pdf or mp4 file, you can open them by clicking on .
All uploaded models are shown at Models. Click on the model name to change it. To download it click . To set a rendered image as project preview image click .
At the end everyone who has access to the project can leave a comment. If no users are configured, an author must always be specified; for logged in users, the name is set automatically.
With our search you can keep track of all projects and find them even in large collections.
You can search specifically for tags. The most common are proposed directly.
In the normal search, project names, file names, descriptions and instructions are searched. You can combine tag and normal search. The corresponding project is always displayed as a search result.
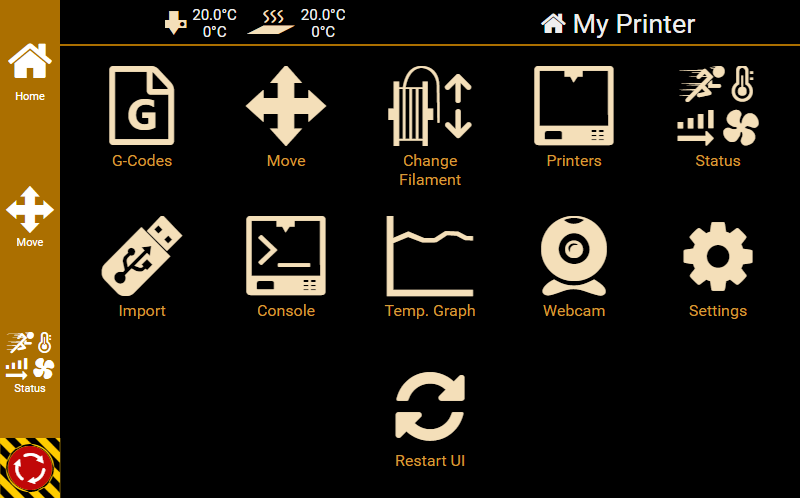
Advanced Themes
If you have a printer with touchscreen, the operability of the regular pages of Repetier-Server can be too complicated and depending on hardware and screen resolution too complex and memory intensive. For this reason we have developed a customized interface for common touchscreen sizes with different resolutions.
You access the touchscreen web page at: http://localhost:3344/modules/front2/app/app.html/
Currently, the following screen resolutions are supported:
- 320 x 240 px
- 480 x 320 px
- 640 x 480 px
- 800 x 480 px
- 800 x 600 px
- 1024 x 600 px
- 1024 x 800 px
- 1280 x 800 px
To use this touchscreen interface, you need a brwoser that supports Flexbox (e.g. Firefox, Iceweasel or Chrome) and run this browser in fullscreen mode. If you are a printer manufacturer and need a different screen resolution, please contact us, then we can add other resolutions.
The surface fits automatically to the display resolution and can be operated intuitively. The design can easily be customized with HTML and CSS knowledge, which is particularly interesting for printer manufacturers who want to offer this with their own branding. More about adapting can be found on our website.
Notice: Since the cheap mini PC Raspberry Pi is very popular and there are a number of touchscreen monitors for this, we have created two special images, which differ on the following points from the standard Jessie distribution:
Version 1 (without display):
- Repetier-Server is pre-installed
- Proxy is configured so that no :3344 is necessary in the URL
- Webcam Server prepared and easily configurable from the server
- avconv to create time-lapse videos is already installed and configured
- WLAN configuration is from the server possible (if a wireless device is present)
Version 2 (with touchscreen display):
- All functions of version 1
- Starts Repetier-Server automatically with touchscreen interface
Here you can download our Raspberry Pi images.
Deprecated Touchscreen Interface
Since version 0.80 we have a complete rewritten touchscreen interface. The old version is only included for backward compability and will get no more updates.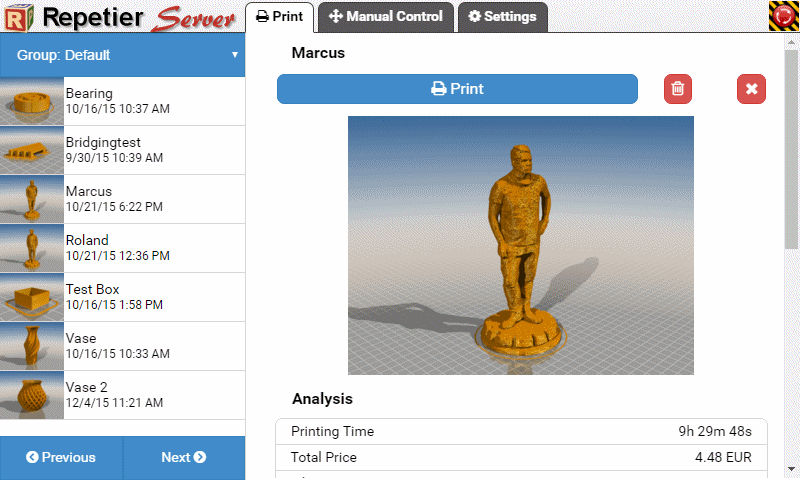
The surfaces are optimized for the selected resolution and can be operated intuitively. The design can be easily adapted in size and design with HTML and CSS knowledge, which is particularly interesting for printer manufacturers who want to offer this with their own branding. More about adapting can be found on our website.
The touchscreen web pages can be accessed at the following URLs:
800 x 480 pixels: http://localhost:3344/mod/front/800x480/index.html
1024 x 600 pixels: http://localhost:3344/mod/front/1024x600/index.html
1024 x 800 pixels: http://localhost:3344/mod/front/1024x800/index.html
1280 x 800 pixels: http://localhost:3344/mod/front/1280x800/index.html
Important: As soon as a user has been created, the touchscreen interface can only be accessed with http://localhost:3344. For all other IP addresses automatic authorization is missing.
Note: Repetier-Server runs smoothly on Windows tablets like Dell Venue 8 Pro. Since the resolution relative to the size is very high, this can partially better be handled using this touchscreen inteface.
On this page we show you how to set up a Linux pc like Raspberry Pi to boot and start the front end on a connected display.
Calling External Commands
Sometimes it is usefull to be able to call some external commands from the web interface. For example if you are running the server from a Raspberry-PI and want to shut it down, it would b econvenient to do so savely without opening a ssh terminal. For that reason you can extend the top right menu with external commands, which then appear there. On the other side you might want to run some commands on special positions of the print. The server therefor has the @execute command allowing to call an external programm. For security reasons it is not possible to call arbitrary commands. Instead you have to write a extcommands.xml file which you drop in your databbase subdirectory inside your storage directory (see installation where this is for your os).
Below you see an example of such a code. After adding/changing the file, you need to restart the server. Make sure your file keeps valid!
<config>
	<!--
       If you want to run external commands, enter them in this configuration with
       full path. You will see them in the main menu. Copy this file into the
       <storage>/database directory.

       Security consideration: The reason there is no online editor for this is simply
       security. The commands you enter here are executed with the privileges of the
       daemon running the server. If you would allow online configuration, a hacker could
       simply add any command he needs to hack your system.

	     Commands are normally visible in the global menu. If you want one to appear only in
	     in the printer menu, add the attribute "slug" with the slugname as value to command tag
       where it should show up. You see the slugname when you select a printer as part of the path.
    -->
	<command>
		<name>Shutdown Server</name>
		<execute>sudo /sbin/shutdown -h now</execute>
		<confirm>Really shut down the server?</confirm>
	    <!-- Define if command should show up in local printer interface, default true.-->
		<local>true</local>
	    <!-- Define if command should show up in remote printer interface, default true.-->
		<remote>true</remote>
	    <!-- Define if command should show up only for users with print permission, default true.-->
		<print-permission>true</print-permission>
	    <!-- Define if command should show up only for users with add files permission, default false.-->
		<add-permission>true</add-permission>
	    <!-- Define if command should show up only for users with del files permission, default false.-->
		<del-permission>true</del-permission>
	    <!-- Define if command should show up only for users with configuration permission, default false.-->
		<config-permission>true</config-permission>
	</command>
	<command>
		<name>Reboot Server</name>
		<execute>sudo /sbin/shutdown -r now</execute>
		<confirm>Really reboot the server?</confirm>
	</command>

	<!--
        G-code files can contain
        @execute cmd param1 param2
        commands. To prevent external users from executing unwanted or dangerous commands,
        only commands defined here are allowed to execute. More over, only the shortcuts
        defined here are to be used as cmd in @execute. Prevent parameter where ever possible.
    -->
	<execute name="play" allowParams="true">/usr/bin/afplay</execute><!-- play the sound file on moc os x -->
</config>
The commands in execute tag are executed asynchronously be default. That means the server will not wait for them to finish and directly continous sending g-code. Normally a good thing as it does not disturb the print. In case you want the server to wait for the command to finish, e.g. because you wait for some starting condition you can add the attribute sync="true". In that case you also have the option to stop the print if the returned error code is not 0. To enable this add attribute stopOnFail="true".
All commands get executed with the user account and privileges the server daemon runs. So if you want to allow it to shutdown your computer, you need to add RepetierServer to the list of allowed users. To do this, open a shell and enter the following commands:
# sudo -s
# echo "repetierserver ALL=NOPASSWD: /sbin/shutdown" > /etc/sudoers.d/repetierserver-shutdown
Often users have problems adding new commands on linux. Here are some common pitfals that we know users run into:
- Changes are only available after a restart of Repetier-Server, see installation section for how to do this.
- Commands are executed with the username Repetier-Server runs. On Linux this is normally repetierserver. Make sure the complete path to your executeable is accessible for other users.
- Use an absolute path to the executeable. It gets started from a different path so local or relative path will often not work.
- The script must be executeable, so make sure the executeable flag is set: chmod a+x filename
- If a script requires root permission start it with sudo and make sure that command is in the list of allowed sudoers for repetierserver just as shown in the shutdown example.
- If you add parameters to teh script in @execute, you need to set allowParams true. This can be a security risk if you execute gcodes from external sources!
Alternative Startup Configuration Settings
By default the installer creates a startup configuration file RepetierServer.xml, which defines most important start parameter like storage location and a port to listen to. Because this gets overwritten with each update, we provide a mechanism to change these parameters permanently. In addition to this config file, the server tries to load two more config files if present. These files are RepetierServer-extra.xml at the same location where RepetierServer.xml resides (installation directory/bin/ for Windows and intsallation directory/etc/ for Linux and Mac) and storage directory/database/RepetierServer.xml.Sometimes you might want to initate actions at special positions of the G-Code beeing send. To allow this, you can add server commands inside the code. Server commands start with @ or ;@. Use the latter if the code should also woek without the server. Then it would be handled as a simple comment and gets ignored. You can also send these commands over the console panel.
@pause some text
Use this to pause at a predefined position. Add some text to give a hint on why you did pause. If push messages are enabled for pauses you will get also a message on your smartphone. Depending on your configuration this will disable extruders and heaters after a while.
@pauseNoCooldown
Like @pause but no cooldown of extruders even if set.
@pauseExtruderCooldown
Like @pause but with immediate extruder cooldown.
@pauseFullCooldown
Like @pause but with immediate extruder and heated bed cooldown.
@message some text
Puts the message into the message queue. Usefull to get some timings or why ever you might want a message.
@pushmessage some text
Sends a push message if enabled with the text.
@execute cmd param1 param2
If you have set up a extcommands.xml with some execute statements, you can run them with @execute. cmd should match the name given with name attibute. Additional parameters are only added if this was allowed in extcommands.xml.
@@quickCommand name
Executes the quick command with given name.
@isathome
Marks the current position as at home coordinates. Usefull if your printer has no endstops yet.
@kill
This command tries to reset the printer with the DTR/RTS signal toggle. Not all printers can be reset that way!
@waitForAllTemperatures maxDiff
Will wait for all set temperatures to be within the given difference. If maxDiff is omitted, the last or default value gets used. This will only prevent the running job from being executed while manual commands can still be send!
@cancelWaitForTemperatures
Will cancel any existing wait for temperatures.
@make_snapshot webcamId
Makes a snapshot if timelapse is enabled. webcamId is the webcam to use starting at 0. For 0 you can omit the number.
@getip
Writes the IP address on the LCD display.
@skip count
Skips count following lines. If count is omitted only the next line will be skipped. This may make sense if you can solve problems with gcodes or server commands. E.g. if you want a firmware side pause if printing from sd card and a server injected pause if printing over the server. Then ;@skip would skip the gcode and the following ;@pause would make the pause. Printing from sd card all lines starting with ; get ignored anyway, so no action on ;@ server commands.
@adderror
Creates a communication error.
@autostart_next_job
Starts the next job in the print queue automatically as soon as the currently running job is completed.
Note: This is intended for printers that clear the bed automatically, because otherwise it will
be printed on the full printing bed, which can cause damage!
@stop_next_autostart
Disables @autostart_next_job.
@debugcon
Displays important communication variables.
@explaincom
Send this to log extended communication behavior. Send it again to stop it.
@syncMotion
Normally the printe rbuffers commands and in addition also moves. So you never know exactly where the tool is or when a command will be executed. @syncMotion will send so many wait for end of move commands that it is guaranteed, that the next command will be executed as next command with tool at the last commanded position. The price you have to pay is, that the tool will come to a full stop.
Timer related commands
The server has a job timer for each print. You can set, report and wait based on that timer. By default the timer is initialized to0 when a job starts. Unit is milliseconds!
@reportTimer msg
Reports the current timer value. Will add msg if you need a hint to the meaning of the output.
@setTimer [value]
Sets timer to a new value. Default value is 0.
@waitForTime value
Stops executing new commands until timer is higher/equal the given value.
Conditions
The server allows a limited amout of conditional commands that exclude some code from execution. These commands should be used with care as they can modify computed times and might get executed wrong in the case of a replay during rescue operations. It is allowed to next several conditions. Make sure that all @if... commands have a matching @endif. You can not send @if ... @else and @endif in the console. They will be ignored.
@ifTimerBelow value
Executes the included code, if the current timer value was below the value. Can be used to add extra pauses with @waitForTime.
@else
Executes the following block if the last @if condition was false.
@endif
Finishes a @if block. Every @if block must be finished by exactly one @endif line.
@resetIfStack
Removes all stored and active @if conditions. Is only to get back into a working state if @endif was forgotten somewhere.
@reportIfStack
Reports active @if conditions in log. Only used to debug problems with unclosed @if commands.
Rendering Commands
Rendering commands have no influence on the print itself. They only influence how the G-Code renderer creates the preview images.
@nosize
Ignore next print moves for object size calculation. This is interesting if you make a extrusion at a fixed position. Then the server will include that into the size and that may lead teh rendere to show a much too small object.
@size
Stops the @nosize command from neglecting size computation. Never forget this if you use @nosize. They should always come as a pair.
@extruderColor <extrId> #RRGGBB
Forces the G-Code renderer to use the given color for extruder ID (extrID). Extruder ID starts with 0 for extruder 1. Example: @extruderColor 0 #ff0000
Sometimes it is necessary, that the firmware can report results or requests to the connected hosting software. Just think of temperatures or fan speeds. Apart from these typical responses, the need for special solutions may arise. Therefore Repetier-Server supports special responses and also has a flexible system to adjust expected answers. In the installation directory is a directory firmware where a definition of special responses is given. If you have a fork with different messages, it is possible to adjust this in the proper firmware file. Special cases are defined below.
Disable printer
In some heavy error cases you might want that the server disables a printer, so it does not try to reconnect. To achieve this, the firmware needs to send:
//action:disconnectRun a script
In the printer configuration you can create named G-Code scripts. These can be send in the terminal or in the control tab. It is also possible, that the firmware requests such a script to be run. A typical case is when the script executes some commands on the pc, not really for injecting g-code. To request this add this:
//run_script:NameOfScriptG-Codes
G0 X<xpos> Y<ypos> Z<zpos> E<epos> F<feedrate>
Coordinated Movement X Y Z E, S1 disables boundary check, S0 enables itG1 X<xpos> Y<ypos> Z<zpos> E<epos> F<feedrate>
Coordinated Movement X Y Z E, S1 disables boundary check, S0 enables itG4
Dwell S<seconds> or P<milliseconds>G10 S<1 = long retract, 0 = short retract = default>
Retracts filament accoridng to stored settingG11 S<1 = long retract, 0 = short retract = default>
Undo retraction according to stored settingG20
Units for G0/G1 are inches.G21
Units for G0/G1 are mm.G28
Home all axis or named axis.G29 S<0..2>
Z-Probe at the 3 defined probe points. S = 1 measure avg. zHeight, S = 2 store avg zHeightG30 P<0..3>
Single z-probe at current position P = 1 first measurement, P = 2 Last measurement P = 0 or 3 first and last measurementG31
Write signal of probe sensorG32 S<0..2> P<0..1>
Autolevel print bed. S = 1 measure zLength, S = 2 Measue and store new zLengthG90
Use absolute coordinatesG91
Use relative coordinatesG92
Set current position to cordinates givenG131
Set extruder offset position to 0 - needed for calibration with G132G132
Calibrate endstop positions. Call this, after calling G131 and after centering the extruder holder.G133
Measure steps until max endstops for deltas. Can be used to detect lost steps within tolerances of endstops.G134 Px Sx Zx
Calibrate nozzle height difference (need z probe in nozzle!) Px = reference extruder, Sx = only measure extrude x against reference, Zx = add to measured z distance for Sx for correction.G201 PX
Go to position X with motor XG202 PX
Mark current position as XG203 P
Report current motor positionG204 PS<0/1>
Enable/disable motor
RepRap M Codes
M104
Set extruder target tempM105
Read current tempM106
Fan onM107
Fan offM109
Wait for extruder current temp to reach target temp.M114
Display current position
Custom M Codes
M3
Spindle on, Clockwise or Laser on during G1 moves.M4
Spindle on, Counterclockwise.M5
Spindle off, Laser off.M20
List SD cardM21
Init SD cardM22
Release SD cardM23
Select SD file (M23 filename.g)M24
Start/resume SD printM25
Pause SD printM26
Set SD position in bytes (M26 S12345)M27
Report SD print statusM28
Start SD write (M28 filename.g)M29
Stop SD writeM30 <filename>
Delete file on sd cardM32 <dirname>
Create subdirectoryM42 P<pin number> S<value 0..255>
Change output of pin P to S. Does not work on most important pins.M80
Turn on power supplyM81
Turn off power supplyM82
Set E codes absolute (default)M83
Set E codes relative while in Absolute Coordinates (G90) modeM84
Disable steppers until next move, or use S<seconds> to specify an inactivity timeout, after which the steppers will be disabled. S0 to disable the timeout.M85
Set inactivity shutdown timer with parameter S<seconds>. To disable set zero (default)M92
Set axisStepsPerMM - same syntax as G92M99 S<delayInSec> X0 Y0 Z0
Disable motors for S seconds (default 10) for given axis.M104 S<temp> T<extruder> P1 F1
Set temperature without wait. P1 = wait for moves to finish, F1 = beep when temp. reached first timeM105 X0
Get temperatures. If X0 is added, the raw analog values are also written.M112
Emergency killM115
Capabilities stringM116
Wait for all temperatures in a +/- 1 degree rangeM117 <message>
Write message in status row on lcdM119
Report endstop statusM140 S<temp> F1
Set bed target temp, F1 makes a beep when temperature is reached the first timeM163 S<extruderNum> P<weight>
Set weight for this mixing extruder driveM164 S<virtNum> P<0 = dont store eeprom,1 = store to eeprom>
Store weights as virtual extruder SM190
Wait for bed current temp to reach target temp.M200 T<extruder> D<diameter>
Use volumetric extrusion. Set D0 or omit D to disable volumetric extr. Omit T for current extruder.M201
Set max acceleration in units/s^2 for print moves (M201 X1000 Y1000)M202
Set max acceleration in units/s^2 for travel moves (M202 X1000 Y1000)M203
Set temperture monitor to SxM204
Set PID parameter X => Kp Y => Ki Z => Kd S<extruder> Default is current extruder. NUM_EXTRUDER=Heated bedM205
Output EEPROM settingsM206
Set EEPROM valueM207 X<XY jerk> Z<Z Jerk> E<ExtruderJerk>
Changes current jerk values, but do not store them in eeprom.M209 S<0/1>
Enable/disable autoretractionM220 S<Feedrate multiplier in percent>
Increase/decrease given feedrateM221 S<Extrusion flow multiplier in percent>
Increase/decrease given flow rateM226 P<pin> S<state 0/1>
Wait for pin getting state S. Add X0 to init as input without pullup and X1 for input with pullup.M231 S<OPS_MODE> X<Min_Distance> Y<Retract> Z<Backlash> F<ReatrctMove>
Set OPS parameterM232
Read and reset max. advance valuesM233 X<AdvanceK> Y<AdvanceL>
Set temporary advance K-value to X and linear term advanceL to YM251
Measure Z steps from homing stop (Delta printers). S0 - Reset, S1 - Print, S2 - Store to Z length (also EEPROM if enabled)M280 S<mode>
Set ditto printing mode. mode: 0 = off, 1 = 1 extra extruder, 2 = 2 extra extruder, 3 = 3 extra extrudersM281
Test if watchdog is running and working.M300 S<Frequency> P<DurationMillis>
Play frequencyM302 S<0 or 1>
Allow cold extrusion. Without S parameter it will allow. S1 will disallow.M303 P<extruder/bed> S<printTemerature> X0
Autodetect pid values. Use P<NUM_EXTRUDER> for heated bed. X0 saves result in EEPROM.M320
Activate autolevelM321
Deactivate autolevelM322
Reset autolevel matrixM323 S0/S1
Enable disable distortion correction P0 = not permanent, P1 = permanent = defaultM340 P<servoId> S<pulseInUS>
servoID = 0..3, Servos are controlled by a pulse with normally between 500 and 2500 with 1500ms in center position. 0 turns servo off.M350 S<mstepsAll> X<mstepsX> Y<mstepsY> Z<mstepsZ> E<mstepsE0> P<mstespE1>
Set microstepping on RAMBO boardM355 S<0/1>
Turn case light on/off, no S = report statusM360
Show configurationM400
Wait until move buffers empty.M401
Store x, y and z position.M402
Go to stored position. If X, Y or Z is specified, only these coordinates are used. F changes feedrate fo rthat move.M408 S<0-5>
Return status as json string (requires matching feature) for PanelDue.M450
Reports printer modeM451
Set printer mode to FFFM452
Set printer mode to laserM453
Set printer mode to CNCM460 XY
SSet temperature range for thermistor controlled fan.M500
Store settings to EEPROMM501
Load settings from EEPROMM502
Reset settings to the one in configuration.h. Does not store values in EEPROM!M513
Clear all jam marker.M600
Change filamentM601 S<1/0>
Pause extruders. Paused extrudes disable heaters and motor. Unpausing reheats extruder to old temp.M602 S<1/0> P<1/0>
Debug jam control (S) Disable jam control (P). If enabled it will log signal changes and will not trigger jam errors!M603
Simulate a jamM604 XY Z T
Set jam detection values on a per extruder basis. If not set it uses defaults from Configuration.hM908 P<address> S<value>
Set stepper current for digipot (RAMBO board)M999
Continue from fatal error. M999 S1 will create a fatal error for testing.
We offer manufacturers and vendors the possibility to create a custom branding for Repetier-Server with own name, logo and colors and to distribute this customized version to their customers. For this a license code is required in any case. On request we offer licence codes for resellers at reduced rates.
Here we show how to create your own branding of Repetier-Server.
If you want to customize the touchscreen interface, click here.